Setting up a Syslog Connection
Privilege Manager can push out Syslog-formatted messages on a set schedule. Note that this does not happen immediately upon events occurring. Listed below are steps for configuration and task creation for scheduling the action of sending Discovery Event logs to a Syslog server.
Configuring a Syslog Connection
The Send policy feedback option needs to be enabled on all policies that are supposed to send Syslog-formatted events.
To obtain the IP address of your Privilege Manager cloud instance, contact the Delinea support team and be ready to provide your privileged technical support PIN.
To configure Syslog messages in Privilege Manager:
-
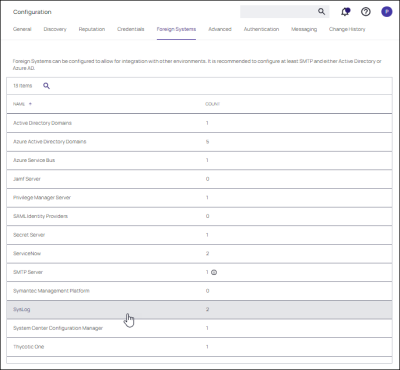
Navigate to Admin | Configuration and select the Foreign Systems tab.
-
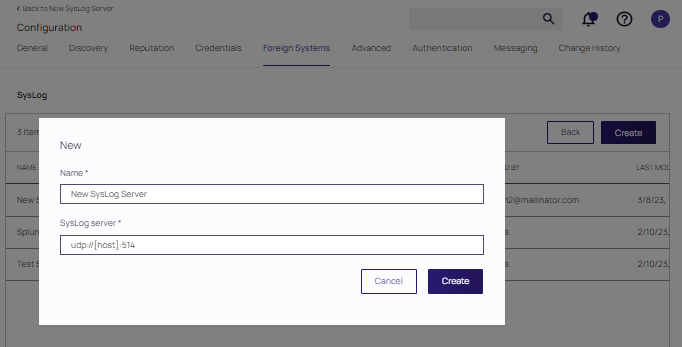
At the Syslog page, click Create. Provide a Name, a Protocol, and the Syslog server address.
-
Once the server is created, you can use Edit to change any of the configuration settings.
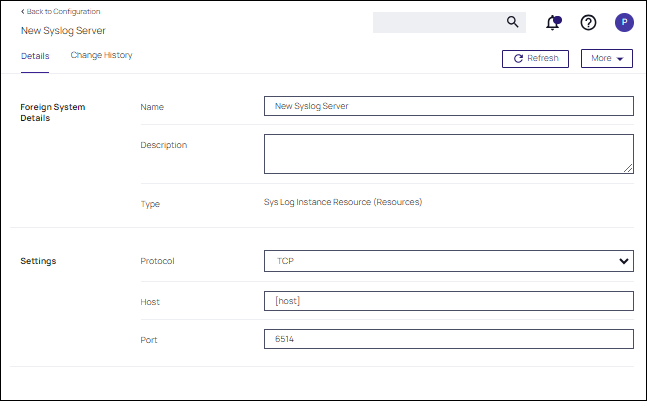
The protocol drop-down options are: UDP, TCP, TCP + TLS, Devo cloud services (HTTPS), and (HEC).
-
If you are using client-based authentication refer to Client Certificate Authentication.
-
If you are configuring syslog over a TLS connection (encrypted) there is no requirement to upload a certificate.
-
If (HEC) is selected, include the URL of the HEC cloud server along with the port number (e.g., https://heccloud.com:443), as well as the HEC Sink Endpoint (for Splunk, this is /services/collector/event). Provide the token used to authenticate with the server. You can Hide/Show Token and Change the token if needed.
Only one (HEC) (HTTP Event Collector) Syslog connection is supported at a given time in Privilege Manager. If multiple HEC connections are added, the most recently modified token will be used.
-
For Devo cloud services (HTTPS), the URL of your Devo cloud instance should be supplied.
When selecting the Devo cloud Services (HTTPS) option HEC Sink Endpoint is not required to function.
-
-
Select a protocol and supply the requested parameters, then click Save Changes.
Setting up SysLog Server Tasks
-
After adding a new Syslog connection, to manually send logs to your Syslog server go to Admin | Tasks.
-
Expand the Server Tasks folder, then Foreign Systems. Select Syslog and click Create.

-
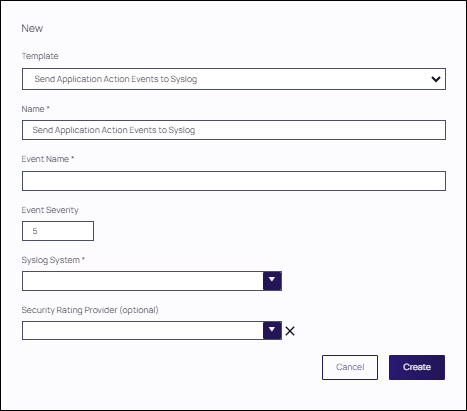
From the Template drop-down, for example select Send Syslog Application Events.
-
Add a Name for this task, an Event Name (e.g., Privilege Manager Application Events), and Event Severity.
-
From the System drop-down, select your Syslog server foreign system (configured above).
-
Optionally also enter a Security Ratings Provider, depending on your other integrations. Use the "X" next to the pull-down to remove a selection.
-
Click Create.
Once created, the new Scheduled Task page is displayed, where you can run the task on demand and/or specify how often you want events received by Privilege Manager (i.e., all events viewed in Admin | Event Discovery) to be pushed out to the Syslog server. The schedule can be hourly, every 30 minutes, daily, or whatever time period is preferred.
After this task runs and successfully completes, verify that Event Discovery events appear in your Syslog system.
Template Options
The following template options are available:
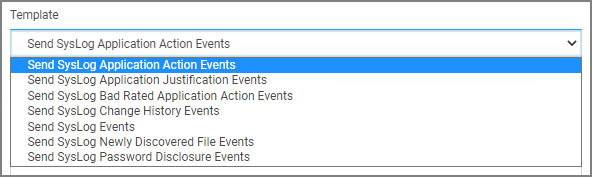
- Send Syslog Application Action Events - Use this template to send application action events to your SysLog system. Application Action Events contain generic information about the application that run, which policy was triggered, the date/time stamp, computer, and user for example.
- Send Syslog Application Justification Events - Use this template to send application justification events to your SysLog system. For example, if a user runs an application requiring a justification workflow.
- Send Approval Events to Syslog - Use this template to send application pending approval events to your Syslog system. For example, if a user runs an application requiring approval workflow.
- Send Syslog Bad Rated Application Action Events - Use this template to send an event to your SysLog system, when an application is being installed or executed, that is identified with a bad security rating.
- Send Syslog Change History Events - Use this template to send change history events to your SysLog system. When this task runs for the first time, it sends all change history to your SysLog server. On subsequent runs it only sends the delta of new change history events.
- Send Syslog Events - Use this template to send all SysLog events to your SysLog system. These events are based on the different options you selected on the SysLog server during setup.
- Send Logon Events to Syslog - Use this template to send application logon events to your SysLog system. For example, if a user logs into the Privilege Manager console. Failed logon events are only recorded for local users.
- Send Syslog Newly Discovered File Events - Use this template to send newly discovered file events to your SysLog system. For this to produce any events the Default File Inventory Policy needs to be enabled and resource discovery schedules need to be customized.
- Send Syslog Password Disclosure Events - Use this template to send all password disclosure events to your SysLog system.
Data Sources
Starting with Privilege Manager version 13.0.0, the data source dropdown when creating or editing a Syslog server task only displays data sources that are tagged as Syslog-compatible. If your organization uses custom (bespoke) data sources with Syslog, they will not appear in the data source drop-down after upgrading to v13.0.0 unless you add the pm.syslogcompatible tag to the data source's XML item definition. See Using Custom Data Sources with Syslog (v13.0.0 and later).
Existing Syslog tasks that are already configured with a custom data source will continue to function. This change only affects the drop-down selection when creating new tasks or editing the data source on existing tasks.
The following six data sources can be used with the respective templates.
Refer to Additional Syslog Data Source Information for detailed descriptions of the associated fields.
- Application Approval Requests Events (2a438af6-b1c8-4a27-8bc6-05513fd42c44)
- Application Control Justification Events (7d6bdbf0-8f2a-4e9c-9c7e-fa6b75803c45)
- Application Control Policy Feedback (eeb7aaf6-f675-4586-a7e3-3eb54b59ba4d)
- Recently Discovered Applications Query (b875d3a6-433c-42cc-8332-05350343e498)
- Local Security Password Disclosure Events (67aa593a-daf9-42b0-933e-24f60239bcc9)
- Application Control Policy Feedback Restricted to Security Level (4eb4ec69-d7a9-4797-972a-41855d3e7799)
-
Application Logon Request Events (07796676-ddbb-4ad6-9844-d70db5b1417b)
If custom data sources are used, they need to specify the following fields:
- externalId
- Facility
- Severity
- EventTime
- Host
- DeviceVendor
- DeviceProduct
- DeviceVersion
- Name
- CEFSeverity
Using Custom Data Sources with Syslog (v13.0.0 and later)
If your organization has created custom data sources for use with Syslog tasks, you must add the pm.syslogcompatible tag to the data source's XML definition for it to appear in the Syslog task data source drop-down.
The <adc:Tags> block must be added inside the <DataSourceItemContract> element, after the <adc:Strings /> element and before the <DataSource> element.
Steps:
1. Navigate to the custom data source item in Privilege Manager.
2. Open the XML view of the data source item (via the item's direct URL: https://[YourServer]/TMS/PrivilegeManager/#/item/xml/[ItemGuid]).
3. Locate the <adc:Strings /> element in the <DataSourceItemContract>.
4. Immediately after <adc:Strings />, add the following XML block:
<adc:Tags>
<arr:string>pm.syslogcompatible</arr:string>
</adc:Tags>
5. Click Edit, make the change, and click Save.
6. The custom data source appears in the Syslog task data source drop-down.
Example — Placement within a DataSourceItemContract
<DataSourceItemContract xmlns:adc="http://schemas.arellia.com/dc/" ...>
<adc:Attributes>NoModify NoDelete NoReplication</adc:Attributes>|
...
<adc:State i:type="adc:ItemState">
...
</adc:State>
<adc:Strings />
<!-- ▼ INSERT THE TAG BLOCK HERE ▼ -->
<adc:Tags>
<arr:string>pm.syslogcompatible</arr:string>
</adc:Tags>
<!-- ▲ END OF TAG BLOCK ▲ -->
<DataSource i:type="RawSqlDataSource">
<Name>Your Custom Data Source Query</Name>
...
</DataSource>
</DataSourceItemContract>
Built-in supported data sources are already tagged and require no changes. Custom data sources must also include the required CEF fields (externalId, Facility, Severity, EventTime, Host, DeviceVendor, DeviceProduct, DeviceVersion, Name, CEFSeverity) to function properly with Syslog.
Client Certificate Authentication
In order to prevent unauthorized systems from sending data to a syslog/SEIM system, users can now use client certificate authentication.
In the configuration of a Syslog system, the Certificate field allows you to upload a certificate .pfx file. The option is only relevant if you select TCP + TLS. Once configured Privilege Manager will use this certificate to authenticate all connections when sending Syslog events.
A .pfx file must be used since the private key is required.
- Select Admin | Foreign Systems.
- On the Configuration page, select the Foreign Systems tab. Then, click Syslog.
- Click Create. Then, supply a Name and address of the Syslog server. Click Create.
- On the New Syslog Server page, select TCP + TLS for protocol.
- Click the Upload link to upload a certificate.
- At the Import items form, click Choose file, browse to the .pfx file, and click Upload.
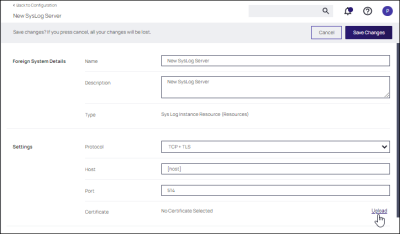
The certificate appears in the Certificate field. A Remove link is available if needed.
Troubleshooting if Syslog Option is Missing under Foreign Systems
If you are a Privilege Manager Cloud customer, contact Delinea support to have it added to your instance.
On-premises customers, navigate to https://[YourOrganizationURL]/TMS/Setup/ProductOptions/SelectProducts and check the Delinea Syslog Connector option. Install the Syslog Connector and accept the License Terms and Conditions.


