Using Microsoft Entra ID as a SAML Provider
This topic relates to Single Sign-On (SSO) only, allowing you to sign in to the Privilege Manager console with your Microsoft Entra ID credentials.
It does NOT sync your Entra directory to import Entra users and groups for policy targeting – for this use the Microsoft Entra ID (Azure Active Directory Domains) directory integration instead. See Setting Up Microsoft Entra ID integration.
This integration works on both Privilege Manager Cloud and on-premises.
Microsoft renamed Azure Active Directory (Azure AD) to Microsoft Entra ID.
Privilege Manager uses IdP-initiated SAML single sign-on. You point Privilege Manager at Entra's application launch (User access) URL; do not use Entra's service-provider “/saml2” sign-on endpoint.
You must create a Microsoft Entra Enterprise Application (non-gallery). An App Registration will not work as it has no SAML single sign-on screen.
Prerequisites
-
Privilege Manager Server version 12.0 or later.
-
A Microsoft Entra tenant in which you have at least the Cloud Application Administrator role.
-
A Privilege Manager administrator account.
Keep a non-SAML administrator login available so you are not locked out while configuring.
Before you Begin: Gather Your Privilege Manager Values
You will enter these two Privilege Manager (service provider) values into Entra. Construct them from your Privilege Manager host, the product does not display them for you.
-
Entity ID (you choose; default):
PrivilegeManagerServiceProvider -
Reply URL (Assertion Consumer Service):
https://<privilegeManagerHostName>/Tms/saml2/acs
Step 1 — Create the Enterprise Application in Microsoft Entra ID
-
In the Microsoft Entra admin center, go to Entra ID > Enterprise apps > New application > Create your own application.
-
Enter a name (for example, "Privilege Manager"), select Integrate any other application you don’t find in the gallery (Non-gallery), and select Create.
-
In the application, select Single sign-on, then select SAML.
-
In Basic SAML Configuration, select Edit and set:
-
Identifier (Entity ID) = PrivilegeManagerServiceProvider
-
Reply URL (ACS) = https://<privilegeManagerHostName>/Tms/saml2/acs
Select Save.
-
-
In the SAML Certificates section, download Certificate (Base64).
-
In the “Set up [application]” section, copy the Microsoft Entra Identifier (you will paste it into the Privilege Manager Issuer field).
-
Select Properties and copy the User access URL (you will paste it into the Privilege Manager Single Sign On URL field). This is the IdP-initiated launch URL.
-
Select Users and groups > Add user/group and assign the users who should be allowed to sign in. Users that are not assigned will authenticate but be denied the application.
Entra’s default Name ID claim is the user’s User Principal Name (user@domain). Privilege Manager matches the signed-in user on the Name ID, so no extra claims configuration is required for a basic setup.
Step 2 — Create the SAML Identity Provider in Privilege Manager
Go to Admin > Configuration > Foreign Systems, select SAML Identity Providers, and select Create. Complete the fields:
| Privilege Managerfield | Enter this value | Where it comes from |
|---|---|---|
| Issuer | https://sts.windows.net/<tid>/
|
Entra – Microsoft Entra Identifier (Step 1, part 6) |
| Single Sign On URL | https://myapplications.microsoft.com/signin/<appId>?tenantId=<tid>
|
Entra – Properties > User access URL (Step 1, part 7) |
| Certificate | (upload the .cer file) | Entra – Certificate (Base64) (Step 1, part 5) |
| Binding | HTTP Post or HTTP Redirect (either works) | Setting within Privilege Manager field |
| Privilege Manager Entity ID | PrivilegeManagerServiceProvider
|
Must match Entra Identifier (Step 1, part 4) |
| Privilege Manager URL | https://<privilegeManagerHostName>/Tms/
|
Your Privilege Manager tenant URL |
About the Binding setting: HTTP Post sends the SAML message in an auto-submitting form (a browser POST), HTTP Redirect sends the SAML message in the URL query string (a browser GET). The setting controls the binding Privilege Manager would use for a service-provided initiated authentication request. Because Privilege Manager uses IdP-initiated SSO, it does not send an authentication request, so this setting does not affect sign-in. Either value works; it is acceptable to leave the setting as HTTP Post.
User Options:
-
Match Active Directory Users: enable only if Privilege Manager users were imported from Active Directory and Entra sends the name as DOMAIN\username or username@domain.
-
Create Users Automatically: enable to create a Federated user on first successful sign-in. A Privilege Manager administrator must still assign the user to a role before they have access.
Select Create/Save.
Step 3 — Enable and test
Enabling restarts the web application. When you enable the SAML identity provider,Privilege Manager restarts its web application to load the new provider. The console may take a few moments to come back before you are able to test the sign-in. It is recommended to make adjustments during a maintenance window when possible.
-
On the Admin > Configuration > Authentication tab in Privilege Manager, enable the new SAML identity provider.
Keep at least one other provider and a standard account with the Privilege Manager Administrators role active so you cannot be locked out.
-
Sign out. On the Privilege Manager sign-in page, select the SAML provider. You are redirected to Microsoft Entra ID; after authenticating, you are returned to Privilege Manager.
-
If Create Users Automatically is enabled, the new Federated user has no permissions until an administrator assigns it a role.
Troubleshooting
| Symptom | Cause and Fix |
|---|---|
|
Entra error AADSTS750054 (“SAMLRequest or SAMLResponse must be present...”) |
The Single Sign On URL is set to Entra’s SP endpoint (…/saml2). Privilege Manager is IdP-initiated — set Single Sign On URL to the Entra User access URL (Properties). |
|
Sign-in succeeds but the user sees nothing / access denied in Privilege Manager. |
The user has no Privilege Manager role. Assign the (auto-created Federated) user to a role. |
|
Sign-in fails with “no user found” |
Enable Create Users Automatically, or enable Match Active Directory Users and confirm the Name ID matches an imported AD user (DOMAIN\username or username@domain). |
|
Entra authenticates but the app is denied. |
The user is not assigned to the enterprise application. Add them under Users and groups. |
Configuring the SAML Provider
This procedure consists of the steps for configuring Privilege Manager to exchange information with the Microsoft identify platform. Dialogs are presented that correlate these configuration parameters, as requested in the configuration.
Additional details for identify parameters in your custom application, as they are requested in Privilege Manager, can be found in the Delinea Support Knowledge Base.
-
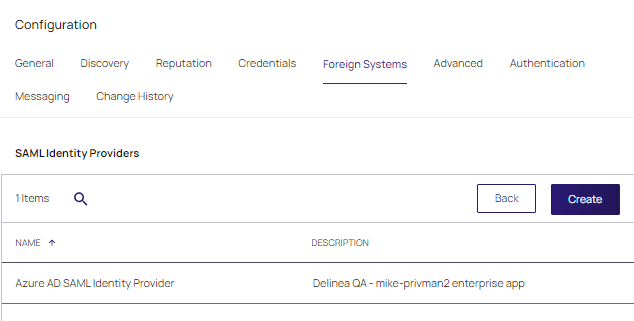
Select Admin | Configuration | Foreign Systems. In the Foreign System tab, select Azure AD SAML Identity Provider. Click Create.
-
Assign a Name for the provider and supply the Identity Provider entity id. Click Create.
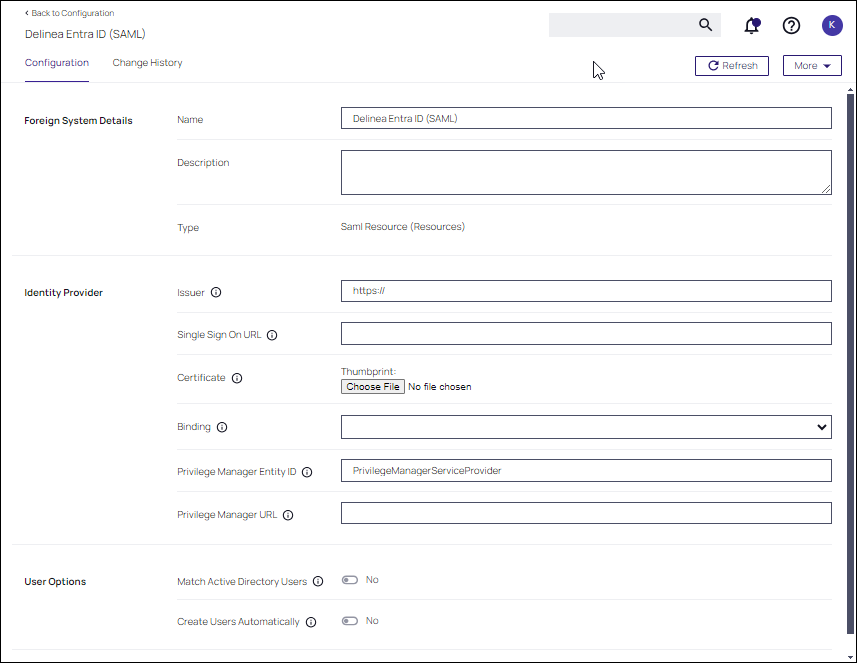
The Identity Provider entity id corresponds to the Single Sign On URL configured in your Entra ID tenant.
Privilege Manager Configuration Entra ID Tenant Identity Provider Entity id User access URL 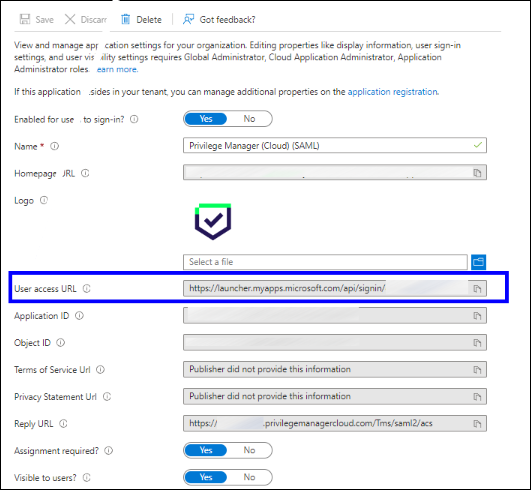
-
Enter the following parameters for your provider configuration.
Privilege Manager Configuration Entra ID Tenant Issuer Microsoft Entra Identifier Certificate Certificate (Base 64) Privilege Manager Entity ID Identifier (Entity ID) 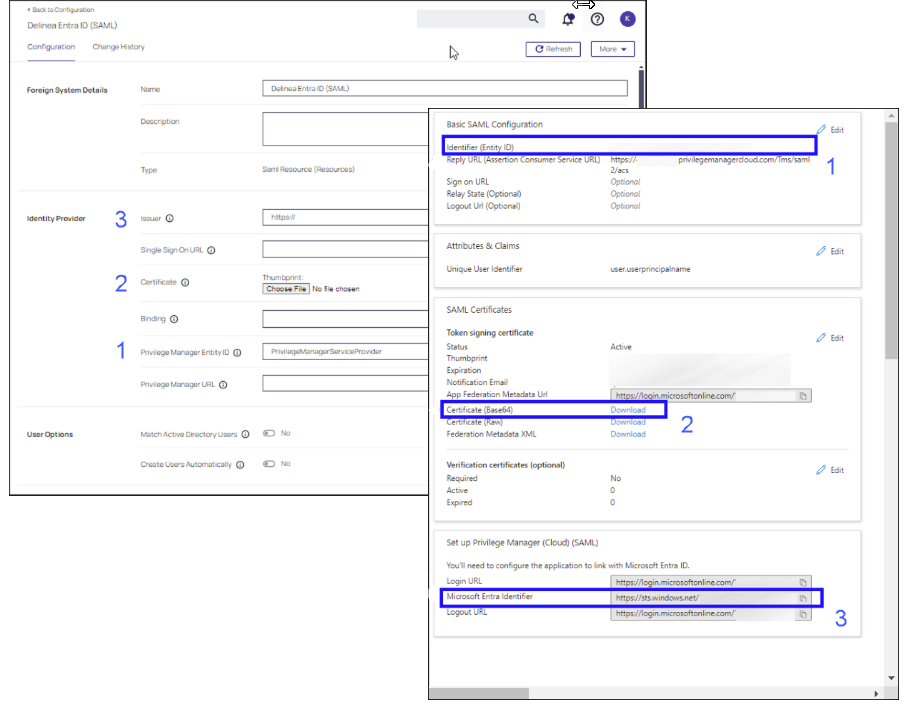
-
Set Create Users Automatically to Yes. For all users approved for this provider, a user account is automatically created. Click Create.
After the provider is created, you need to assign rights to these users.


