Microsoft Entra ID Authentication
This action enables single or multi-factor authentication for Windows and macOS, using Microsoft Entra ID. Starting with Privilege Manager Windows agent version 13.0.0 and newer, an optional Use Default Browser mode, that enables hardware security key authentication (YubiKey, Passkey, FIDO2) via Entra ID conditional access policies, is available. This mode launches the user's default browser (detected via registry) instead of the embedded Webview2 control. It is Windows-only and requires additional Entra configuration described below. The default embedded Webview 2.0 mode remains unchanged.
You are able to customize the message presented to the user when authentication is requested.
The configuration of Entra ID authentication requires the following steps:
Prerequisites
-
You will need access to your organization's Entra ID tenant. Refer to the Microsoft documentation if required.
-
You will need to register a new application for your Entra tenant that will be used in this integration. See Step 1 - Registering Your Application with Entra ID.
-
Privilege Manager and Privilege Manager agent version 12.0 is required.
-
For default browser mode: A supported browser must be installed on the endpoint. The agent detects the user's default browser via the Windows registry. Chromium-based browsers (Edge, Chrome) and Firefox are supported. If detection fails, the agent falls back to Microsoft Edge.
-
For YubiKey/FIDO2 support: A second Entra application registration ("resource app") is required to serve as the conditional access target. See Additional Configuration for Defaut Browser Mode with YubiKeyFIDO2.
Step 1 - Registering Your Application with Entra ID
The Microsoft identity platform performs identity and access management (IAM) only for registered applications. Registering your new custom application establishes a trust relationship between your application and the Microsoft identity platform, with Entra.
Refer to Register an application in Microsoft Entra ID for complete instructions for registering your custom application.
Authentication page
If you are using the agent build 12.0.5289 please pay attention to Step 2, as an additional configuration option is required. Functionality previous to this version has been restored with agent build 12.0.5290.
-
Disable Allow public client flows (set to No).
-
Add a platform and specify Mobile and desktop applications. Enable nativeclient and MSAL only. If you are using agent build 12.0.5289, http://localhost should be configured as a URI.
-
Add a platform and specify Single-page application. For this platform, configure any Redirect URIs for the application (for example, http://localhost/). This is not a functional URI in the application. This allows Entra to display this application on the Conditional access page.
-
Add a platform and select iOS / macOS. For this platform, enter com.thycotic.privilegemanagergui in the Bundle ID field
Entering Parameters from the Application Home page
Parameters specific to Privilege Manager, should be set in the Entra admin center. These parameters are found on the following pages, accessed from the left panel of your application's Home page.
Application page | Register an application
-
For Supported account types, select Accounts in this organizational directory only (<your tenant name>). Delinea recommends using a single tenant, where only users from this tenant are allowed to use the application.
Overview page
Make a note of the following values.
-
Application (client) ID (you can use copy to clipboard)
-
Select the Endpoints tab and in the Endpoints panel, note the OpenID Connect metadata document URL.
These two parameters will be requested by Privilege Manager when configuring the Entra action.
Expose an API page
-
Select Expose an API. Click Add next to the Application ID URI field. In the Edit application ID URI panel, click Save to accept the default URI used to identify your web API.
-
Add a scope and supply
privman.action.authfor Scope name. This is the permission that the Privilege Manager agent application uses during the authentication process, associating the Entra ID with the application resource. This helps the application of the Entra ID Conditional Access policies when targeting an application. Refer to Conditional access page | Overview. -
Supply an Admin content display name and Admin consent description for use in Microsoft Entra admin center.
When using default browser mode, this scope configuration should be done on the resource application (not the original Privilege Manager application), and the original application should have the scope removed if it was previously configured there for conditional access.
API permissions page
-
Add a permission. Select the application you created (APIs my organization uses tab).
-
Enable the check box for privman.action.auth.
-
Grant admin consent for your application.
When using default browser mode, this scope configuration should be done on the resource application (not the original Privilege Manager application), and the original application should have the scope removed if it was previously configured there for conditional access.
Conditional access page | Overview
A Conditional Access policy targets the application so that Entra requests a second factor of authentication (MFA) before a user is granted access to an application. Refer to Create a Conditional Access Policy for complete instructions.
Session controls are not supported by Privilege Manager.
-
Enable Grant access.
Select Policies, then Create new policy.
-
Configure the following for the new policy: Name, Users (specify users and groups), Target resources (specify the application), and Grants (specify multi-factor authentication).
-
Set Enable policy to On.
Additional Configuration for Defaut Browser Mode with YubiKeyFIDO2
Default browser mode requires two Entra application registrations: the existing Privilege Manager application (used for token acquisition) and a new resource app (targeted by conditional access).
Resource application setup steps:
-
Register a new application in Entra (no redirect URIs needed).
-
Go to Expose an API. Accept the default Application ID URI, then add scope with
privman.action.auth. -
Go to API Permissions. Add the scope from APIs my organization uses. Select the resource application and grant administrator consent.
Conditional Access update: Target the new resource application (not the original Privilege Manager application) in the conditional access policy.
Original application cleanup: Remove the original Privilege Manager application from any conditional access policies and remove web redirect URIs if they were added for conditional access purposes. Restore it to baseline configuration.
Step 2 - Creating the Authentication Action
In Privilege Manager, create an custom Entra ID Authentication action for your application. Navigate to Admin | Actions and click Create Action. Select your platform at the Create Action drop-down.
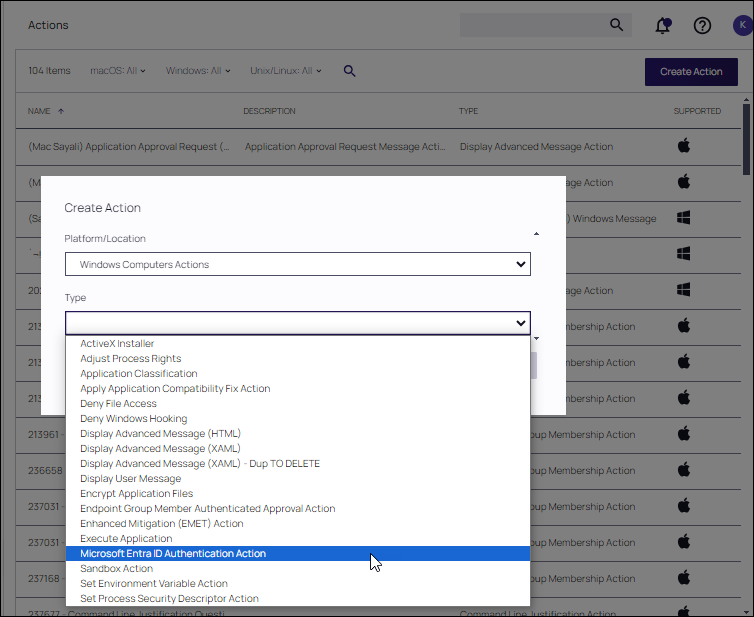
Next, select Microsoft Entra ID Authentication Action at the Create Action pull-down.
The Create Action dialog presents the following required parameters.
-
Entra ID Application/Client ID
This is the Application ID URI from Entra. -
Entra ID Authority URL
This is the OpenID Connect metadata document URL from Entra.
Enter these values then click Create.
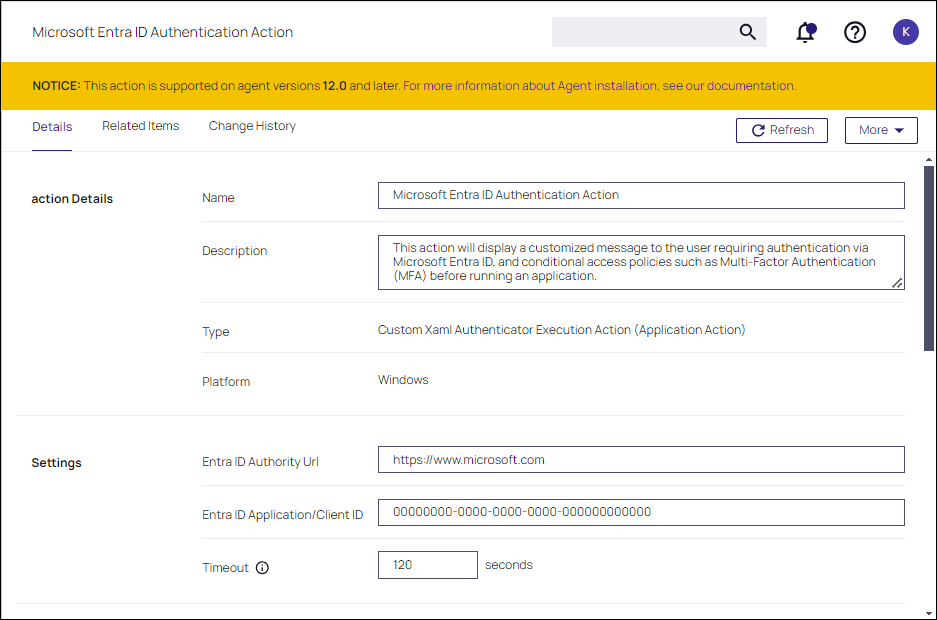
After the action is created, your custom Microsoft Entra ID Authentication action page is displayed. Any of the Entra ID authentication settings can be edited and customized, as well as the authentication messaging.
-
TImeout - After the user clicks Authenticate, this is the time the user has to finish authenticating before the authentication is canceled, and the application is blocked from opening.
-
Use Default Browser toggle (Windows actions only, hidden on macOS action versions):
When OFF (default): the existing embedded Webview2 behavior (auto-closes after auth).
When ON: launches the user's default system browser for authentication. The browser window will not automatically close after authentication completes; the user must close it manually.
-
OAuth Scopes field: The administrator enters the custom API scope URI from the resource application's Expose an API page, e.g., api://<resource-app-id>/privman.action.auth. Entering a value here automatically sets
Authenticator_AddPrivmanActionAuthScopetofalse. -
For macOS applications, you are able to customize the message, as with other advanced message actions.
Click Save Changes, if updates were made.
Step 3 - Configuring Application Policies for Authentication
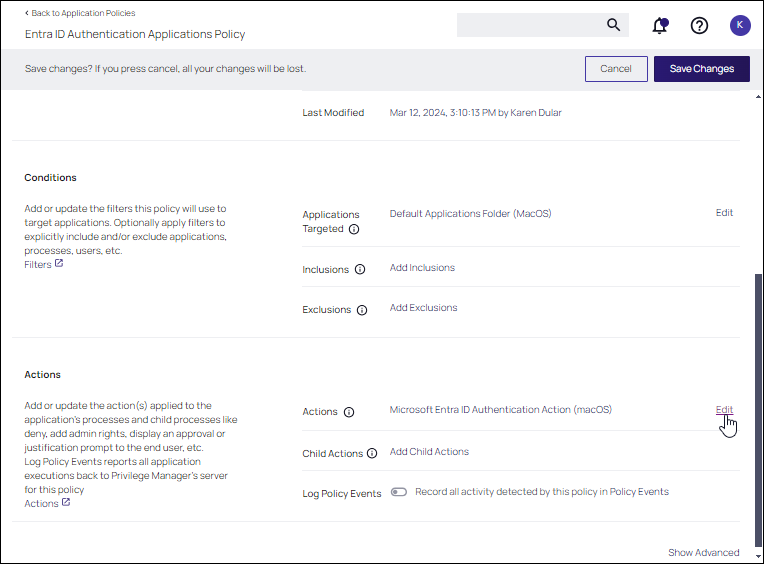
Identify the Application Policy that requires Entra ID authentication. In the Actions section of the policy, ensure the Actions field is configured for the Entra ID action you created. Edit if necessary.
Known Limitations
-
Default Browser toggle is Windows-only: The macOS agent uses the embedded browser. The toggle is hidden in the console for macOS actions.
-
When using default browser mode, the browser stays open: The browser window remains open after authentication with a completion message. The user must close it manually.
-
Windows Browser support: The agent detects the user's default browser via the Windows registry. Chromium-based browsers (Edge, Chrome) and Firefox are supported. If detection fails, Edge is used as a fallback.
-
Entra setup: The dual-app configuration requires careful attention to scope URIs and conditional access targeting. Entra sign-in logs are recommended for troubleshooting.
Initiating an Entra ID Authentication
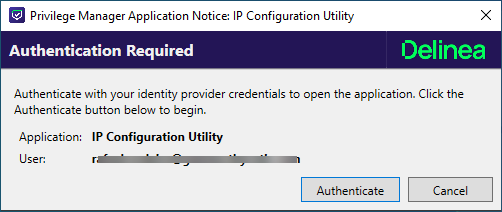
Whenever a policy with an application that requires authentication with an Entra ID is initiated, the following message is presented to the user. Click Authenticate.
Supply the requested credentials for authentication.