Configuration
To enable the integration between Okta and the Platform, complete the following configuration tasks:
Configuring the Platform
To configure the Platform for the integration with Okta, complete the following SCIM Connector configuration steps:
-
Step 1: Configuring SCIM for the Platform.
-
Step 2: Review the recommended best practices to confirm that your configuration follows recommended guidelines for authentication, synchronization, permissions, filters, and connectivity.
-
Step 3: Review the FAQ for answers to common questions about SCIM Cloud Connector Configuration and Troubleshooting.
The Platform prevents creation of privileged data and privileged data permissions directly through SCIM Cloud. Manage these through the Platform or Secret Server directly.
Configuring Okta
To configure Okta for the integration with the Platform, complete the following steps:
Step 1: Configure Federation
You need to create Okta SAML Application in Okta before configuring SCIM provisioning. If you have already configured Okta federation via SAML in your Platform tenant, skip this step.
If you have not configured Okta federation via SAML application, follow the steps in Build an Okta SAML Application. You do not have to configure the Platform to use this Okta SAML app as a federation provider. This Okta app is purely a container for SCIM.
Step 2: Configure SCIM Provisioning
You can use one of two supported methods for configuring SCIM provisioning in Okta. Choose the method that best fits your environment. The following table offers some guidance to help you choose the appropriate method for your environment.
| Method 1: App Integration Wizard (AIW) | Method 2: OIN Catalog Template | |
|---|---|---|
| Approach | Enable SCIM on an existing SAML app | Use SCIM 2.0 template from OIN Catalog |
| Update method | PUT only (full object replacement) |
PATCH by default (partial update) |
| Profile sourcing | Not supported | Supported |
| Best for | Combined SAML SSO + SCIM in a single app | Dedicated SCIM app |
| Engineering verified | Yes. Verified by our Engineering department | Based on Okta official documentation |
Method 1: App Integration Wizard (AIW) Approach
The AIW configuration method has been verified by our Engineering department and tested end-to-end with the Platform SCIM Connector.
This method uses your existing Okta SAML application and enables SCIM provisioning directly on it.
To configure SCIM provisioning using AIW:
-
Log in to the Okta Admin Console.
-
Navigate to Applications → Applications.
-
Select the Platform SAML application.
-
Navigate to General → App Settings.
-
In the Provisioning section, select SCIM and select Save.
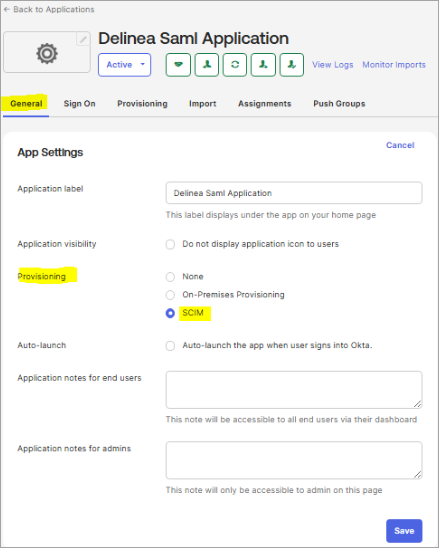
After saving, the Provisioning tab becomes available.
-
Go to the Provisioning tab and select Integration on the left side.
-
Select Edit.
-
To configure the SCIM connection, provide the following settings:
-
SCIM Connector Base URL:
https://<your-platform-tenant-url>/scim/v2. -
Unique Identifier Field for Users: Enter userName.
userNameis unique in the Platform and is treated as immutable. If the username is updated in Okta, the existing user account in the Platform is automatically suspended, and a new account is created with the updated username. Never update theuserNamefield after initial user creation. -
Supported provisioning actions: Select Import Users and Profile Updates, Push New Users, Push Profile Updates, Push Groups, and Import Groups.
-
Authentication Mode: Select OAuth 2.0.
-
-
Configure the OAuth 2.0 authentication settings:
-
Grant Type: Select Client Credentials.
-
Access token endpoint URI:
https://<your-Platform-tenant-url>/identity/api/oauth2/token/xpmplatform?scope=xpmheadlessMake sure to append
scope=xpmheadlessto the URL because Okta does not provide a dedicated scope field. -
Client ID: Enter the username of the Platform service user.
-
Client Secret: Enter the password of the Platform service user.
-
-
Select Save.
The To App and To Okta options become available on the Provisioning tab.
-
Select Integration and select Authenticate or Re-authenticate to validate the connection to the Platform API.
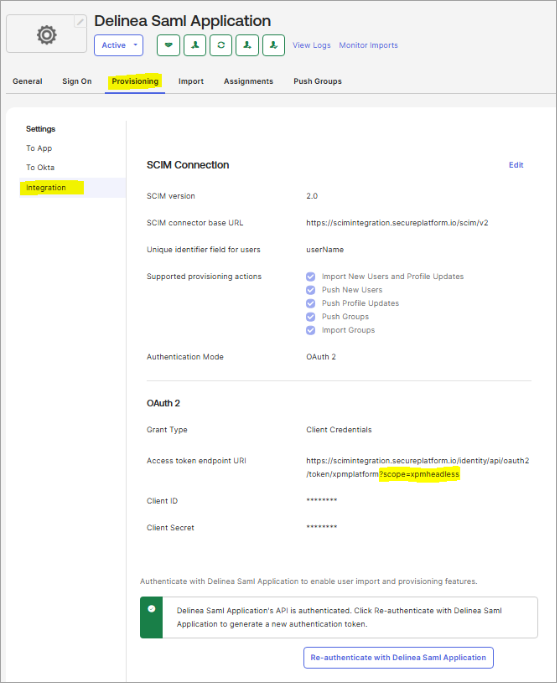
If the connection was successful, a message “<App name>'s API is authenticated” appears.
Method 2: OIN Catalog Template Approach
This method uses a pre-built SCIM 2.0 template from the Okta Integration Network (OIN) catalog. It supports PATCH updates by default, which can help avoid user status issues during profile updates.
To configure SCIM provisioning using the OIN catalog:
-
Log in to the Okta Admin Console.
-
Navigate to Applications → Browse App Catalog. Search for SCIM 2.0.
-
Select the appropriate template (for example, SCIM 2.0 Test App (OAuth Bearer Token)). Select Add Integration.
-
Name the application (for example, “Platform SCIM Cloud”).
-
On Sign-On Options, verify that SAML 2.0 is selected if applicable and select Done.
-
Navigate to Provisioning tab → Configure API Integration → Enable API Integration.
-
Enter the SCIM Cloud Base URL (
https://<your-tenant>.delinea.app/scim/v2) and set the unique identifier field touserName. -
In the Authorization / Token field, set Authentication Mode to OAuth 2.0 or HTTP Header and enter the service user credentials from the platform. Paste the bearer token generated from the Platform.
-
Select Test API Credentials.
Okta will send a
GET /Users?startIndex=1&count=2to your SCIM base URL. If successful, you'll see a green confirmation message.After saving, the provisioning configuration expands.
-
Select provisioning actions: Import Users and Profile Updates, Push New Users, Push Profile Updates, Push Groups, and Import Groups.
-
Select Save.
Step 3: Configure Okta-to-Platform Provisioning
Configure user and group provisioning operations that you want to be performed automatically from Okta to the Platform.
To configure Okta-to-Platform provisioning operations:
-
Go to the Provisioning tab.
-
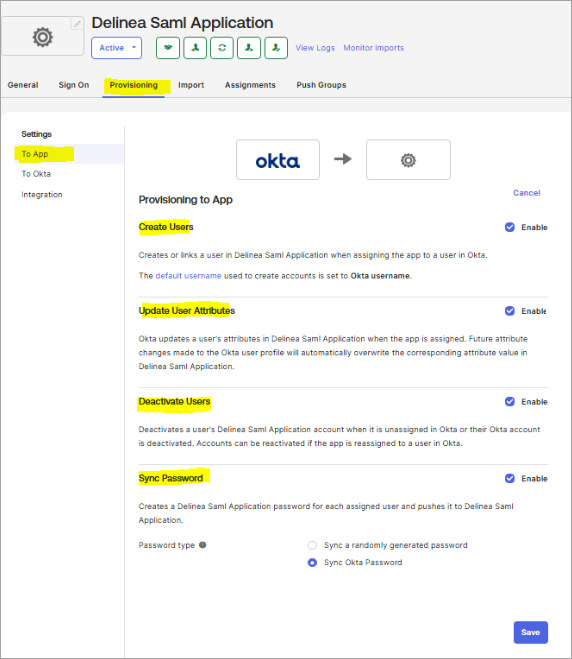
On the left side, select To App and select Edit.
-
Select Enable next to the following provisioning options:
-
Create Users
-
Update User Attributes
-
Deactivate Users
-
Push Groups
-
Sync Password
Next to Password type, select Sync Okta Password.
-
-
Select Save.
(Optional) Step 4: Configure Import of Users from the Platform to Okta
If Okta is your IdP via SAML in the Platform, then Okta is the source of truth for identities. Every user authenticating to the Platform already exists in Okta's directory first. In this case, skip this step.
If your Platform instance was already in use with local accounts, service accounts, or users provisioned through other methods, those users exist in the Platform but have no SCIM link to Okta yet. The import will discover them and create the link so Okta can manage them going forward instead of colliding with them.
To configure user import from the Platform:
-
Go to the Provisioning tab.
-
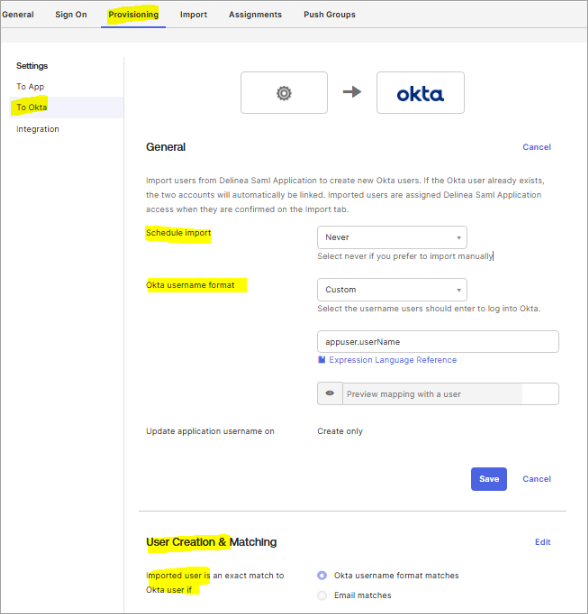
On the left side, select To Okta.
-
In the General section, configure the following settings:
-
Schedule Import: Set to fit your requirements. Select Never if automatic imports are not needed.
-
Okta username format: Select Custom from the drop-down list and enter appuser.userName into the box below.
-
-
Select Save.
-
In the User Creation & Matching section, for Imported user is an exact match to Okta user if, select Okta username format matches.
-
Select Save.
(Optional) Step 5: Configure Mandatory Attribute Mappings
Okta requires First Name and Last Name attributes for user creation. Since the Platform does not maintain separate first name and last name attributes, you must configure these user attributes by using attribute mappings in Okta. Ideally, ensure that all Platform users have email-format usernames (for example, jsmith@domain.com) when Okta SCIM is configured. Non-email-format usernames (for example, jsmith) will cause Okta SCIM provisioning to fail during import, matching, or synchronization.
If attribute mappings for these user attributes do not exist, Okta will give an error during import of users from the Platform.
To configure the first name and last name attribute mappings:
-
Go to the Provisioning tab.
-
On the left side, select To Okta.
-
In the Okta Attribute Mappings section, next to First name and Last name, select the pencil icon.
-
In Attribute value, create an attribute mapping by using one of the following approaches:
-
Map both First name and Last name to an existing Platform attribute, for example
appuser.displayName. -
Provide a static placeholder value for each attribute.
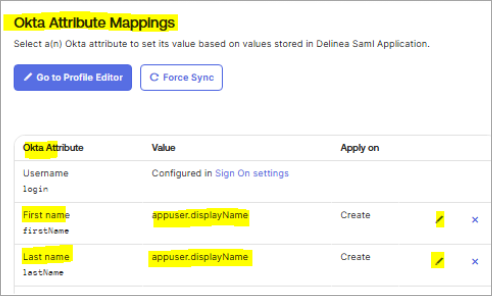
-
-
Save the configuration.


