Using Identity Posture
This section provides an introduction to the main features of Identity Posture.
Apps Overview
The Apps Overview page enables you to monitor the health of all connected cloud service user applications, both out-of-the-box and custom. The Platform assigns an identity posture score to every application to help you understand the app’s state of compliance with best-practice configuration settings. For more information, see Checks. From the Apps Overview page, you can use this score to easily find those applications that are most vulnerable, and then drill down to see exactly which issues need to be managed.
To display the Apps Overview page, choose Identity Posture > Apps Overview from the main menu.
Every app is represented by a tile.
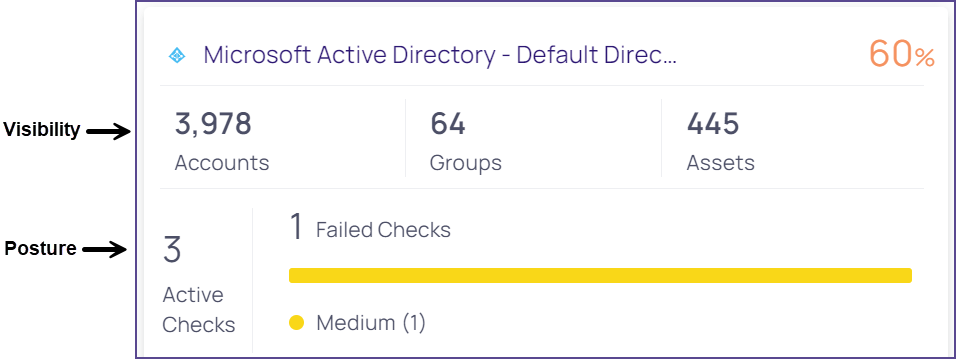
The app tiles are sorted by posture score (ascending), from 0% (greatest risk) to 100% (least risk). The app with the lowest posture score, that is, the greatest risk, is displayed first. You can filter the page to show one app type at a time.
The app is represented by two sections:
-
Visibility: the number of cloud service accounts, groups, and assets
-
Posture: the number of checks performed and failed, and the severities of the failed checks. For more information, see Checks.
When you click any field, you are shown the supporting data in the platform. For example, when you click the app title, the Checks page displays, filtered by that application. You can easily drill down for further explanation of the app status.
To focus on relevant apps, you can filter the page by application type, or type search terms into the search field.
Checks
The Checks page gives a structured security view for IAM/IT and security teams of how your company complies with best-practice configuration recommendations (“checks”) relating to identity misconfiguration, stale access, and over privileging.
For example, the Enable MFA (Multi-factor Authentication) for All Users check shows the level of MFA enrollment within the organization.
To see the Checks page, choose Identity Posture > Checks from the main menu.
The Checks page shows these parts:
-
Overview: shows the company-wide posture-related data
-
Table: shows data specific to each check
Each row in the table represents a different check the Platform runs. These checks are based on instances of applications that are integrated with the platform.
By default, the page is sorted by descending check severity. You can change the sort order by clicking a column heading.
The checks are divided into these categories to streamline management:
-
AI Security: identify AI misconfigurations on CSPs
-
Authentication: mechanisms used to verify the identity of cloud service users, systems, or processes
-
Key management: management of keys
-
Privileged access: management of access rights for cloud service users with elevated permissions
-
Privileged escalation: identify potential privileged escalation path
-
Stale access: management of outdated or unused access rights
In addition to basic information about the check, the table shows the compliance frameworks relevant to each check, and how many entities failed the check ("affected entities").
The Checks side panel
The Checks side panel displays more details about the check and affected entities, which you can explore to remediate the issues.
To open the side panel, click a row in the table.
The Checks side panel shows more information about the check, including the security motivation for remediating the failed entities. You can also do the following:
-
Disable the check so it no longer runs. Some organizations are unable to follow the best-practice recommendations and they are willing to accept the risk of a misconfiguration. At the same time, they don't want their overall posture score to decrease. Disabling a check will affect the identity posture score.
-
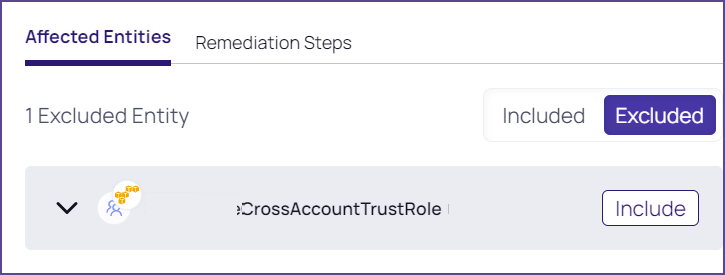
Change the severity of the check. From the Affected Entities tab, you can view and manage the affected entities.
-
See why each specific entity failed the check and get a recommendation on how to fix that.
-
Exclude specific entities from being included in this check. This could change the status of the check; for example, if one excludes all the entities, the check will now pass.
-
From the Remediation Steps tab, you can view remediation steps.
To disable or change the severity of a check:
-
Open a check’s side panel.
-
To disable the check, click Disable.
-
To change the severity of the check, select a severity from the drop-down.
To see and manage affected entities:
-
Open the side panel to look for a check that is in failed status.
-
All affected entities that are included are listed in the Affected Entities tab.
-
To see more information about why a specific entity failed and how to fix it, click the drop-down next to the entity name.
-
To exclude a specific entity from this check, click Exclude on that row.
-
Excluded entities are moved to the Excluded list:
-
To include an excluded entity, click Include.
-
To see general remediation steps for this check, click Remediation Steps.
Check Configuration
Some checks can be configured and you can modify a specific check and tailor it to your organization’s requirements. When available, use the "Go to Alert Configuration" option in the side panel to customize the parameters.
