Verification
This section provides steps to verify that the integration between Microsoft Entra ID and the Delinea Platform provisions users and groups for the supported use cases.
Because automatic provisioning is configured, the Microsoft Entra provisioning service will automatically detect changes in assigned users and groups and synchronize the changes to the Delinea Platform after running provisioning cycles every 40 minutes.
If you want to immediately verify how changes in users and groups are synchronized to the Delinea Platform, you can initiate on-demand provisioning. In this case, the provisioning service will detect changes in users and groups and attempt to synchronize the changes to the Delinea Platform immediately. The changes are normally synchronized to the Platform in minutes. Following are the steps for initiating on-demand provisioning that apply to all the use cases:
-
In Azure Portal, navigate to Entra ID > Enterprise Applications.
-
Select the enterprise application that you created for this integration.
-
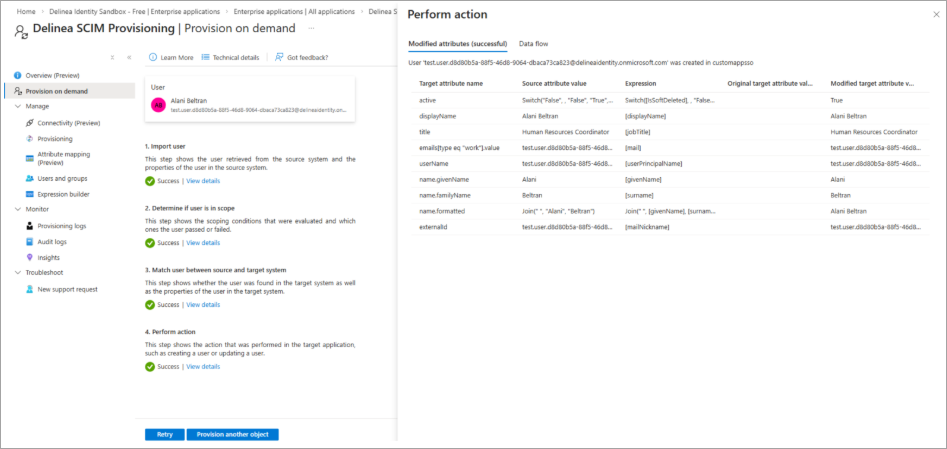
In the left pane, navigate to Provisioning > Provision on demand.
-
In the drop-down list, select the user or group that you want to provision and select Provision.
If the on-demand provisioning of the user or group was successful, on the Provision on demand page, Success is displayed under 4. Perform action, and the Perform Action section displays the details of the provisioning operation. For example, if a user’s updated attributes were successfully provisioned to the Delinea Platform, the attribute values that were modified for the user in the Platform are displayed, as shown below. To open the Perform action section, select the View details link under 4. Perform action.
The following sections describe how to verify each use case.
Use Case: Provision New Users
Complete the following procedure to verify that new users in Microsoft Entra ID are automatically created in the Delinea Platform through an automatic provisioning process.
Verification steps in Microsoft Entra ID
-
Log in to the Azure Portal.
-
Create a user by following the Microsoft Entra ID documentation.
-
Navigate to Entra ID > Enterprise Applications.
-
Select the enterprise application that you created for this integration.
-
In the left pane, select Users and groups.
-
Select Add user/group.
-
On the Add Assignment pane, under Users and groups, select None Selected.
-
Select the checkbox next to the new user and select Select.
-
Select Assign to assign the user to the application.
-
In the left pane, navigate to Provisioning > Provisioning logs.
-
Filter the provisioning logs as follows:
-
Action: Create.
-
Status: Success.
-
-
In the logs, verify that there is a new entry for the new user.
Verification steps on the Delinea Platform
-
Log in to the Delinea Platform.
-
Search for users.
-
On the Users page, verify that the new user account was created and that its status is Active.
-
On the Overview tab of the user details page, verify that the user’s attributes match the values in Microsoft Entra ID.
Use Case: Provision New Groups
Complete the following procedure to verify that new groups in Microsoft Entra ID are automatically created in the Delinea Platform.
Verification steps in Microsoft Entra ID
-
Log in to the Azure Portal.
-
Create a group by following the Microsoft Entra ID documentation.
-
Navigate to Entra ID > Enterprise Applications.
-
Select the enterprise application that you created for this integration.
-
In the left pane, select Users and groups.
-
Select Add user/group.
-
On the Add Assignment pane, under Users and groups, select None Selected.
-
Select the checkbox next to the new group and select Select.
-
Select Assign to assign the group to the application.
-
In the left pane, navigate to Provisioning > Provisioning logs.
-
Filter the provisioning logs as follows:
-
Action: Create.
-
Status: Success.
-
-
In the logs, verify that there is a new entry for the new group.
Verification steps in the Delinea Platform
-
Log in to the Delinea Platform.
-
Search for groups.
-
On the Groups page, verify that the new group was created.
Use Case: Disable a User
Complete the following procedure to verify that disabling a user in Microsoft Entra ID results in the user being disabled in the Delinea Platform via SCIM.
Verification steps in Microsoft Entra ID
-
Log in to the Azure Portal.
-
Navigate to Entra ID > Users.
-
Select the user.
-
At the top of the user’s page, select Edit Properties.
-
Go to the Settings tab.
-
To disable the user account, clear the Account enabled checkbox and select Save.
-
In the left pane, select Enterprise Applications and then select the enterprise application that you created.
-
Navigate to Provisioning > Provisioning logs.
-
Filter the provisioning logs as follows:
-
Action: Disable.
-
Status: Success.
-
-
Verify that there is a log entry for the disabled user account
Verification steps in the Delinea Platform
-
Log in to the Delinea Platform.
-
Search for users.
-
On the Users page, verify that the user account is present.
-
On the Overview tab of the user details page, verify that Account is disabled is set to Yes.
-
Verify that the user’s roles, permissions, and data are preserved.
Use Case: Re-Enable a User
Complete the following procedure to verify that re-enabling a previously disabled user in Microsoft Entra ID restores the user’s access in the Delinea Platform without re-creating the account.
Verification steps in Microsoft Entra ID
-
Log in to the Azure Portal.
-
Navigate to Entra ID > Users.
-
Select the user.
-
At the top of the user’s page, select Edit properties.
-
Go to the Settings tab.
-
To re-enable the user account, select the Account enabled checkbox and select Save.
-
In the left pane, select Enterprise Applications and then select the enterprise application you created.
-
Navigate to Provisioning > Provisioning logs.
-
Filter the provisioning logs as follows:
-
Action: Update.
-
Status: Success.
-
-
Verify that there is a log entry for the re-enabled user account.
Verification steps in the Delinea Platform
-
Log in to the Delinea Platform.
-
Search for users.
-
On the Users page, verify that the user account is in Active status and that a duplicate user account was not created.
-
On the Overview tab of the user details page, verify that Account is disabled is set to No.
Use Case: Update User Attributes
Complete the following procedure to verify that changes to a user’s attributes in Microsoft Entra ID are automatically reflected in the Delinea Platform via SCIM.
Verification steps in Microsoft Entra ID
-
Log in to the Azure Portal.
-
Navigate to Entra ID > Users.
-
Select the user.
-
At the top of the user’s page, select Edit properties.
-
Update one or more of the mapped attributes, for example:
-
Department
-
Job title
-
Display name
-
-
Select Save.
-
In the left pane, select Enterprise Applications and then select the enterprise application you created.
-
Navigate to Provisioning > Provisioning logs.
-
Filter the provisioning logs as follows:
-
Action: Update.
-
Status: Success.
-
-
Verify that there is a log entry for the updated user account.
Verification steps in the Delinea Platform
-
Log in to the Delinea Platform.
-
Search for users.
-
On the Users page, find the user account and verify that the user account is in Active status.
-
Verify that the user details page reflects the changes in the user attributes.
Use Case: Deprovision a User
Complete the following procedure to verify that a permanently deleted Microsoft Entra ID user is removed from the Delinea Platform via SCIM.
Verification steps in Microsoft Entra ID
-
Log in to the Azure Portal.
-
Navigate to Entra ID > Users.
-
Select the user and select Delete.
-
In the left pane, select Deleted users.
-
Select the same user, select Permanently delete, and confirm the deletion.
-
In the left pane, select Enterprise Applications and then select the enterprise application you created.
-
Navigate to Provisioning > Provisioning logs.
-
Filter the provisioning logs as follows:
-
Action: Delete.
-
Status: Success.
-
-
Verify that there is a log entry for the deleted user.
Verification steps in the Delinea Platform
-
Log in to the Delinea Platform.
-
Search for users.
-
On the Users page, search for the deleted user and verify that no user is found.
Use Case: Unassign a User from the Provisioning Scope
When you unassign a user or group from the enterprise application that you created for this integration in Microsoft Entra ID, that user or group gets removed from the provisioning scope, so changes made to the user record or group in Microsoft Entra ID are no longer synchronized to the Delinea Platform.
Complete the following procedure to verify the behavior that occurs when a user or group is unassigned from the enterprise application in Microsoft Entra ID.
Verification steps in Microsoft Entra ID
-
Log in to the Azure Portal.
-
Navigate to Entra ID → Enterprise Applications.
-
Select the enterprise application that you created for this integration.
-
In the left pane, select Users and groups.
-
Select the user that you want to unassign from the enterprise application.
-
Select Remove.
-
Make changes to the user.
For example, changes some of the user’s attributes.
Verification steps in the Delinea Platform
-
Log in to the Delinea Platform.
-
Search for users.
-
On the Users page, verify that the user account is present and that no changes were made to the user’s details. Also verify that the user account is disabled and login access is blocked for the user.