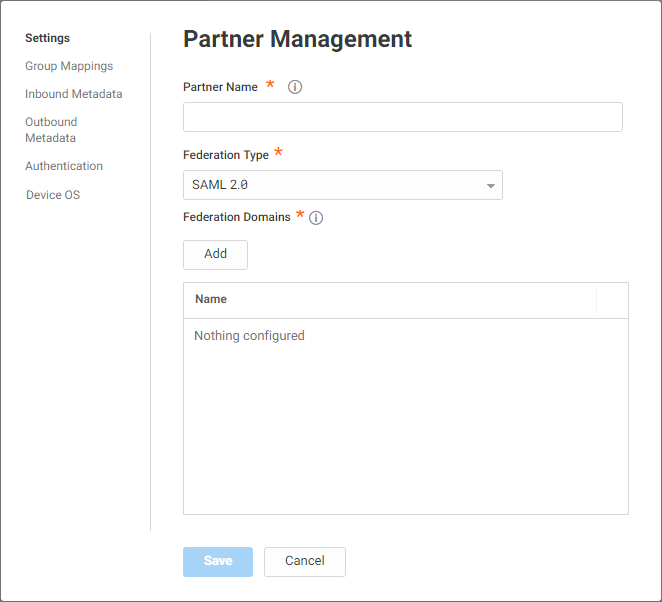
Add a Partner
Add the partner in Admin Portal to enable sharing on your end. You will need the group attribute values and IDP metadata from your partner to finish the configuration.
Creating a partner
-
Log in to Admin Portal.
-
Click Settings, Users, Partner Management and Add.
-
Enter a unique partner name.
-
Ensure your SAML file includes the required elements.
SAML 2.0 is automatically selected because we currently only support this federation type.
The following attributes are consumed by federations with other Cloud customers.
userprincipalnameis a mandatory attribute that needs to be configured in the IDP SAML configuration.Additional attributes are supported and can be configured with the partner IDP SAML configuration. These can also be configured on the Service Provider side with the B2B application template.
Mandatory attribute:
userprincipalname(mandatory)Additional supported attributes:
-
DisplayName -
Description -
Email -
Group -
HomeNumber -
LoginName -
MobileNumber -
OfficeNumberFor example:
CopysetAttribute("userprincipalname", LoginUser.Get("userprincipalname"));
-
-
Click Add associated with the Domain Name field to enter a unique domain name.
This domain name will be used as the login suffix for all partner users. It allows Delinea to recognize users coming from a specific IDP and redirects them accordingly. For example, you may want to use the business partner company name (for example companyABC.com) as the domain name.
-
Click Add to add the domain name to the table.
-
Click Group Mappings > Add to create a mapping of the group attribute values to your groups.
For example, create a group mapping for partner roles for other Delinea tenants, or federated groups.
The SAML attribute can be multi-valued and must be from the Identity Provider to Delinea.
-
Enter the federated group into the Group Attribute Value column. This is your mapping name.
-
Select an existing group in the Group Name column or enter a new name.
Once you save, the service creates the group. This group can then can be assigned to roles.
You will see the group name when you assign a member to a role, and select only the Groups check box.
This step maps the federated groups (information you should have received from your partner) to your groups. For details, see Assigning Host Groups to Roles.
-
Click Custom Mappings > Add to create a custom mapping of the user attribute values.
This maps users with the specified attribute name and value to the selected group. Users mapped to groups are given the same admin rights as the group.
-
Click Inbound Metadata to configure IDP settings (using the IDP metadata you received from your partner) for this partner using one of the following options:
-
Option 1: Upload the IDP configuration from URL. To use this option, paste the Identity Provider SAML Metadata URL provided by your partner.
-
Option 2: Upload IDP configuration from a file. If your partner provided the Identity Provider SAML Metadata in an XML file, you can upload it here.
-
Option 3: Manual Configuration. Manually enter the relevant information. This is not a recommended option.
-
-
Click Outbound Metadata to provide IDP configuration settings (using the IDP metadata to send to your federating partner) for your partners using one of the following options:
-
Option 1: Service Provider Metadata URL. Copy this link and paste at the partner IDP SAML configuration.
-
Option 2: Download Service Provider Metadata. Upload this file at the partner IDP SAML configuration.
-
Option 3: Manual Configuration. Copy and paste this information at the partner IDP SAML configuration.
-
-
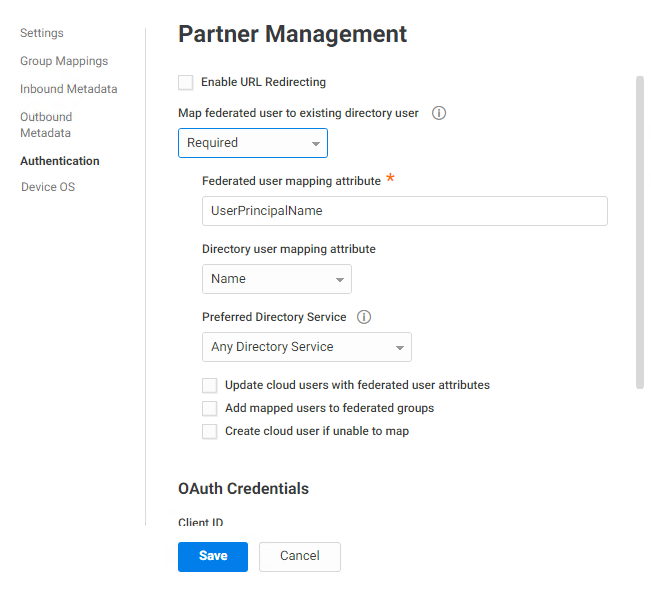
Click Authentication to configure mapping federated users to existing directory users.
By default, when a federated user logs in, a new user is created in the Delinea Directory, even if a user already exists in a source directory (Delinea Directory, AD, LDAP, or Google) that has the same uuid or username. This feature maps the authenticated user to an existing user (if possible) before creating a new Delinea Directory user. By default, assertions of the federated user are ignored in favor of the attributes of the mapped user.
-
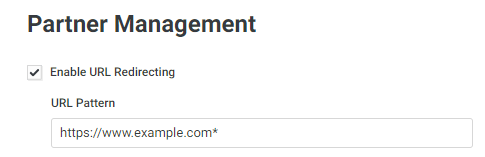
(This step is optional) Select Enable URL redirecting if you want incoming federated users to be redirected to the target URL (as defined by the RelayState).
If you enable URL redirecting, you can also limit redirection to a RelayState matching the URL pattern. If the field is empty, all URLs are allowed. The URL pattern is a wildcard pattern starting with https://. For example, https://www.example.com*.
-
Select Optional or Required in the Map federated user to existing directory user drop-down menu to enable the feature.
-
Selecting Optional means authentication of a mapped federation user results in the user of the mapped directory service. If a user cannot be mapped, a new Federated user is created.
-
Selecting Required means the user of a federation will authenticate as the matching user of another directory service. If no match is found, login is denied. If Create cloud user if unable to map is also enabled, a matched Delinea Directory user is created and login is permitted.
-
-
(This step is optional) Enter a federated user mapping attribute.
The default value is
UserPrincipalName, since it is a required assertion.The federated user mapping attribute must be in the SAML assertion and map to either the Name or Uuid source directory attributes. If you change this value to an attribute that is not in the assertion and/or does not map to a unique attribute in a source directory, the mapping will fail.
-
Select a directory user mapping attribute; either Name or Uuid.
-
(This step is optional) Select a preferred directory service to search first for existing users. After the preferred directory service, remaining directory services are searched according to their creation date.
-
(This step is optional) Select Update cloud users with federated user attributes to update a mapped Delinea Directory user with the federated assertions.
-
Adding a Microsoft Azure Partner
For information on adding a Microsoft Azure partner, see Entra ID Integration with PAS/Cloud Suite.
Adding an Okta Partner
For information on adding an Okta partner, see Integration with Okta.
Authenticating to Servers for Federated Users
Since many customers use Okta as the main authentication directory, this example will use Okta to explain how to set up Delinea PAS and Delinea Client so that you can authenticate to servers managed by Delinea with your users.
-
From the Admin Portal navigate to Resources > Systems.
-
Right-click the system you want to use and click Enter Account. This will open a new window, enabling authentication into the system.
-
Authenticate into the server using your login credentials. The logged in user is "local" to the server.
This manages the back channel between Delinea Client, PAS and the server, and therefore requires you to update your Admin Portal settings with your server information.
-
Retrieve the relevant information from Okta.
-
Set up an App in Okta.
The app must be a "Native App" that uses OpenID Connect as the Sign-On Method.
The Native App will generate the following:
-
Client ID
-
Client secret
-
Token URL - This is the default Authorization Server. For Okta, you can find this in the Okta Developer Console for your tenant under API / Authorization Servers > Metadata URI. The Token URL is listed under the token_endpoint variable.
Save this information, as you will need to use them in the Admin Portal.
-
-
Ensure a default Scope is set up in the Scopes tab for your Authorization Server.
-
-
Return to the Admin Portal and navigate to Settings > Users >Partner Management.
-
Click Add to add a new partner.
-
On the Settings tab, Set the Federation Type, Signature Type, and Federation Domains.
-
Click the Authentication tab and enter the Client ID and Secret you copied from your server and fill in the Token URL.
Adding Entra ID as a Federated Partner
If Entra ID is set up as a federated partner, then users can use their Entra ID credentials to log in to enrolled systems. To do this, you first configure Entra ID, then you set up Entra ID as a federated partner in PAS.
Step 1: Configure the OAuth Resource in Entra ID
-
Navigate to the Microsoft Azure Portal and authenticate.
-
Navigate to Azure Active Directory.
-
Click App Registrations, then click New Registrations.
-
Enter 'OAuth Resource' or a similar value as the Name.
-
Verify that the Supported Account Type is set to Single Tenant.
-
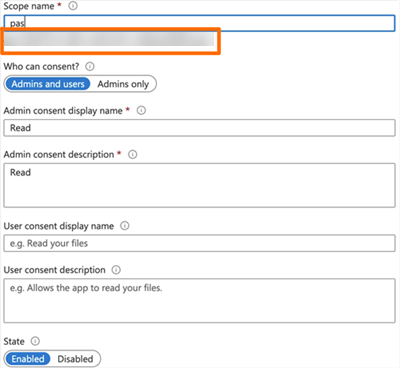
Click Register, then click Expose on API, then click Add A Scope.
-
Enter 'pas' as the Scope name.
-
Select Admins and Users as who can consent.
-
Enter a display name for the scope. (For example: Read)
-
Enter a description for the scope. (For example: Read) Copy and paste the api://.../pas address generated here for later use:
-
Click Add Scope .
-
Click Save.
-
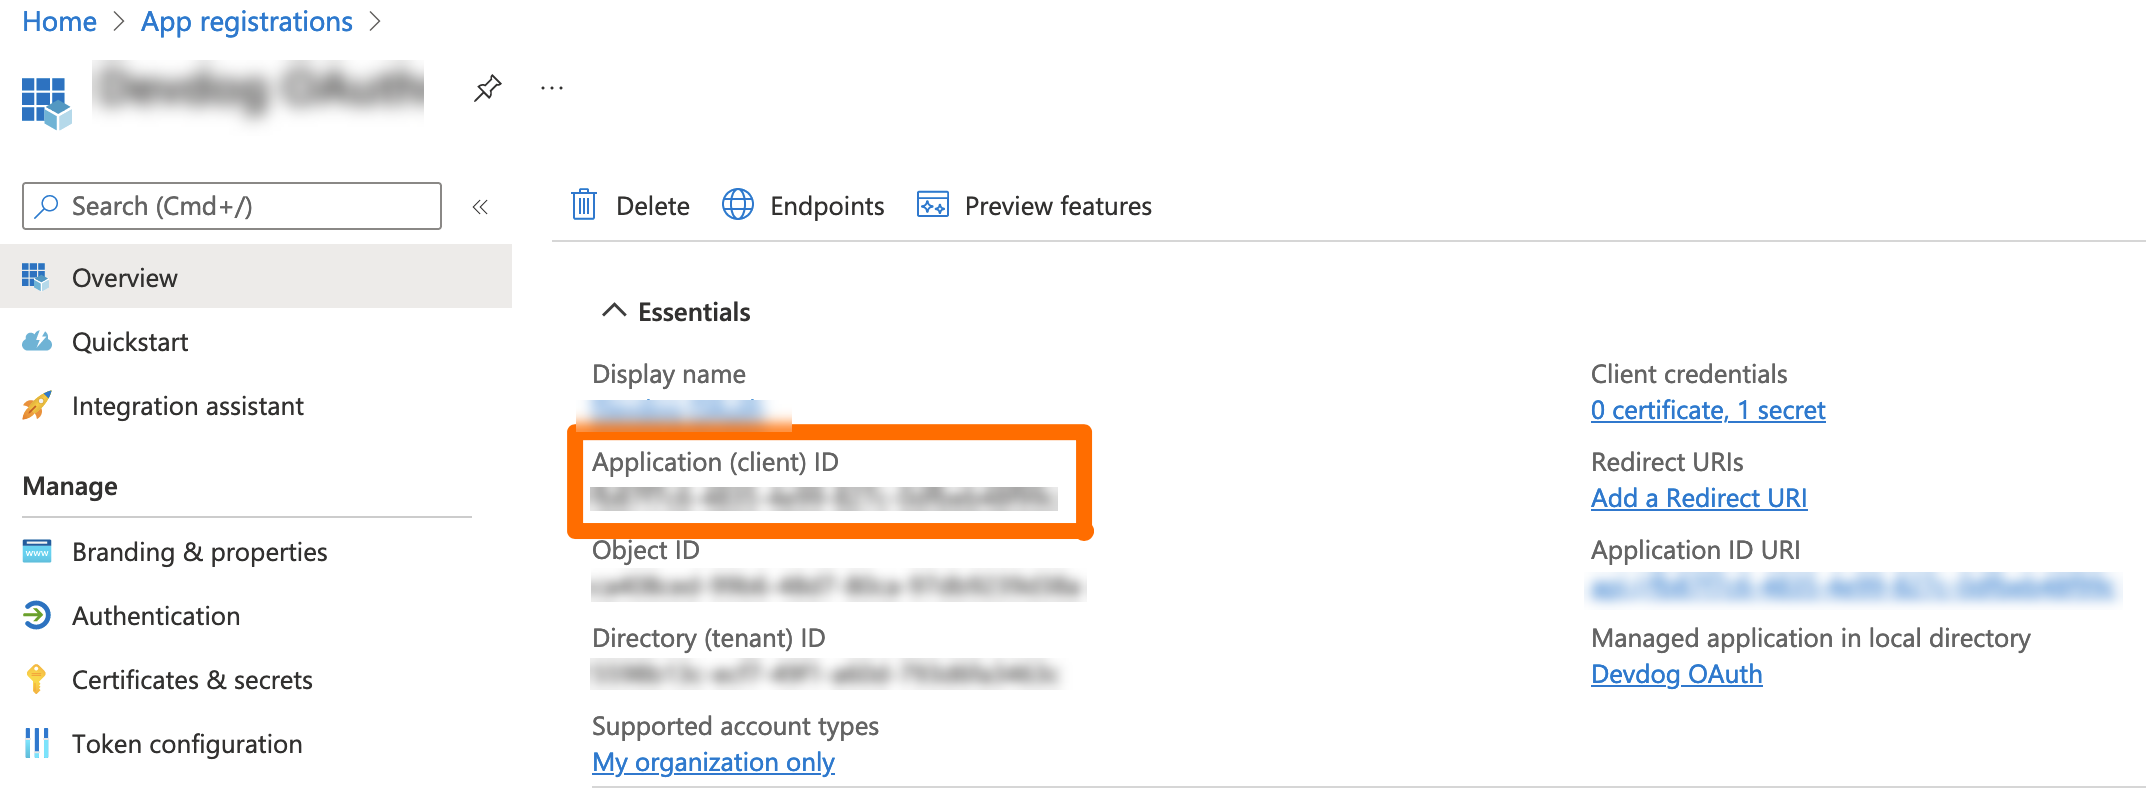
Go back to the Overview screen and copy and paste the Application (client) ID for later use:
-
Click the link under Client Credentials to generate a secret.
-
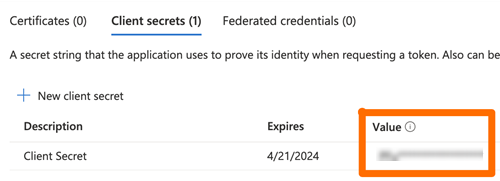
Under Client Secrets, click New Client Secret.
-
Enter a description and expiration date.
-
Once created, copy and paste the value of the secret for later use. If you close this window and open it later, you won't be able to copy the secret value:
-
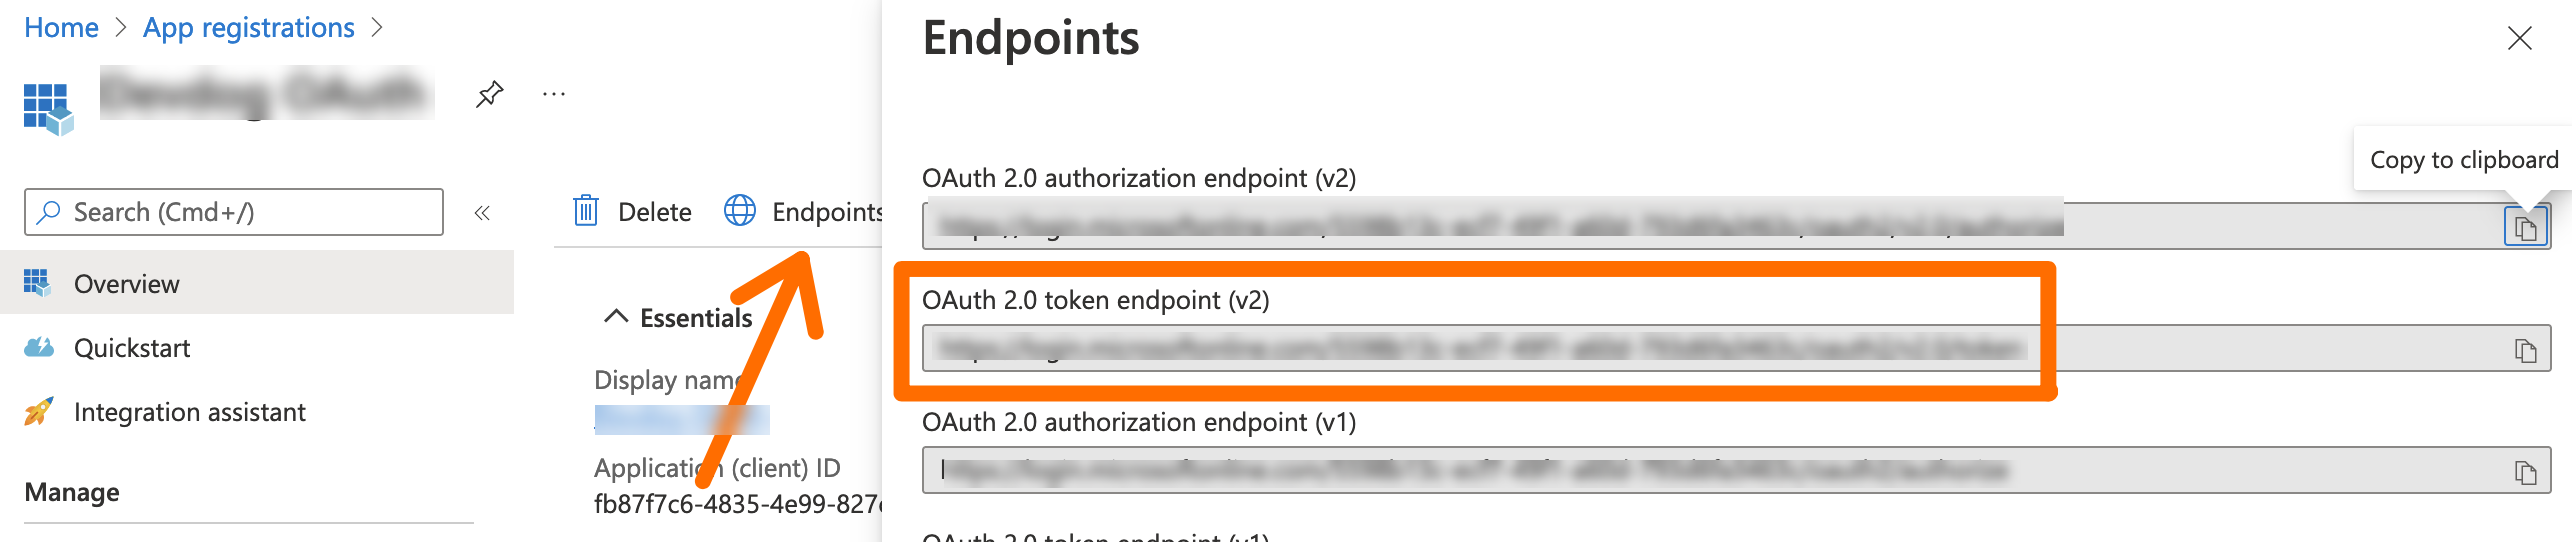
Go back to the Overview page, click Endpoints and copy the value of the OAuth 2.0 token endpoint (v2) item:
Step 2: Set up Entra ID as the Federated Partner
- In the Settings/Users/Partner Management screen, open Entra ID Federation setting.
-
On the Authentication screen, paste the values of the following:
- Token URL
- Client ID
- Secret
- Scope