Registering an iOS Device and Using the Mobile App
You register your device in the Privileged Access Service using the Delinea application. If you have not installed the Centrify Mobile app, see Using Devices then return here to complete device registration.
Your organization may also configure mobile device policy profiles. The profiles set system preferences that configure communications with your corporate network and may impose some restrictions on your use of some device features.
The following topics are relevant to registering a device and using the Centrify Mobile app.
Registering an iOS Device
You use the Centrify Mobile app to register the device in the Privileged Access Service. After you register the device, you use the Centrify Mobile app to open the web applications that were assigned to you by your IT department.
To register your device:
-
Open the Centrify Mobile app on your device.
-
Enter your user name and password.
Your IT administrator will provide you with the user name and password you should use.
-
(Contingent upon configuration) If your systems administrator has enabled the feature, you can register your device without entering your user name and password. Do the following:
-
Tap Register with QR.
The scanning tool opens.
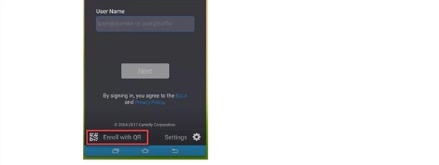
-
Scan the QR code on Admin Portal > Profile > Devices > Add Devices.
-
Click Proceed on the device browser.
-
-
Tap Allow if you want the Privileged Access Service to show your device’s location on the Admin Portal.
The Centrify Mobile app opens to a screen that lists the web applications that have been deployed to you by your Privileged Access Service administrator. See Using the Mobile App.
Using the Mobile App
You use the Centrify Mobile app to view and manage system resources from your device. Also, if your IT department requires a one time passcode to log in to the Admin Portal, you use the Centrify Mobile app to generate the one-time passcode.
Securing Access to the Mobile App
You can secure access to the Centrify Mobile app by using a PIN or biometrics. After you configure these security settings and enable the application lock feature, you will be prompted to use one of the configured methods (PIN or biometrics) to access the Centrify Mobile app.
To secure your Centrify Mobile app:
-
Tap the Centrify Mobile app on your device.
-
Tap Settings > Security Settings.
-
Enter a PIN as your primary access method.
-
(optional) Register your biometrics as an alternative access method.
If biometrics recognition is available on your device, then we direct you to the device biometrics registration window.
-
Tap the App Lock Settings option on the Settings page and enable the feature using the Lock on Exit field.
The setting defined by your system administrator overrides your settings here.
-
(optional) Tap Auto-Lock and configure how long you want the Centrify Mobile app to be inactive before it automatically logs you out.
You will now be prompted to use one of the configured methods (PIN or biometrics) to access the Centrify Mobile app.
Changing Your Active Directory or Mobile App Password
If you have a Privileged Access Service User account, changing your password changes the password you use to open the Centrify Mobile app and to register devices. If you have an Active Directory User account, this also changes the password you use to log in to your company account when you start up your computer.
Your IT administrator controls whether or not you can change your password.
If you have an Active Directory User account, you may need to change other passwords as well. For example, if you log in to Outlook with the same account, you’ll need to change that login password to match. Confirm with your IT staff regarding other passwords you may need to change after you change your Active Directory User account password in the Centrify Mobile app.
To change your account password on your device:
-
Tap the Delinea application on your device.
-
Tap Settings > Change Password.
-
Enter your current and new passwords.
-
Tap Save.
Checking Out an Account Password
You can use Privileged Access Service to securely store user name and password combinations for local accounts. You can use those accounts to log on securely to the servers, switches, and routers you identify as Systems, Domains, and Databases.
In addition, you can check out passwords for Delinea-managed local administrator accounts for registered devices. You can either show the password or copy it to the clipboard, then use it to perform operations that require admin rights.
Checking out an account password requires the following:
-
Appropriate administrative rights on the Delinea identity platform.
-
Existing access to Delinea privilege service (for Systems accounts).
-
The device must be registered in the Privileged Access Service.
-
Your authentication mechanisms must be configured for the Delinea application—see Securing Access to the Mobile App.
Account Types You Can Check Out
In the Centrify Mobile app, you can check out passwords for the following account types:
-
Tap Systems to see available systems and check out the password for a stored account.
-
Tap Domains to see available domains and check out the password for a stored domain.
-
Tap Databases to see available domains and check out the password for domains.
You need view and checkout permission to check out a system, domain, or database password.
When you check out a password, it remains checked out until either you check it back in or the checkout time expires. The maximum check out time is configured by your admin through policy; however, you can extend the checkout time for a password that is currently checked out. When you extend the time, it is reset to the maximum check out time.
Checking Out a Password
For detailed steps on how to check out a password, see Checking Out an Account Password. You can view these operations in the activity stream of the resource in portal. To do this: navigate to a resource, select the resource and choose the Activity tab.
Using Privileged Access Service as an Authenticator
You can use the Privileged Access Service Admin Portal to get the one time passcode (either by scanning an external source's QR code or entering the authentication key information manually). You then can use the passcode to log in to the relevant application or website.
To Scan a QR Code
To scan a QR code, you must use the Privileged Access Service Admin Portal application on an registered mobile device.
-
Log in to the Privileged Access Service application on your mobile device.
-
Tap Passcodes.
The Authentication window shows any existing passcodes.
-
Tap the plus icon (+) then tap Scan QR Code.
-
Scan the external source's QR code.
The Passcodes window shows the newly generated passcode. The newly added authentication account is also added to the Passcodes page in the Accounts section of the Admin Portal.
To enter the authentication key information manually on your mobile device
To enter the authentication key information manually, you can use the Privileged Access Service Admin Portal on your mobile device or computer. See Managing Authentication Keys for information on entering the authentication key information manually using your computer.
-
Log in to the Centrify Mobile app on your mobile device.
-
Tap Passcodes.
The Passcodes window shows any existing passcodes.
-
Tap the plus icon (+) then tap Enter Authentication Key.
-
Enter the information provided by the application or website.
-
Tap Save.
The Passcodes window shows the newly-generated passcode. The newly added authentication account is also added to the Passcodes page in the Accounts section of the Admin Portal.
Using App Lock
This icon locks the Centrify Mobile app. If you do not have a PIN configured, then you are prompted to create one. You can also use your fingerprint for authentication if your device supports fingerprinting.
Configurations made by the system administrator override your user configuration.
See Securing Access to the Mobile App for configuration information.
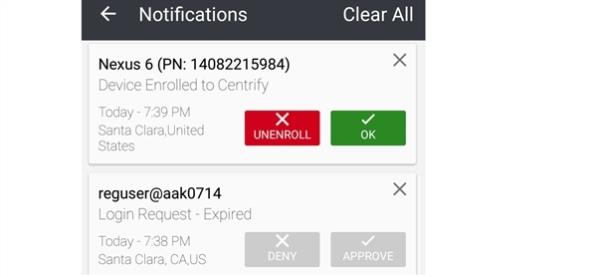
Pending Notifications
Notifications to which you have not responded can be accessed via the bell icon. The number associated with the icon shows the number of pending notification.
Tapping the icon displays the notifications. Expired notifications (such as MFA notifications where the default response time is 10 minutes) are grayed out and you cannot take action on them.
Using the Settings Screen
The Settings screen contains device configuration information such as default browser settings, authentication settings, and other useful information.
Debug Options
Allows you to enable/disable the debug mode for the Browser Extension. You will typically use this setting while working with your system administrator.
Browser Settings
You use this option to set your default browser and clear browsing data.
-
Tap Default Browser to select the default browser for you device.
-
Tap Clear Browsing Data to delete your cache an other browsing data from the built-in browser.
Log Settings
Allows you to configure log file related information. Options are:
-
Log Level
Sets the level at which log files are logged.
-
Log to Console
Sets the level at which log files are sent to the console.
-
Send Log File
Provide the email addresses to which the log files should be sent.
Privileged Access Service Settings
The URL option contains the Privileged Access Service service URL.
Do not change this setting unless specifically instructed to by your IT department. If the URL is wrong, you cannot use the Privileged Access Service.
Apps Settings
Lets you show/hide applications that are not supported on mobile device browsers.
When you tap an application that cannot be run, the Delinea application displays an error message and gives you the option to hide it and all other applications that are not supported. Tap Hide All to remove these applications from the screen.
To display the hidden applications, open the Settings tab in the Delinea application and configure the Show All Applications option.
Authentication
Lets you configure the following:
-
Mobile authenticator -- See Using Multi-Factor Authentication.
-
Change Password -- Allows you to change your Active Directory or Privileged Access Service account password. See Changing Your Network Login Password.
Terms
Displays the terms of service and use, privacy policy, and acknowledgments.
Accessing Shortcuts
You can access the following shortcuts by long-pressing the Privileged Access Service application icon:
-
Multi-factor access (MFA) options
-
Top two frequently used applications
-
Pending notifications

Important: This feature is only supported on iOS 7 and newer.
Unregistering an iOS Device
You unregister a device to remove the Privileged Access Service profiles from the device’s settings. You can register the device again using the Delinea application.
The ability to unregister your device is controlled by your IT administrator. This option may not be available to you. If your device is assigned to the Apple Device Enrollment Program, you cannot unregister it.
Unregistering removes the profiles installed when you registered the device.
To unregister an iOS device:
-
Tap the Delinea application icon on your home screen.
-
Tap Settings.
-
Scroll down and tap the Unregister Mobile Device button at the bottom of the screen.
If you do not see the Unregister Mobile Device option, it means your IT department has not given you the permission to unregister.
-
Tap OK to confirm that you want to unregister.
After unregistering is complete, the Delinea application displays its log in screen.