Creating Authentication Rules
Authentication rules define the conditions in which a certain authentication profile is applied. For example, you can create a rule to require that users provide a password and text message confirmation code if they are coming from an IP address that is outside of your corporate IP range. To specify this requirement, you need to create a rule and associate it with an authentication profile.
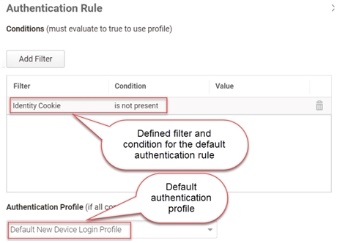
If you do not define any authentication rules, then a default rule and profile is used. This default rule uses the identity cookie not present condition and the Default New Device Login Profile. This profile uses Password for the first challenge and Mobile Authenticator, Text message (SMS) confirmation code, Email confirmation code, or OATH OTP Client for the second challenge with a 12 hours pass-through duration. The following image shows the default authentication rule.
To define an authentication rule:
-
In the Admin Portal, click Access > Policies.
-
Click Add Policy Set to create a new one.
-
Click Authentication > Delinea Services.
-
Select Yes in the Enable authentication policy controls drop-down.
-
(Optional) Click Add Rule to specify conditional access.
The Authentication Rule window displays.

-
Click Add Filter on the Authentication Rule window.
-
Define the filter and condition using the drop-down menus.
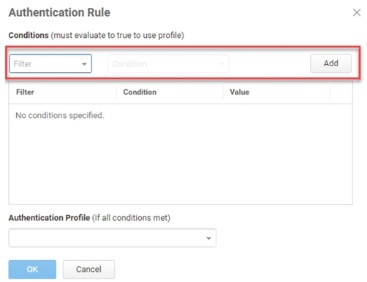
For example, you can create a rule that requires a specific authentication method when users access Privileged Access Service from an IP address that is outside of your corporate IP range. Available filters vary depending on the object they are applied to and features enabled on your tenant. Supported filters are:
| Filter | Description |
|---|---|
| IP Address | The authentication factor is the computer’s IP address when the user logs in. This option requires that you have configured the IP address range in Settings, Network, Corporate IP Range. |
| Identity Cookie | The authentication factor is the cookie that is embedded in the current browser by Privileged Access Service after the user has successfully logged in. |
| Day of Week | The authentication factor is the specific days of the week (Sunday through Saturday) when the user logs in. |
| Date | The authentication factor is a date before or after which the user logs in that triggers the specified authentication requirement. |
| Date Range | The authentication factor is a specific date range. |
| Time Range | The authentication factor is a specific time range in hours and minutes. |
| Device OS | The authentication factor is the device operating system. |
| Browser | The authentication factor is the browser used for opening the Privileged Access Service portal. |
| Country | The authentication factor is the country based on the IP address of the user computer. |
| Certificate Authentication | The certificate is used for authentication. |
| For the Day/Date/Time related conditions, you can choose between the user’s local time and Universal Time Coordinated (UTC) time. |
-
Click the Add button associated with the filter and condition.
-
Select the profile you want applied if all filters/conditions are met in the Authentication Profile drop-down.
The authentication profile is where you define the authentication methods. If you have not created the necessary authentication profile, select theAdd New Profile option. See Creating Authentication Profiles.
-
Click OK.
-
(Optional) In the Default Profile (used if no conditions matched)drop-down, you can select a default profile to be applied if a user does not match any of the configured conditions.
If you have no authentication rules configured and you select Not Allowed in the Default Profile drop-down, users will not be able to log in to the service.
-
(Optional) If you have more than one authentication rule, you can drag and drop the rules to a new position in the list to control the order they are applied.
-
Click Save.
If you have more than one authentication rule, you can prioritize them by dragging them. The rule on top has the highest priority.