Configuring the Delinea Connector for Use as a RADIUS Server
To enable communication between your RADIUS client and the connector (acting as a RADIUS server), do the following:
-
Make configuration changes in the Admin Portal to designate the connector as a RADIUS server, add the RADIUS client information, and define the requirement for a secondary authentication mechanism. See Configuring the Admin Portal (connector as a RADIUS server).
-
Configure the RADIUS client (for example Cisco VPN, Juniper VPN, and Palo Alto VPN). See Setting Up a RADIUS Client for client configuration details.
Configuring the Admin Portal (connector as a RADIUS server)
Make configuration changes in the Admin Portal to designate the connector as a RADIUS server, define the RADIUS client information, and define the requirement for a secondary authentication mechanism.
To configure the Admin Portal:
-
Log in to the Admin Portal.
-
Configure the connector to be a RADIUS server.
-
Click Settings > Network > Delinea Connector.
-
Select an existing connector or add a new one.
-
Click RADIUS.
-
Select the Enable incoming RADIUS connections checkbox.
Your VPN server and the connector must be able to communicate. Confirm with your network administrator that your corporate firewall rules arenot blocking this connection, for example if your VPN server is in the DMZ.
-
Provide the port number in which the Delinea Connector talks to Privileged Access Service. The default port number is 1812.
-
Click Save.
-
-
Define the RADIUS client information.
-
Click Authentication > RADIUS Connections > Client tab > Add to configure your RADIUS client.
A RADIUS client can be VPN server, wireless access point, etc.
-
Enter the required information.
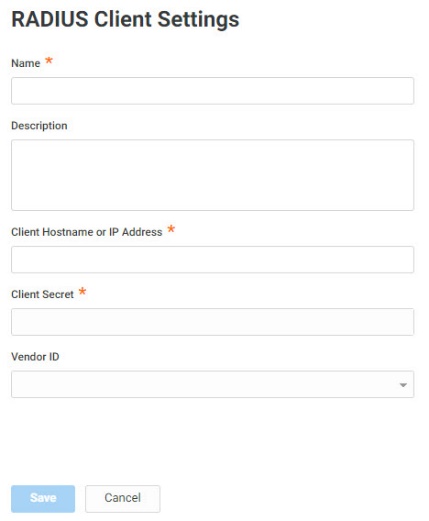
The Client Hostname or IP Address field is expecting the hostname or IP address of the RADIUS client.
The Client Secret field is expecting a shared secret key for the RADIUS client and Privileged Access Service. If you have entered a secret key on your RADIUS client, then enter that same key here. The keys must match to enable authentication. If you are creating a new secret key, best practices recommend 22 or more characters in length.
(Optional) The Vendor ID field is used for defining custom RADIUS attributes and is expecting an integer identifier for your RADIUS vendor. Each vendor (Cisco, Juniper Networks, etc.) has unique IDs for their RADIUS Vendor-Specific Attributes (VSA). The drop-down list provides a few common VSAs, but you can also enter a vendor ID for your specific RADIUS VSA. When entering your vendor ID, only integers are accepted. The descriptive text associated with VSA in the drop-down list is ignored by our back-end system. See Configuring the Admin Portal (connector as a RADIUS server) to configure the custom RADIUS attributes.
-
Click Response.
-
(Optional) Select the language in which RADIUS client messages and user communications (Email and SMS) will be displayed.
-
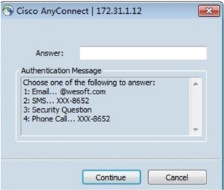
(Optional) The “Include new-line characters in the mechanism selection list prompt” option controls how the mechanism list is displayed. This image shows the list when this option is enabled.
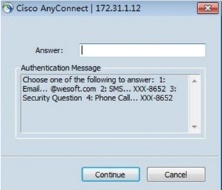
This image shows the list when this option is disabled.
-
Specify the Wait Timeout (a time, in seconds, the service should wait for an out-of-band response).
-
Specify the user response option for each authentication mechanism. Select Push for users to respond from the mechanism (for example, click a link in the email or tap a link in the text message). SelectEnter Code for users to manually enter the code on the RADIUS client UI.
-
Click Save.
-
-
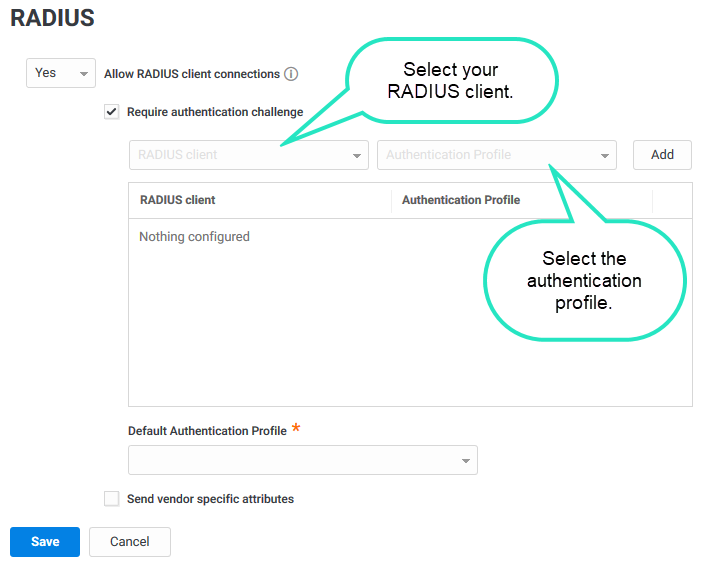
Enable the RADIUS client connection and define the secondary authentication requirement.
-
Click Polices and either select an existing policy set or add a new one.
-
Click User Security Policies > RADIUS.
-
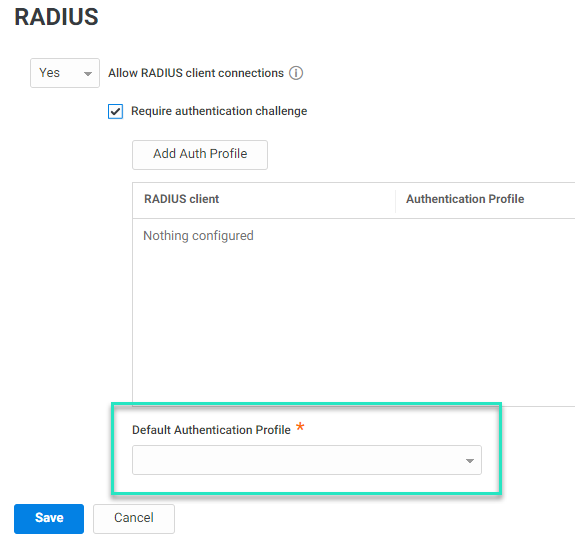
Select Yes in the Allow RADIUS client connections dropdown.
This setting allows users to authenticate with the RADIUS client.
-
Select the Require authentication challenge check box to require that users provide a secondary authentication mechanism to log in via the RADIUS client.
-
(Optional) Configure an authentication profile for specific RADIUS clients.
-
Click the Add Authentication Profile button.
-
Select the RADIUS client from the drop-down list.
-
Select an Authentication Profile from the drop-down list or Add New Profile.
Important: We recommend that the first challenge in the profile is Password because the user prompt from the RADIUS client defaults to Username/Password, regardless of the authentication mechanism(s)you choose for the first challenge. If your first challenge is not Password, for example it is Mobile Authenticator, then users may not successfully authenticate with the RADIUS client because we are expecting a mobile authenticator code but users enter their username/password based on the UI prompt.
Verify that your RADIUS client allows for the selection of an authentication mechanism when multiple mechanisms are available. Some RADIUS clients do not support the selection of an authentication mechanism when more than one mechanism is available. Therefore, if your authentication profile has more than one mechanism in the second challenge, users will not be authenticated with some RADIUS clients.
See Creating Authentication Profiles for information on authentication profiles.
-
Click the Add button.
-
-
Select an authentication profile from the Default Authentication Profile drop-down list to define authentication requirements for all your RADIUS clients or a profile to be used for any clients you did not specify in the above step.
For example, users coming in via a RADIUS client not specified above will be authenticated using the authentication profile selected here.
See Creating Authentication Profiles for information on authentication profiles.
-
-
(Optional) Define custom RADIUS attributes for authentication response
You can define the RADIUS attributes sent to the RADIUS client. The RADIUS client can then interpret the attributes based on defined standards. For example, you can define a "contract employee" attribute and associate only contract/contingent workers to this Privileged Access Service policy; then you can configure the RADIUS client with a VPN access policy specifically for contract/contingent workers.
-
Confirm that you have specified the Vendor ID when you configured your RADIUS client information in step 3.
-
Click Policies and either select an existing policy set or add a new one.
-
Click User Security Policies > RADIUS.
-
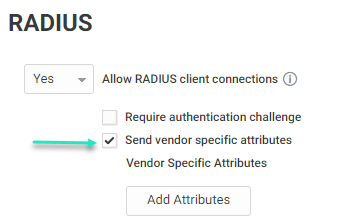
Select the Send vendor specific attributes check box.
-
Click the Add Attributes button.
-
Specify the necessary information.
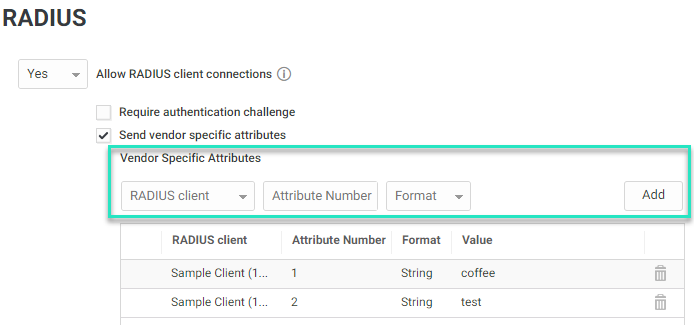
Select the relevant client from the RADIUS client dropdown list.
Enter the Attribute Number. This number identifies the attribute and must be a unique number. For example, if you have created an attribute with the number 2, you can not create another attribute using the same number.
Select the attribute Format -- string or integer.
Enter the attribute Value.
-
Click the Add button.
The newly created attribute is shown in the table.
-
Click Save
-
Setting Up a RADIUS Client
The steps for configuring a RADIUS client to work with the Delinea Connector vary for each client. Refer to your RADIUS client documentation for the configuration procedure and guidelines.
At a high level, you consistently need the following information regardless of the RADIUS client device:
-
IP address of the Delinea Connector
-
The secret key you provide to the RADIUS client and Admin Portal must match exactly
Important: For Open VPN, the Delinea Connector only supports the PAP authentication method.
To configure RADIUS authentication on a Cisco ASA device:
-
On the Cisco ASDM for ASA interface, create an IP Name object for the target by doing the following:
-
Navigate to Firewall, expand Objects, and select IP Names.
-
Click Add and enter a descriptive name (for example, Privileged Access Service RADIUS), the IP address of the Delinea Connector, and a description (for example, Privileged Access Service RADIUS Bridge).
-
Click OK then Apply.
-
-
Create a AAA server group by doing the following:
-
Click Remote Access VPN.
-
Click AAA Setup, AAA Server Group, then Add.
-
Enter a server group name, for example “Privileged Access Service"
-
Confirm that the RADIUS protocol is selected.
-
Accept the default for the other settings and click OK.
-
-
Add the RADIUS server to the server group by doing the following:
-
Select the newly created server group.
-
Click Add.
-
Under the Interface Name, select the interface on the ASA that will have access to the RADIUS server.
-
Under "Server Name or IP Address" enter the IP Name you created for the RADIUS server (i.e. DelineaRADIUS).
-
In the Server Secret Key field, enter the secret key that you entered in the Privileged Access Service Admin Portal interface.
-
In the Common Password field, re-enter the pass phrase/secret key.
-
Accept the default for the other settings and click OK.
-
To configure RADIUS authentication on a Juniper device:
-
Open the Juniper Secure Networks Secure Access SSL-VPN Central Manager.
-
Navigate to Authentication > Authentication Servers > New Server.

-
Provide the following information:
-
Name: Descriptive name such as Delinea RADIUS.
-
NAS-Identifier: Descriptive name such as Juniper.
-
Radius Server: IP address of the Delinea Connector.
-
Authentication port: 1812
-
Shared Secret: The secret key that you entered in the Privileged Access Service Admin Portal interface.
-
NAS-IP-Address: IP address of the Juniper device.
-
Timeout: 30 seconds
-
Retries: 0
-
Users authenticate using tokens or one-time password: leave unchecked.
-
-
Click Save Changes.
-
Click New Radius Rule to add a new custom rule and provide the following information:
-
Name: A descriptive name
-
Response Packet Type: Access-Challenge
-
Reply-Message -- matches the expression: (.*)
-
Show GENERIC LOGIN page: Enable the check box

-
-
Click Save Changes.
-
Create another rule for the Access Reject packet type by clicking Radius New Rule and providing the following information:
-
Name: Enter a descriptive name
-
Response Packet Type: Access-Reject
-
Reply-Message - matches the expression: (.*)
-
Show GENERIC LOGIN page: Enable the check box
-
-
Click Save Changes.
When you are done configuring the authentication rules, they should look similar to the following:
-
rule_1 - Access Challenge - (Reply-Message matches the expression "(.*)")
-
rule_2 - Access Reject - (Reply-Message matches the expression "(.*)")
-
-
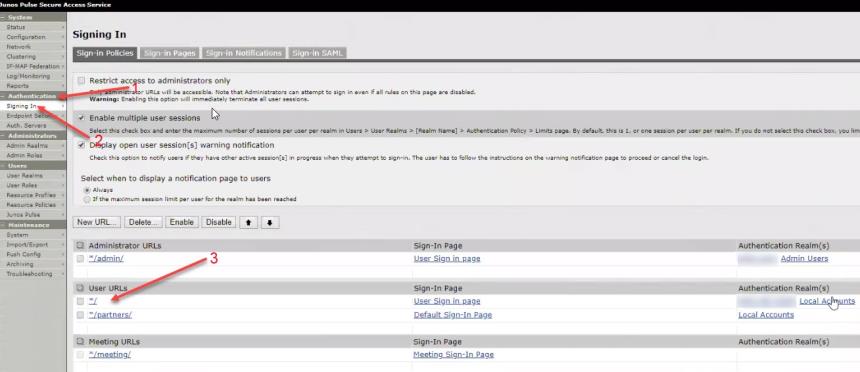
Add the newly created Delinea RADIUS realm to the authentication realm.
-
Click Authentication > Signing In > the relevant User URL.
-
Move the newly created realm from the "Available realms" area to the "Selected realms" area.
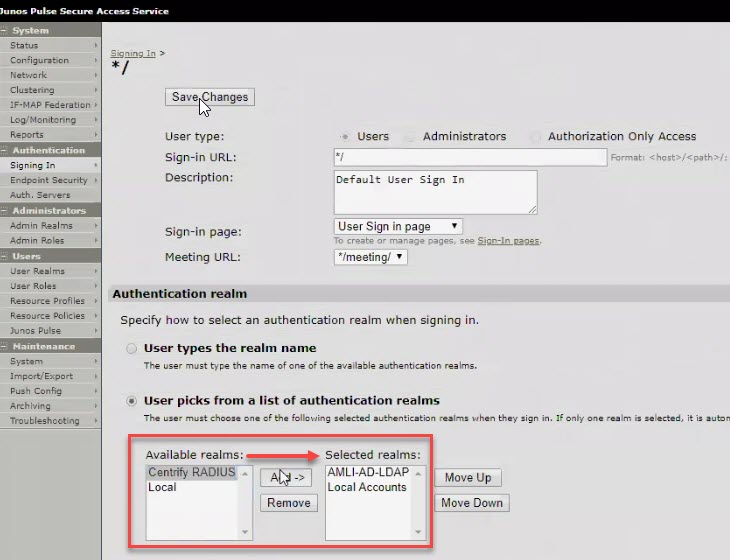
-
-
Click Save Changes.
To configure RADIUS authentication on a Palo Alto Networks device:
-
Add a server profile.
-
Open the Palo Alto Networks administration interface.
-
Navigate to Device, Server Profiles, RADIUS.
-
Click Add and enter a name for the profile.
-
Provide the following information for the Server settings:
-
Timeout (Sec): 120
-
Authentication Protocol: PAP
-
Retries: 1
-
-
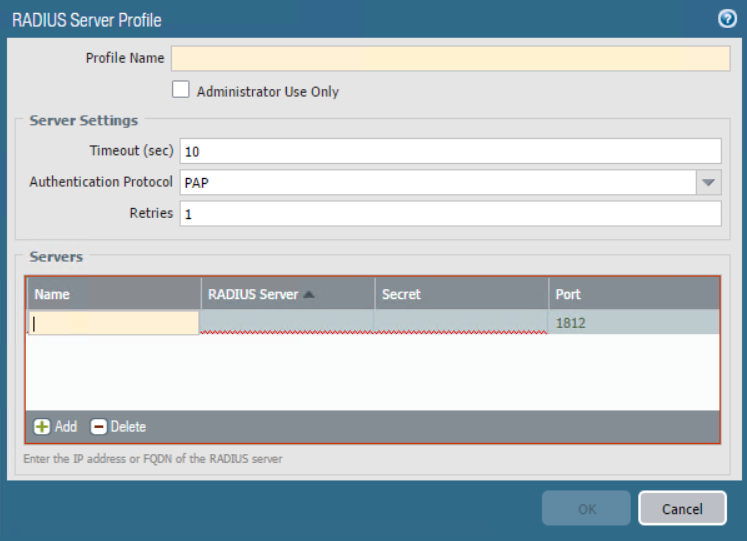
Navigate to Servers and click Add to add a RADIUS server profile.
-
Provide the following information:
-
Name: Enter a descriptive name to identify this RADIUS server, such as Delinea RADIUS.
-
RADIUS Server: The hostname or IP address of the Delinea Connector.
-
Secret: The Client Secret that you entered in the RADIUS client settings in the DelineaAdmin Portal.
-
Port: 1812
-
-
Click OK to save the profile.
-
-
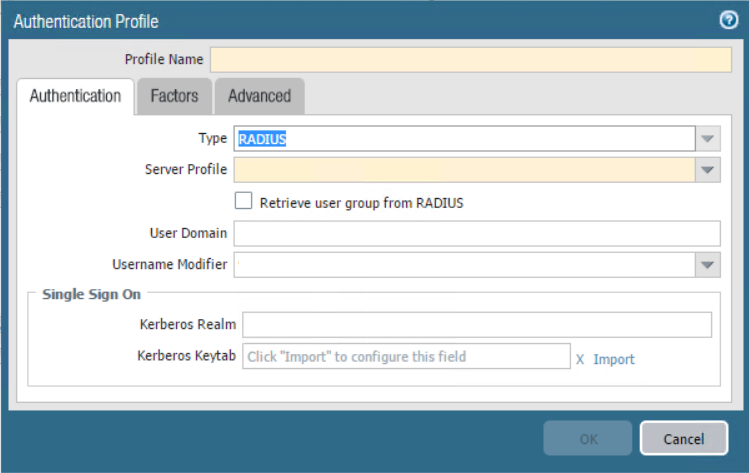
Create an authentication profile.
-
Navigate to Device, Authentication Profile, click Add to enter a Name for the profile.
The authentication profile name cannot contain any spaces (for example, CentrifyAuth).
-
In the Authentication tab, select RADIUS from the Type drop-down menu.
-
Select the Server Profile you created for accessing your RADIUS server (for example, Delinea RADIUS).
-
Click OK to save the authentication profile.
-
-
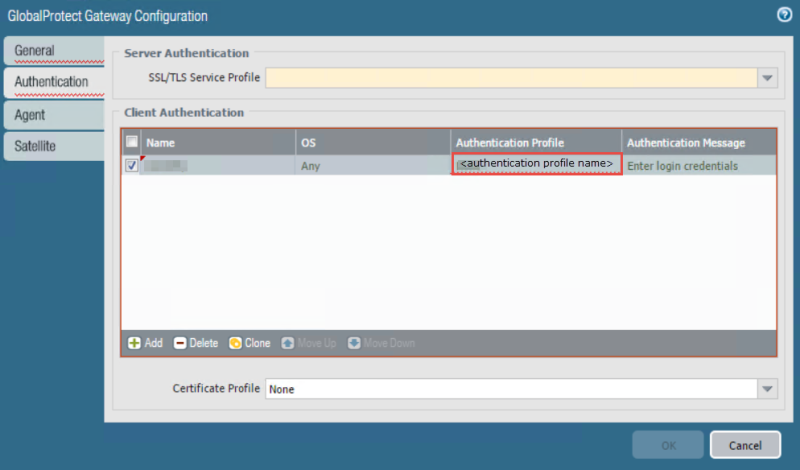
Configure the gateway(s).
-
Click the __Network__tab and select GlobalProtect > Gateways and select a configuration or Add one.
-
Click the Authentication tab, and then click Add.
-
Click the Authentication Profile field and from the drop down menu select the authentication profile you just created (for example, CentrifyAuth).
-
Enter an Authentication Message to let users know what authentication credentials to use.
-
Click OK to save the configuration.
-
-
Configure authentication override settings to accept secure, encrypted cookies.
-
Click Network > GlobalProtect > Portals, then open GlobalProtect Portal Configuration.
-
Click the Agent tab, then open OnDemand-Profile.
-
Click the Authentication tab, then select the following options:
-
Generate cookie for authentication override
-
Accept cookie for authentication override
-
-
-
Set the global-protect timeout on the firewall device to 120 seconds.
-
Connect to the firewall device via SSH.
-
Enter the following commands:
\> configure\# set deviceconfig setting global-protect timeout 120\# commit\# exit
-