Creating a Port Scan Discovery Profile
Port scanning probes your specified system and uses the defined account credentials to log-in to the system and determine the system type (IBM i, HP NonStop OS, Windows computers, servers, etc.). If you do not specify an account or specifies one with insufficient permissions, the Privileged Access Service can only do a basic discovery. See Adding Accounts for Port Scan Discovery for more information about the discovery accounts.
To create a port scan system profile:
-
Click Discovery > Systems and Accounts > Profiles.
-
Click the Add Profile button.
-
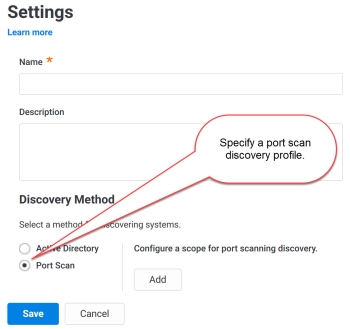
Enter a name for the profile.
-
(Optional) Enter a description for the profile.
-
Select Port Scan in the discovery method area.
-
Click the Add button associated with the "Configure a scope for port scanning discovery" area.
-
The “Discovery Scope” window opens.
-
-
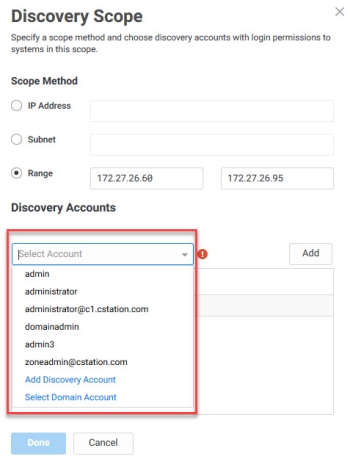
Enter either an IP address, subnet (in CIDR format), or IP address range.
-
Port scanning identifies the connectors for discovery based on the system subnet mapping you have configured on the Admin Portal > Settings >Resources> System Subnet Mapping page. If you do not specify any subnets, then Privileged Access Service uses all connectors by default. Contact Delinea Support to specify the use of specific connectors without configuring system subnets.
-
(Optional) Click the Add button to select an existing account to be used for port scanning.
-
If you have added the accounts using the Discovery > Discovery Accounts option in the System area, then you will see them in this drop-down list.
-
Alternatively, you can specify a discovery account or a domain account ad hoc by selecting Add Discovery Account or Select Domain Account from the drop-down list. The domain account you specify here can be a managed account. See Using Managed or Unmanaged Accounts for more info on managed accounts.
-
A detailed discovery (to get more information, such as the accounts associated with IIS application pools, services, and scheduled tasks), requires one of the following credentials:
-
- You specify an account with local administrative rights.
- You specify domain accounts that are local domain administrators or domain admin groups that have local administrative rights on each of the domain-joined Windows systems
-
If you run port scan discovery without local administrative rights or with a domain account that does not meet the above requirement, then Privileged Access Service can only perform a basic discovery -- discover only the system type (UNIX/LINUX system or Windows system).
-
Click the associated Add button.
-
Click Done.
-
-
Select the system types you want the discovery to find.
-
The default is to discover all system types (Windows Computers, Unix Computers , IBM i, and HP NonStop OS) and Network Devices selected.
-
(Optional) Select the Import systems detected without known credentials check box if you want Privileged Access Service to discover and import systems even if the required credentials are not provided.
-
(Optional and only available if you enable the above check box) Select the Ignore if system name not found in DNS check box if you want Privileged Access Service to not discover and import the systems whose names are not found in DNS.
-
(Optional) Specify the default DNS domains by clicking the Add button associated with the “DNS Suffix Search List” field.
-
These domains are used to find the fully qualified domain name (FQDN) in the DNS. Privileged Access Service logs-in to the system to discover the system name, type, and FQDN. If a system does not report on its FQDN, Privileged Access Service uses this list to find the FQDN in the DNS.
-
Click Save.
You can now specify the actions you want performed as part of the discovery.