Using Local Windows-based Clients
As an alternative to using the default web‑based client, you can configure remote connections to use a local Windows-based client or native UNIX client. By configuring remote connections to use a local Windows-based client or a native client, you can use a familiar interface you are comfortable with for performing remote operations. However, these clients and remote connections still require you to enable the SSH or RDP gateway service for at least one connector before you can log on remotely to target systems using secure shell or remote desktop sessions. If the gateway service is available for a connector in your infrastructure and you have appropriate permissions, you can log on either by using stored account information or by manually specifying a user name and password. For information about how to configure a local Windows-based client instead of the default web-based browser for remote connections, see Selecting User Preferences For information about how to use a native UNIX client for remote connections, see "Accessing remote systems." For information about adding the gateway service to a connector, see Selecting Connector Services
If you decide to use a local Windows-based client for remote connections, you have the option to download and install a separate "client launcher" application that is part of the Remote Access Kit software package. The Remote Access Kit enables you to execute the command to open the local client and pass arguments to it without manually typing the command and its arguments every time you open a new session. If you download the Remote Access Kit and trust the website detected for the current cloud server, Privileged Access Service adds the host name for the current cloud server to a list of trusted websites for launching the local client. This information is stored the HostWhiteList registry key on the computer that hosts the local Windows-based client. You can add other host names to the list of trusted websites or remove host names from the list to ensure the arguments used to invoke the local client are only passed from the secure websites that you trust.
The following diagram illustrates the basic flow when you use a local Windows-based client with the client launcher.
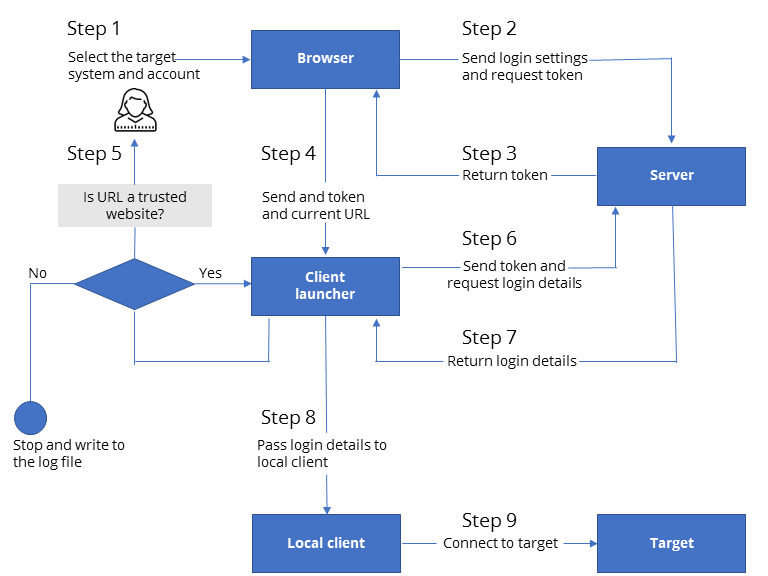
As illustrated in the diagram, selecting a target and account for remote access in the Admin Portal sends initial login information and the request for a token to the server that handles process requests (REST call: GetAuthToken). The server returns the authentication token, which is cached by the Admin Portal, and sent with the login information and current URL to the client launcher. The client launcher checks the \HKEY_CURRENT_USER\Software\Centrify\CpsRun\HostWhiteList registry key to determine whether the URL is listed as a trusted website. If the URL isn't listed but the user specifies it is a trusted website, the client launcher requests additional login details (REST call: GetLoginDetails) from the server and passes the login details to a local client—such as PuTTY or a remote Session Host—to connect to the target system.
You can remove a trusted website for the client launcher by manually editing the registry entry on the computer that hosts the local client. If you attempt to add a trusted website and don’t see confirmation that the operation was successful, it might indicate that there is a security issue, such as invalid or expired credentials. For more information about specifying URLs for trusted websites and the success or failure of the operation, see the client launcher log file. By default, the log file log.txt is found in the Program Data\Centrfy\CPS Run Log folder.
Keep in mind that manually editing the registry can result in making a system unstable or unusable if not done properly, Only experienced administrators should modify registry keys directly.
Changing Display Size for Windows-based Client Sessions
You can set a user preference to specify the default window size for remote sessions to adjust to different display requirements. For example, if you are viewing sessions using a tablet or a computer with a small monitor you might want to change the display size to suit a smaller screen than when you are working with a full-scale desktop monitor.
If you have administrative rights for the Privileged Access Service, you can change the window size for remote sessions from the Admin Portal by setting a user preference.
For more information about changing the window size for Windows-based client sessions, see Selecting User Preferences
Downloading and Testing the Remote Access Kit
If you want to use the local Windows-based client for remote sessions, you can download and install the Remote Access Kit for Windows computers. After you have downloaded and installed the software package or if you need to verify access to it on a specific local computer, you can test for the availability of the program before you attempt to open sessions using the local Windows-based client.
if you have administrative rights for the Privileged Access Service, you can download, install, and test access to the remote access kit from the Admin Portal by setting a user preference.
For more information about changing the window size for Windows-based client sessions, see Selecting User Preferences
To download and install the Remote Access Kit:
- In the Admin Portal, click Settings, then click Resources to display the settings available for the Infrastructure Services.
- Click User Preferences.
- Select the local Windows-based client to use for SSH and RDP sessions.
- Click Download to download the Remote Access Kit software package that contains the local client launcher.
- Open the downloaded file and follow the prompts displayed to install the software.
- Click Save.
- Downloading the installing the Remote Access Kit automatically downloads the RDP file for launching a Windows Remote Desktop Connection.
- If you want to immediately verify installation on the local computer, select I have installed the Remote Access Kit on this computer then click Test.
- Click Open Delinea Remote Access Kit to complete verification.
- If you trust the website URL for the current cloud server, click Yes.
If you do not download and install the Remote Access Kit on the local computer, review the instructions displayed for information about how to start sessions using the local Windows-based client with command-line arguments.
To test for the availability of the Remote Access Kit:
- In the Admin Portal, click Settings, then click Resources to display the settings available for the Infrastructure Services.
- Click User Preferences.
- Select I have installed the Remote Access Kit on this computer.
- Click Test.
- If you have installed the Remote Access Kit on the local computer, you are prompted to open it.
- Click Open Delinea Remote Access Kit to complete verification.
- If you trust the website URL for the current cloud server, click Yes.
If you do not download and install the Remote Access Kit on the local computer, review the instructions displayed for information about how to start sessions using the local Windows-based client with command-line arguments.