Adding Systems Using Enrollment Codes
If you want to automate the process of adding new systems to the Privileged Access Service, you can do so by creating and using a randomly-generated enrollment code. Enrollment codes enable you to automatically join multiple computers matching certain criteria to the Privileged Access Service without specifying user credentials. Without an enrollment code, adding new computers would require you to provide credentials to verify that you have permission to perform the operation or hard-coding a user name and password in an enrollment automation script.
To Automate Enrollment and Avoid Storing any User Names or Passwords
in automation scripts, you can create one or more enrollment codes that specify a domain pattern to identify the computers you want to add. You can also specify how many times the code can be used, that is, the maximum number of computers the code can be used to add, and when the enrollment code should expire.
Some things to remember about enrollment and enrollment codes:
-
Enrollment codes can only be used to add computers to the Privileged Access
Service and don’t provide access to any sensitive information or grant any
elevated privileges.
-
You must be a member of the System Administrator role to generate enrollment
codes.
-
You must be in a role with the System Enrollment administrative right to add
computers to the Privileged Access Service when using a user name and
password.
-
You can use an enrollment code to add the computer without supplying a user
name and password.
In most cases, adding a computer to the Privileged Access Service makes you the owner of the computer object with permission to delete the computer account and the ability to delegate permissions to other users. However, if you add computers using an enrollment code, the built-in SYSTEM account becomes the owner of the computer object. Only members of the System Administrator role can grant permissions on computers owned by the SYSTEM account.
For more information about running the cenroll command and other command-line programs, see the Linux man pages or Windows command-line help installed with the software.
To Automate the Process of Adding Computers
-
In the Admin Portal, click Settings, then click Enrollment to display available settings.
-
Click Enrollment Codes.
-
Click Add.
-
Select the details to be used to generate the enrollment code.
-
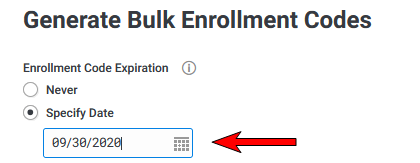
Set an expiration date if the code should expire.
-
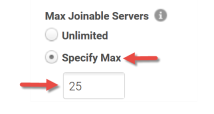
Specify the maximum number of computers that can be enrolled if there should be a limit.
-
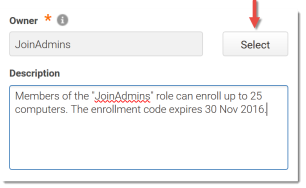
For the Owner, click Select to select a role to control who will own the computers being added.
-
(Optional) Enter a description for the enrollment code.
If you click Save, an enrollment code is generated without any IP address restrictions or System Set configuration. If you want to limitenrollment to computers matching certain IP patterns, you should click IP Range Restriction before clicking Save.
-
-
Click IP Range Restrictions to specify the IP addresses where the code is valid.
Only computers with a client installed and an IP address within the ranges specified can be added to the Privileged Access Service using the enrollment code.
-
Click Import Corporate IP Range to automatically add your existing network IP range or click Add to specify IP ranges manually.
You can also add addresses after importing your corporate IP addresses. For example, you might want to add IP addresses that are outside of the corporate firewall.
-
Click System Sets Allowed to associate a group of systems with attributes in common (system set) to an enrollment code.
- Select the check box to allow system sets to be associated with an enrollment code.
- Select No Restrictions to allow any system set to be enrolled using
an enrollment code or select Specified System Sets only to select
which system sets are allowed for enrollment using an enrollment code.
If you select to only allow Specified system sets, you need to select
the system sets that are allowed from the drop down menu or add them to
list.
-
Click Role Membership to specify which roles the system service account will be assigned to after enrollment.
Preassigning roles to enrollment codes is particularly useful when using delegated machine credentials; preassigned roles allow you to automatically configure the machine accounts with the appropriate permissions.
- Click Add to open the Select Role dialog box.
- Select the desired role(s) and click Add to return to the Role Membership information.
-
Click Save to generate the enrollment code, then click Copy to copy it to the clipboard.
-
Download the Delinea Client package, if necessary.
-
Create a script that installs the Delinea Client software package, registers the computer, and enables secure shell (ssh) connections.
For example, you might create a simple script similar to this:
Copy#!/bin/bash
rpm -iv ftp://ftp.centrify.com/CentrifyCC-1.0.0-121.x86_64.rpm
sudo /usr/share/centrifycc/bin/cenroll --tenant aak0298.centrify.com \
--code A12B3CD-EF45-6789-G01H-123456789012 \
--features aapm,agentauth,dmc \
--agentauth Authorized
sed -i '/^PasswordAuthentication no/d' /etc/ssh/sshd_config
/etc/init.d/sshd restartIn this example, the enrollment code (specified by the --code parameter in the above example) includes the rules for expiration, maximum number ofservers allowed to register, the role that owns the registered server, and the IP restrictions you have defined.
For more information about the Delinea Client and enrollment, see the following topics: