System Hardening
Things to Know Before You Begin
The following is intended for Windows Server systems only. It assumes you have
completed the installation steps as detailed in:
-
installed Scalable Privileged Access Service successfully.
-
the operating system has been hardened in accordance with either:
-
the Center for Internet Security Windows Server (Level 1 benchmarks).
The following should be used in conjunction with any applicable organizational
security policies and hardening guidelines. General hardening of the Windows
Server instances should be performed before applying the more detailed steps
below. If there are conflicts between the following and organizational policy
documents, they should be raised with the internal security team for assessment
and resolution.
As a general rule, the most restrictive policy that allows for the desired operation of Hyper-Scalable PAS without adversely effecting it or any other required element of Windows functionality should be implemented.
All Hyper-Scalable PAS components, with the exception of the management node, should be installed on dedicated servers. The servers should not serve any other purpose than that required by the Hyper-Scalable PAS solution. The system considered to be direct components of the Hyper-Scalable PAS solution are as follows:
-
PAS
-
Connectors
Windows Operating System Hardening
For Microsoft Windows Server Operating Systems hardening, refer to the Center
for Internet Security Level 1 Benchmarks for Windows Server at
https://www.cisecurity.org/benchmark/microsoft_windows_server/.
Applying Windows Operating System Updates
Windows updates should be applied in a timely fashion in accordance with the
organizational security policy. These may be applied manually or automatically
using the Windows Server Update Service (WSUS). Configuration of WSUS is beyond
the scope of this document and will also depend on the organization’s update
strategy. Microsoft provides comprehensive documentation for WSUS and should be
consulted as needed.
Using Anti-virus Software
It is recommended consult with your company IT and/or compliance departments to
discuss anti-virus needs.
Disabling Network Protocols
The following networking components are not required by Hyper-Scalable PAS or
the supporting Windows infrastructure and can therefore be safely disabled on
all network adapters:
-
File and Printer Sharing for Microsoft Networks.
-
QoS Packer Scheduler.
-
Microsoft LLDP Protocol Driver.
-
Internet Protocol Version 6 (TCP/IPv6).
-
Link-Layer Topology Discovery Responder.
-
Link-Layer-Topology Discovery Mapper I/O Driver.
This should leave only the following networking components enabled:
-
Internet Protocol Version 4 (TCP/IPv4).
-
Client for Microsoft Networks.
The following image illustrates how the network adapter properties should look
following these changes:
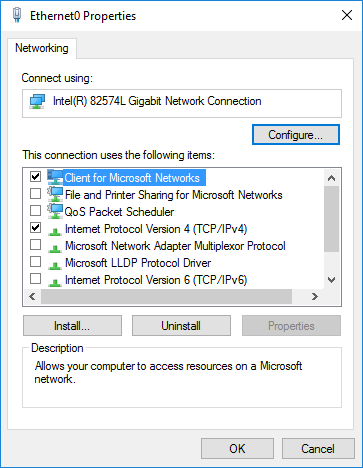
Network Adaptor Properties
Configuring Windows Logging and Auditing
By default, Windows Server does not log all events of potential interest. Unless
organizational policies mandate them and they have previously been enabled,
perform the following steps:
-
Go to Start Menu > Administrative Tools > Group Policy
Management. In the left pane, navigate to Forest > Domains >
Domain Name. Expand it. -
If it does not already exist, create a new Group Policy Object called
“Delinea”by right-clicking on Domain Name and selecting Create a GPO in
this domain and link it here…. -
Right-click on the “Delinea”policy object.
-
Click Edit in the context menu. It shows Group Policy Management
Editor. Navigate to Computer Configuration > Policies → Windows
Settings > Security Settings > Advanced Audit Policy
Configuration > Audit Policies. It lists all audit policies in the
right pane. Here, enable the following policies for both “Successful” and
“Failed” events: -
Configure the following keys as follows:
|
Key |
Value |
|---|---|
|
Logon/Logoff → Audit Logoff |
Success & Failure |
|
Logon/Logoff → Audit Logon |
Success & Failure |
|
Object Access → Audit Detailed File Share |
Success & Failure |
|
Object Access → Audit File Share |
Success & Failure |
|
Object Access → Audit File System |
Success & Failure |
|
Object Access → Audit Registry |
Success & Failure |
|
Object Access → Audit Handle Manipulation |
Success & Failure |
After making the above changes open an Administrative command prompt and
enter gpupdate/force.
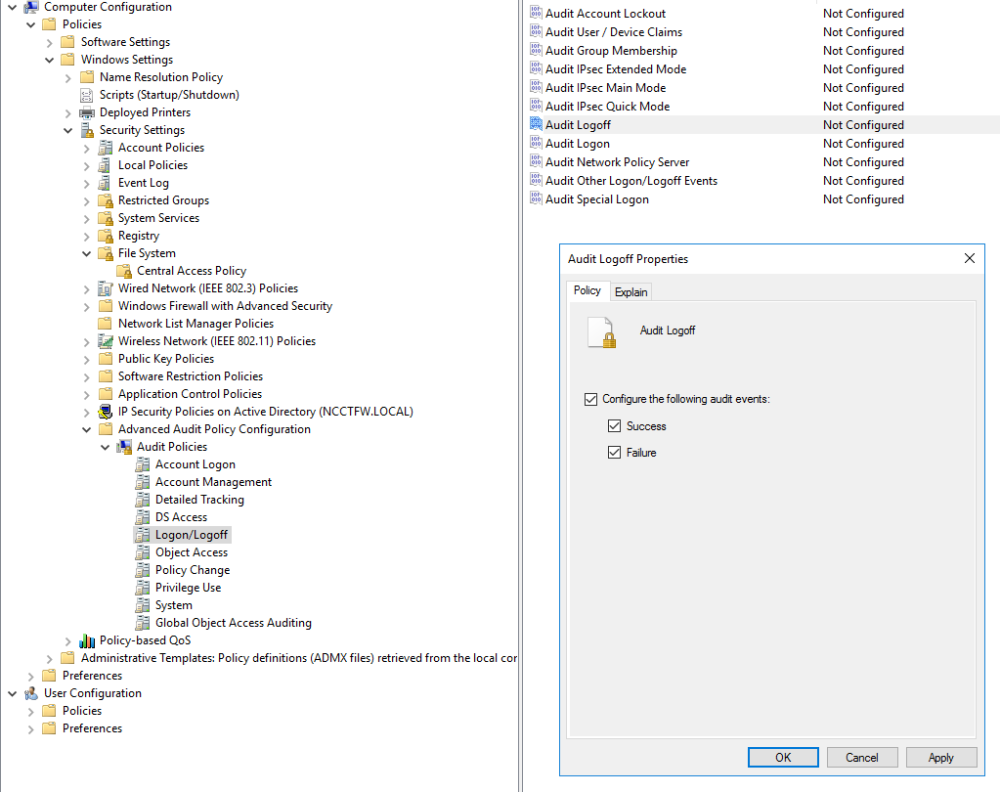
Audit Logoff
Verifying Firewall Configuration
During the installation process, the Windows Firewall is correctly configured to
allow Hyper-Scalable PAS components to operate correctly. No further steps
should be required. If a firewall other than the Windows Firewall is in use, it
must be configured according to the following values:

Disabling Default Accounts
Disabling Default Accounts
The local administrator account should be disabled to prevent its use. Before
you do this, ensure you have another administrative account configured.
To disable local administrator account, enter the following command into an
administrative command prompt:
net user administrator /active:no
The same steps should be taken for the "Guest" and "DefaultAccount" accounts.
To list the accounts present on a server, enter the following command into an
administrative command prompt:
net users
To learn if a given account is active or not, enter the following command into
an administrative command prompt:
net user <account name>
For instance, net user guest should return output of the following form:
Note the line "Account active No."
C:\Windowssystem32\>net user guest
User name Guest
Full Name
Comment Built-in account for guest access to the computer/domain
User's comment
Country code 000 (System Default)
Account active No
Account expires Never
Password last set 14/09/2018 15:41:54
Password expires Never
Password changeable 14/09/2018 15:41:54
Password required No
User may change password No
Workstations allowed All
Logon script
User profile
Home directory
Last logon Never
Logon hours allowed All
Local Group Memberships *Guests
Global Group memberships *None
The command completed successfully.
Disabling Unnecessary Default Shares in Windows
To disable the share, perform the following steps:
Disable default shares on all Hyper-Scalable PAS servers by running regedit
(Windows key + R → regedit) and setting the value of the following registry key
to (REG_DWORD) 0:
HKEY_LOCAL_MACHINE\SYSTEM\CurrentControlSet\Services\LanmanServer\Parameters
AutoShareServer
Create the AutoShareServer key if it does not already exist .
Restart the server.
To confirm the change run the following in a command prompt: net share
The result should be as follows:
C:\>net share
Share name Resource Remark
IPC$ Remote IPC
The command completed successfully.
Windows Internet Information Server (IIS) Hardening
Perform the following steps:
-
Remove all unnecessary IIS Application Pools on all Hyper-Scalable PAS
servers. -
Start Internet Information Services (IIS) Manager (Windows Key + R →
inetmgr). -
Open the Application Pools leaf under the server being managed and remove
all application pools apart from the DefaultAppPool and the Delinea entry.
The results should appear as follows:

-
Restart the server.
Securing Hyper-Scalable PAS
Understanding Hyper-Scalable PAS User Password Policy
Due to the sensitivity of the information and functionality handled by a
Hyper-Scalable PAS implementation, the standard organizational password policies
might not provide adequate protection. The following settings are recommended
for Hyper-Scalable PAS users.
-
To apply these polices, log into the Admin Portal and navigate to Core
Services → Policies → Add Policy Set. -
Under User Security Policies → Password Settings set the values
above as follows:
|
Setting |
Recommendation |
|---|---|
|
Minimum password length |
16 characters |
|
Maximum password age |
31 days |
|
Password history |
20 |
|
Require at least one digit |
yes |
|
Require at least one upper case and one lower case letter |
yes |
|
Require at least one symbol |
yes |
|
Maximum consecutive bad password attempts allowed within window |
3 |
|
Capture window for consecutive bad password attempts |
10 |
|
Lockout duration before password re-attempt allowed |
30 |
|
Password expiration notification |
7 |
|
Escalated password expiration notification |
24 |
|
Enable password expiration notification on enrolled devices |
yes |
|
Show password complexity requirements when entering a new password |
yes |
Alternatively, if there is an available OAUTH or RADIUS solution in place, with
appropriate password policies, these may be configured in the same place.

Password Profiles
Endpoint and Infrastructure Password Profiles
The following password policy settings are recommended to enforce a
strong level of protection for endpoints and infrastructure using Hyper-scalable
PAS.
-
To apply these policies, log into the Admin Portal and navigate to
Settings → Users > Password Profiles → Add.

-
Create new profiles with the following values:
|
Setting |
Recommendation |
|---|---|
|
Minimum password length |
12 |
|
Maximum password length |
32 (or greater) |
|
At least one lower-case alpha character |
Checked |
|
At least one upper-case alpha character |
Checked |
|
At least one digit |
Checked |
|
No consecutive repeated characters |
Checked |
|
At least one special character |
Checked |
|
Restrict number of character occurrences |
Checked (3) |
|
Special characters |
!#$%&()*+,-./:;<=>?@[\]\^_{|}~ |
|
A leading alpha or alphanumeric character |
Unchecked |
|
A trailing alpha or alphanumeric character |
Unchecked |
|
Min number of alpha characters |
3 |
|
Min number of non-alpha characters |
3 |
Setting Idle User Timeout
Users should be timed out and required to re-authenticate after a period of
inactivity exceeding five minutes. This setting can be configured through the
Admin portal by:
-
Navigating to Settings → Users → Idle User Session Timeout.
-
Automatically Logout Idle Users should be checked and a value of 5
entered for the Minutes of inactivity before idle users are logged out
setting.
-
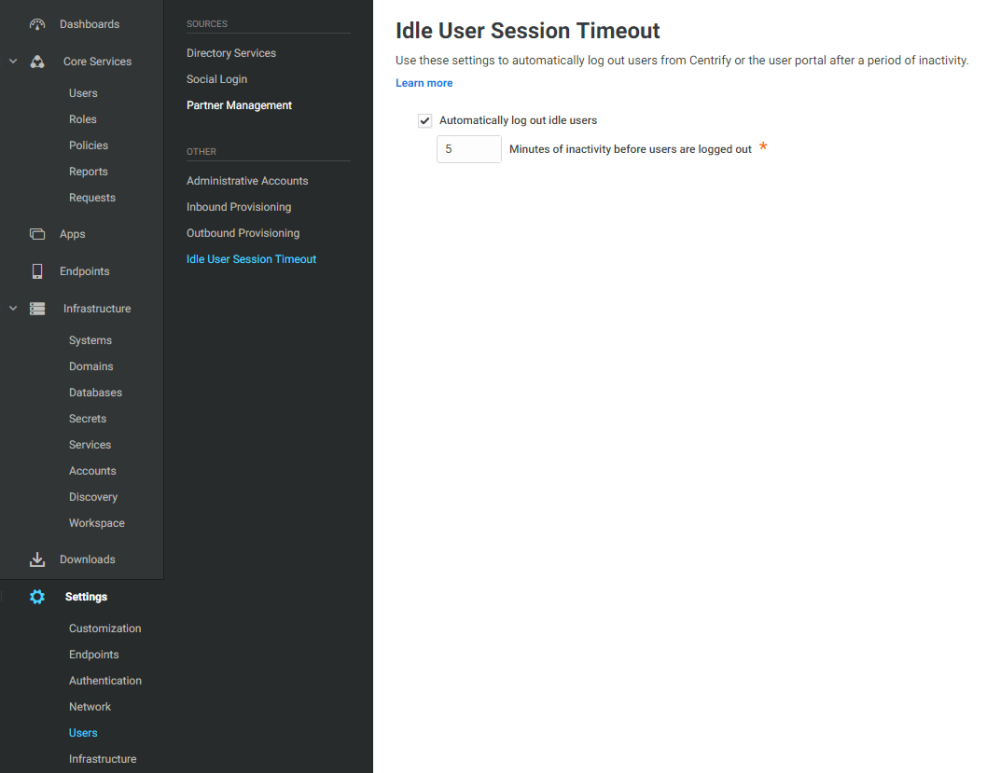
-
Idle User Session Timeout
Reviewing Infrastructure Security Settings
To enforce a strong level of protection for endpoints and infrastructure using
Hyper-Scalable PAS the following settings password policy settings are
recommended:
|
Setting |
Recommendation |
|---|---|
|
Allow multiple password checkouts |
Unchecked |
|
Enable periodic password history clean-up at specified interval |
Check and set to 90 |
|
Enable periodic password rotation at specified interval |
Check and set to 90 |
|
Default account password checkout lifetime |
60 |
|
Minimum password age |
0 |
|
SSH Custom Banner |
Checked and set according to organizational security policy |
To apply these policies, log into the Admin Portal and navigate to Settings
→ Authentication → SecuritySettings.

Windows Server Update Services (WSUS)
Microsoft pushes updates and reboots to your systems. For this reason, it is
strongly recommended you follow the best practice of running a Windows Server
Update Services (WSUS) for your installation cluster. This allows you control of
the updates. Configure as follows:
-
Configure WSUS to only install upon administrator approval.
-
Automatic updates must be disabled.
-
Deploy new nodes with the latest operating system patches and with the
current deployment package. Then, decommission the nodes in need of an
operating system update.
For more information on WSUS, see Windows Server Update Services
(WSUS).