Working with Privilege Elevation
Privilege elevation provides a way for users to log in as themselves with limited privilege and then request to elevate their access in order to perform privileged operations. Users can then provide additional MFA credentials to continue and run the privileged commands or applications.
By using privilege elevation, you grant access based on Zero Trust principles and then grant privileged access only when needed for a specific operation.
How Privilege Elevation Works
Privilege elevation works on both Windows and Linux systems, with some slight differences.
An Example of How Privilege Elevation Works on Windows Systems
Offline Privilege Elevation isn't supported on Windows.
-
The admin configures the Windows system so that the
bob@acme.comaccount has privilege elevation access and sets a policy that anyone logging in Monday through Friday needs to provide a password when running privileged applications or commands. -
User
bob@acme.comlogs on to a Windows system on a Tuesday with just enough privilege to do normal tasks. -
Bob needs to run some PowerShell scripts as Administrator. He opens a PowerShell Administrator window.
An elevation consent dialog box displays.
-
Bob selects Run with Privilege.
-
Because of the privilege elevation policy, the service prompts him for his password.
After the user enters the correct, additional authentication credentials, he can run the privileged application.
An Example of How Privilege Elevation Works on Linux Systems
For offline Privilege Elevation to work on Linux, set the option in /etc/sudoers to timestamp_timeout=0. This impacts default behavior where a user will always have to reauthorize, but it allows our offline login to work.
-
The admin configures the Linux system so that the
bob@acme.comaccount has privilege elevation access and sets a policy that anyone logging in Monday through Friday needs to provide a password when running privileged applications or commands. -
User
bob@acme.comlogs on to a Linux system on a Tuesday with just enough privilege to do normal tasks. -
Bob needs to run
cdiagas root, so at the terminal, he enters the following command:sudo cdiag -
Because of the privilege elevation policy, the service prompts Bob to enter his password.
After the user enters the correct, additional authentication credentials, he can run the privileged command.
Using Sudo Plugin to Run Commands as Another User
The sudo plugin runs a command as another cloud or local user on the linux system.
This feature is for Linux only.
- In the Admin Portal, go to Settings> Resources > Privilege Elevation Command.
- You can add a new command or select a current command to edit or change it.
- Once you are in a new command or modifying an existing command, click the Run as User box.
-
Add the username you'll use to run as a local user or a cloud user:
- To run as a local user input yourusername@localhost.
- To run as a cloud user, specify the UPN name and user@suffix.
After following the above steps your request to run a command as a different user goes to the cloud service. The following outcomes can happen:
- If the command is allowed, the command runs on the system.
- If the command is not allowed but workflow is enabled, then you can send a workflow request.
- If the command is not allowed to run and workflow is not enabled, then a message will appear saying that you are not allowed to run that command as the runas user.
You can now, as User A, run a command as User B according to the policy rules.
Privilege Elevation Requirements
In order to have your users be able to use privilege elevation on a system, here are the requirements:
-
Administrative rights: You the administrator need to have these permissions:
- Privilege Elevation Management administrative rights — (assigned to your role) in order to grant privilege elevation access to others. For details, see Admin Portal administrative rights
- Add Privilege Elevation permission — this can be set either on a specific system, a set of systems, or globally.
- Enrollment: Install and enroll the Cloud Client on the desired systems. For details, see Installing and Using the Cloud Client for Windows and Enrolling and Managing Computers Using the Cloud Client for Linux.
-
System permissions: Enable the Agent Auth (client-based login) feature for the affected systems. For details, see Setting system-specific permissions.
- The Server Suite Agent cannot be installed on the same computer; if the Server Suite Agent is also installed, you can't enable Agent Auth.
- Privilege elevation access: Configure privilege elevation access to users, roles, or groups for a specific system, a set of systems, or all systems (see the procedures below)
- Force MFA policies: If desired, configure privilege elevation authentication policy settings to enforce MFA at elevation—when users go to run an privileged application or command on a designated system. You can set the policy for a single system, a set, or for all systems. For details, see Setting system-specific policies.
- Commands and applications with elevated privilege: To control access to commands or applications with elevated privilege, define the commands in the global Settings > Resources > Privilege Elevation Command page. For details, see Specifying Privilege Elevation Commands and Applications.
If you try to elevate privileges for a user whose account name has 16 or more characters in it, privilege elevation fails with an error.
Configuring Privilege Elevation Access
There are a few tasks you perform when configuring privilege elevation access:
- Specifying Privilege Elevation Commands and Applications. You can control access to either all commands and applications on systems or limit it to just one or more commands or applications. You specify different sets of commands or applications for Windows and Linux systems.
- Granting Privilege Elevation Access to Users (below) so that people can request applications or commands with elevated privilege on the specified systems.
- Configuring Privilege Elevation Challenge Rules (below) that specify how people will get access to applications or commands with elevated privilege. The rules specify what conditions need to be met and the authentication profiles say how to authenticate the users under those conditions.
Granting Privilege Elevation Access to Users
To grant privilege elevation access to users, groups, or roles
-
Navigate to the Privilege Elevation tab for the systems that you want to grant people access to:
- All systems (global): go to Settings > Resources > Security > Global Privilege Elevation.
- A set of systems: In the Systems view, select the desired set and click the menu item (...) and choose Modify, and then click Member Privilege Elevation.
- One system: In the Systems view, open the desired system, and then click Privilege Elevation.
-
Click Add.
The Search Command or Application screen displays and includes the commands that apply to the affected system(s). For example, if you selected only Windows systems, then only Windows command options display.
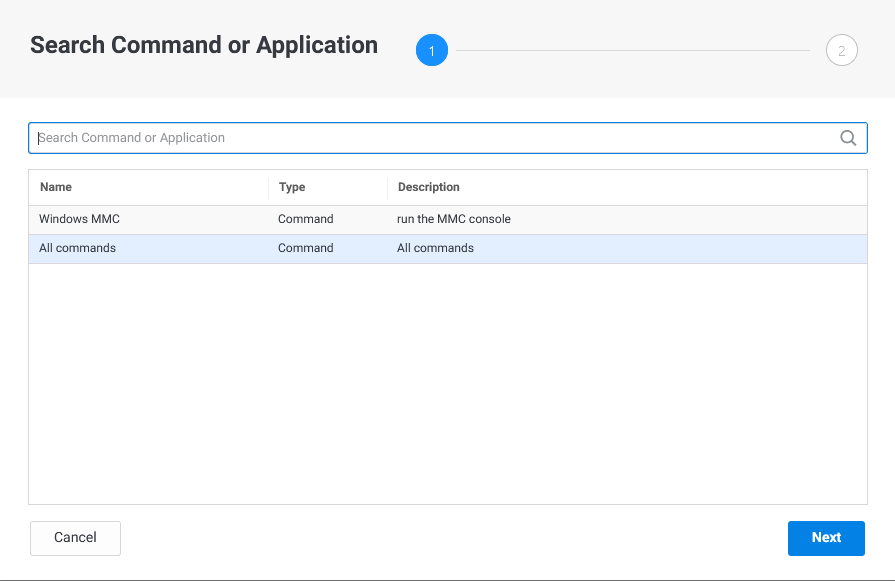
-
Select the commands you want to grant access to.
If you select All Commands the user will be able to perform any commands on the target system with elevated privileges.
CopyClick __Next__ to continue. -
Search for or select the users, groups, or roles that you want to grant access to, select them in the results list, and click Add.
The users, groups, or roles that you added now display in the list on the Privilege Elevation tab. Users, groups, or roles added here must have the Agent Auth permission on the affected system.
If you specify permissions at the set or global level, you can see the inherited permissions when you view a single system affected by those settings.
The ability to configure a valid date or time span when the privilege elevation applies is coming in a later release. For now, ignore the Starts and Expires columns.
-
If desired, you can select Bypass MFA for any of the users, groups, or roles that you've granted privilege elevation access to. Selecting this option grants them access but they don't have to provide any additional authentication credentials.
-
Click Save to save your changes.
Your designated users can now run applications with elevated privilege on the designated systems.
Configuring Privilege Elevation Challenge Rules
To configure privilege elevation challenge rules and default authentication profiles
-
Open the policy tab for the desired systems:
- One system: In the Systems area, open the desired system, then click the Policy tab.
- Some or all systems: In the Policies area, open or edit a policy set.
-
In the policy, navigate to Resources > Systems, and then the Privilege Elevation Challenge Rules section of the page.
-
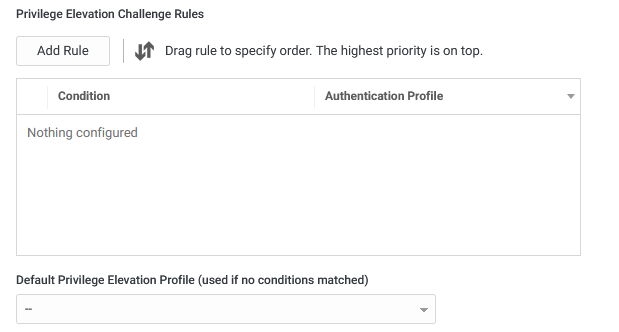
In the Privilege Elevation Challenge Rules area, add rules that specify for a particular condition, apply a particular authentication profile.
-
For the Default Privilege Elevation Profile, specify which authentication profile applies if none of the conditions in the challenge rules are met.
-
Click Save to save your changes.
The challenge rules and default authentication profile changes for privilege elevation take effect when the affected users next log try to run an application with privilege on an affected system.