Managing Application Access Requests
In most cases, you give users access to applications by assigning them to one or more specific roles. You can also selectively define a “request and approval” workflow that gives specific users or members of specific roles the ability to approve or reject access requests for specific applications. You can configure the “request and approval” workflow for any of the individual web applications for which you want to manage access requests.
By defining a workflow, users can request access to an application and, if their request is approved, be added to a role with access privileges and see their new application available when they log on to the Admin Portal. A designated “approver” might be a specific user or any member of a specific role. If you configure a role as an approver, the first member to respond to the request is given the authority to approve or reject the request.
Configuring a Request and Approval Workflow
As a member of the sysadmin role or a role with the Role Management administrative right, you can configure roles for all other users. Initially, only the members of the sysadmin role have the ability to enable a “request and approval” workflow and can configure the workflow for selected applications, specify the users or roles with authority to approve access requests, and identify the role or roles to which users will be assigned if their request is approved.
At a high level, the steps involved in configuring a workflow are these:
-
Create one or more roles that can enable a “request and approval” workflow.
-
Create one or more roles that can approve access requests for the applications that have a “request and approval” workflow.
-
Select an application and click Workflow to select the role into which requestor's who are approved will be placed.
-
Select the user or role with authority to approve requests.
If the Requestor’s Manager is the only approver in the approver list and the user has no manager, the request will be approved. If this is not desirable, verify that your users have a manager (refer to Adding Privileged Access Service users for more information) or add other users or roles to the approver list.
Creating Roles for Workflow Administration
The first few steps in configuring the “request and approval” workflow are optional and involve creating one or more roles for users who are allowed to define a “request and approval” workflow for applications and the roles that can approve access requests. These steps are optional because you can choose to only allow members of the sysadmin role to be the users permitted to configure a workflow and members of the sysadmin role can assign approval authority to individual users without creating any approval roles. In most cases, however, creating roles for different sets of users provides greater flexibility and helps to reduce the number of requests left pending an approval.
If you don’t create any intermediary roles with the appropriate administrative rights to enable a workflow, only members of the sysadmin role will be able to configure any “request and approval” workflow you might want to implement.
In most cases, if you are configuring a request and approval workflow for applications, you should create at least one role for users who are allowed to add, modify, or remove applications and who have permission to change which roles are assigned to a specific applications. If you don’t create a role with the Application Management and Role Management rights, only members of the sysadmin role can configure the “request and approval” workflow for applications.
To configure roles that can enable a workflow
-
Log in to Admin Portal.
-
Click Access > Roles.
-
Click Add Role or select an existing role to display the role details.
If you are creating a new role, you must provide at least a unique name for the role.
-
Click Members, then click Add.
-
Type a search string to search for and select users and groups for this role.
-
Click Administrative Rights, then click Add.
-
Select the appropriate rights, then click Add.
For example, if you are creating a role with permission to enable a workflow for access to applications, select Application Management and Role Management. You can select any additional rights you want included in this role, but you must select at least one of the required administrative rights.
-
Click Save to save the role.
Creating Roles for Approvers
You can assign approval authority to individual users. However, in most cases, creating “approver” roles for different sets of users provides greater flexibility and helps to reduce the number of requests left pending an approval. If you don’t create any intermediary roles with the appropriate administrative rights to approve access requests, only members of the sysadmin role will be able to approve access requests. You can follow the same steps described in Creating Roles for Workflow Administration to create roles for approvers.
Keep in mind that if you are creating a role with permission to approve access requests for applications, you should include the Application Management and Role Management rights. You can select any additional rights you want included in this role.
Configuring Workflow
As a member of the sysadmin role or a role with Application Management and Role Management administrative rights, you can configure a request and approval workflow for any application.
For more information, see Managing Application Access Requests.
To configure workflow for applications
-
In Admin Portal, click the Apps tab, then select a specific application for which you want to configure a request and approval workflow.
-
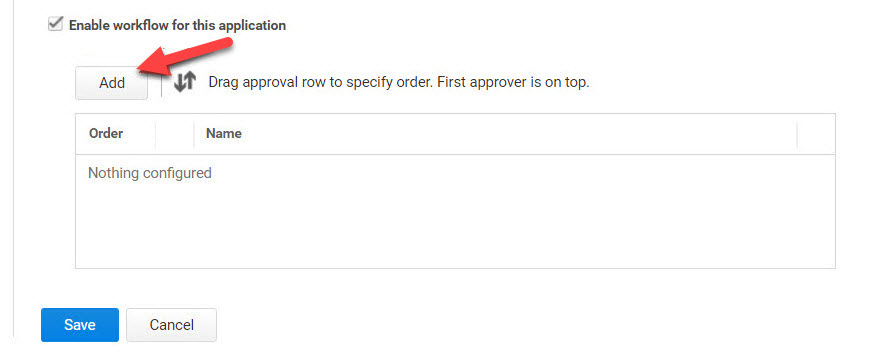
Click Workflow, then select Enable workflow for this application.
-
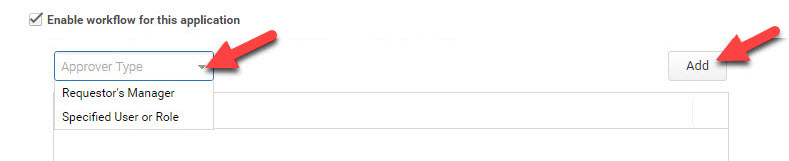
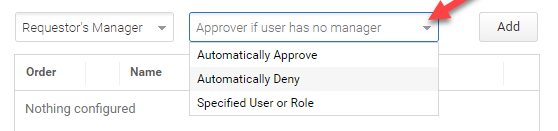
Click Add (above) and select an Approver Type from the list (below).
Note: If you choose Requestor’s Manager, you will also need to choose an option for how to handle the request if the user has no manager:
-
Click Add again to finish adding the approver type to the list.
-
If you want to have more than one approval before access to the app is granted, repeat the previous two steps.
Adding steps can be repeated as many times as desired to reflect the required steps in your approval process.
When multiple approval steps are added, approval is needed from all listed approvers before access is granted. A rejection at any level results in the request being rejected. If the requestor's manager is not known, the request proceeds to the next step as though it had been approved. The next approver in the list is notified that the manager was not known, and therefore there has not yet been any approval or rejection of the request.
The first approver is the only one who can choose which role the user is added to.
If the manager is the first approver and the requester does not have a manager, the requester will be placed into the first role in the role list if the app request is approved.
-
Click Save.
After you have configured the workflow for an application, users can request access to the application through the Admin Portal.
Requesting Access to an Application
Any user who has an account in Privileged Access Service can request access to applications with workflow enabled. No special privileges are required to make requests or approve requests.
To request access to an application
-
Log on to the Admin Portal.
-
Click Apps > Add Web Apps.
-
Type a search string to find the application of interest in the catalog, then right-click or select the check box next to the application.
-
Select Request Launch from the Actions menu.
Only applications with workflow enabled display a Request Launch option.
-
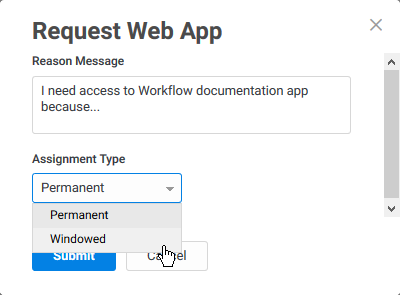
Select either Permanent or Windowed in the Assignment Type drop-down menu.
-
Permanent - if the request is granted, the user will have access to the app for an indefinite time period, or until it is revoked by an administrator.
-
Windowed - if the request is granted, the user will have access to the app for the specified window, or until it is revoked by an administrator.
-
-
(Optional) Select the start and end date and time if the request is for a windowed assignment type.

-
Type the business reason for requesting access to the application, then click Submit to continue.
-
Click Close to close the App Catalog.
An email notification of your request is sent directly to the designated approver. You can click the Requests tab to see the status of your request. You will also receive an email notification when you request is approved or rejected. If your request was approved, the email will include a link to open the Admin Portal.
Viewing Request Status and History
You will only see the Requests tab if you have made a request or approved a request. After you have made or responded to at least one request, you can click the Requests tab to view the status of requests and the history of request activity.
The list of requests includes the following information:
-
Description provides a brief summary of the request indicating the type of access or application requested.
-
Status displays the current status of the request as Pending, Approved, Rejected, or Failed.
You can review the request details to see the reason the request failed. For example, a request might fail if the email address for the approver or requester is invalid. A failed request might also indicate that the time allowed for taking the requested action has expired. For example, assume the request was for permission to use the root account to log on to a resource and the request was approved with a duration of 60 minutes. If the requester did not log on within 60 minutes of the request approval, the request status will display Failed.
-
Posted displays the date and time of the most recent activity for each request.
-
Approver displays the user or role designated for approving access requests if the approval is pending or the specific user who approved or rejected the request if the request has been resolved.
-
Requester displays the user who submitted the request.
-
Latest Log Entry displays the most recent information recorded for the request.
Viewing Request Details
You will only see the Requests tab if you have made a request or approved a request. After you have made or responded to at least one request, you can click the Requests tab to view the status of requests and the history of request activity.
If you are an approver, you can also go directly to Request Details by clicking the link in the email notifying you of the request.
Regardless of the entry point for viewing request details, the request information table displays details appropriate for the current state of the request. For example, you might see the following information:
-
Posted displays the date and time of the most recent activity for each request.
-
Description provides a brief summary of the request indicating the type of access or application requested.
-
Requester displays the user who submitted the request.
-
Requesters Reason displays the business reason provided by the user who submitted the request.
-
Approver displays the user or role designated for approving access requests if the approval is pending or the specific user who approved or rejected the request if the request has been resolved.
-
Status displays the current status of the request as Pending, Approved, Rejected, or Failed.
Depending on the status of the request, you might see the reason the request was rejected or the reason why the request failed.
Responding to Application Access Requests
There are no special privileges required to respond to requests. Anyone with access to the Privileged Access Service can be designated as an approver.
If you have been designated as an approver for requests, you will receive an email notification when requests are received. You can click the View Request link in the email to view the request details. If you are authorized to approve the request and the request is still pending a response, the Request Details displays the options to Approve or Reject the request.
-
Click Approve to approve the request and add the requester to the role selected for user access when the “request and approval” workflow was configured. If you click OK to continue with the approval, the request details are updated with the date and time the request was resolved and the approved status.
-
Click Reject to reject the request and type the reason you are rejecting the request. If you click OK to continue with the rejection, the request details are updated with the reason the request was rejected, the date and time the request was resolved, and the rejected status.
After you respond to the request, the Requests tab is also updated with the latest activity and email is sent to the requester as notification of your response to the request.
To respond to application access requests
-
Access the request details by clicking View Request in the email notification or selecting Access > Requests and then clicking the request in the Admin Portal.
The Approve Request window appears.
-
Click either Approve or Reject to respond to the request.
Approve
Reject
-
Click Approve to approve the request and grant the requester the necessary permissions to the object.
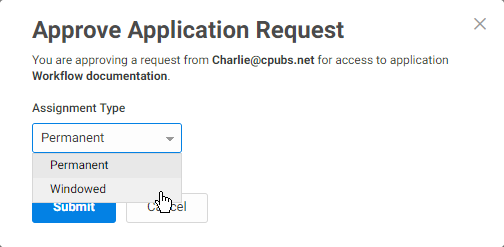
The Approve Request window appears.
-
Select either Permanent or Windowed in the Assignment Type drop-down menu.
-
Permanent - Grants the user access to the app for an indefinite time period, or until you revoke access.
-
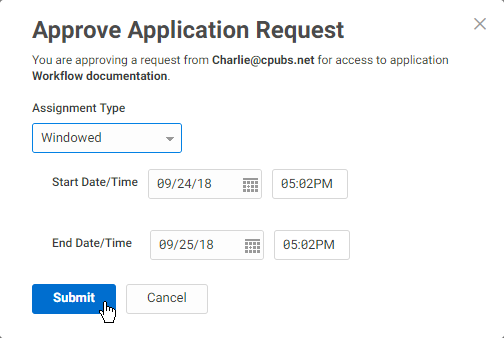
Windowed - Grants the user access to the app for the specified window, or until you revoke access.
-
-
(Optional) Select the start and end date and time if the approval is for a windowed assignment type.
You can select a windowed approval regardless of the assignment type requested by the user. For example, you can approve access for a windowed time period if the user requested permanent access, or you can change the time window if the user requested windowed access.
-
Click Submit.
The request details are updated with the date and time the request was resolved and the approved status.
Click Reject to reject the request and type the reason you are rejecting the request. If you click Submit to continue with the rejection, the request details are updated with the reason the request was rejected, the date and time the request was resolved, and the rejected status.
-