App Gateway Configuration Workflow
Here’s an overview of what you need to configure for App Gateway connections:
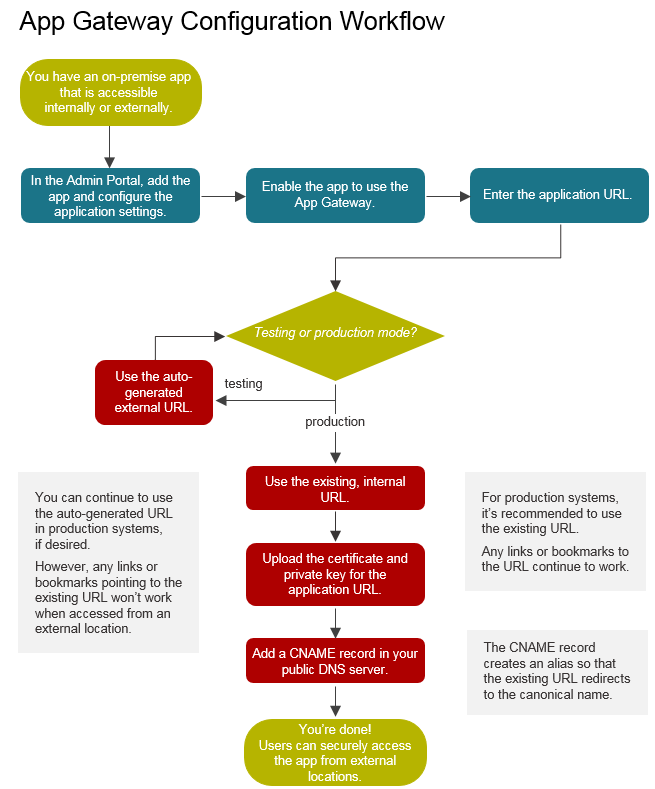
When you configure an application to use the App Gateway, you don’t have to change any configurations in the application directly. In Admin Portal, you enable the application for App Gateway access and you enter the existing URL that users enter to open the application.
At that point, you have a choice: you can use an external URL that the Privileged Access Service automatically generates for you to use, or you can continue using your existing, internal URL. In most cases, it works better for your users to use the auto-generated URL for testing purposes only and then switch over to use the existing URL for external App Gateway access for applications in production mode.
If you use the same DNS name both internally and externally, you must be able to create internal and external DNS entries that point to different things. For example:
Internal zone: Host (A) record pointing to IP address
External zone: CNAME record pointing to <guid>-gw.gateway..centrify.com
Which URL you use involves different advantages and disadvantages.
| Advantages | Disadvantages | |
|---|---|---|
| Use the App Gateway, and use the auto-generated, external URL for App Gateway connections | Easy to configure and test Excellent for test environments | Existing links and bookmarks won’t work outside of the corporate network. Users have to use different URLs depending on whether they’re accessing the application internally or externally. |
| Use your existing, internal URL for App Gateway connections | Existing links and bookmarks work regardless of user login location. Seamless user experience. Recommended for production environments | You do more configuration: you need to upload the URL certificate and private key, and edit your DNS settings. |