Splunk
Splunk offers both IdP-initiated SAML SSO (for SSO access through the Admin Portal) and SP-initiated SAML SSO (for SSO access directly through the Splunk web application). You can configure Splunk for either or both types of SSO.
This document is written for Splunk On-Premise 8.x. If you are not using this version, your interface may differ from the descriptions in this document.
Splunk SSO Requirements
Before you configure the Splunk web application for SSO, you need the following:
-
A registered Privileged Access Service account and at least one Delinea Connector installed on a Windows computer (if you use only the Privileged Access Service directory as your identity store, you do not need to install the Delinea Connector).
-
A running version of Splunk Enterprise.
-
An active Splunk Enterprise account with administrator rights for your organization.
-
Delinea or your Active Directory configured to provide the role, realName, and mail attributes for the SSO user.
-
An admin role with change authentication capability. This permission level lets you enable SAML and edit authentication settings on the Splunk search head.
-
A signed certificate in both the Splunk web application and Delinea Admin Portal. You can either download one from Admin Portal or use your organization’s trusted certificate. If you use your own certificate, upload the signing certificate and its private key in a .pfx or .p12 file to the application settings in Admin Portal, and upload the public key certificate in a .cer or .pem file to the web application.
Currently Splunk does not support certificate chaining and the certificate provided to Splunk must be publicly verifiable.
-
The Privileged Access Service tenant certificate contains two certificates in chain. If you use the Privileged Access Service tenant certificate for your application and you provide that certificate to Splunk, the application will fail to validate the SAML response. If you use that certificate for your application, you must provide the Delinea CA certificate (the root certificate from the Delinea tenant certificate in Splunk) for the Splunk application to correctly verify the signature.
-
If you have more than two certificates in chain, e.g. Leaf > Intermediate > Root and you provide the Leaf certificate to Splunk, Splunk will fail to validate the SAML response. In this case you must follow the steps explained in this Splunk forum answer:
Adding the Splunk App in Admin Portal
To add the Splunk application in Admin Portal:
-
In the Admin Portal, click Apps, then click Add Web Apps.
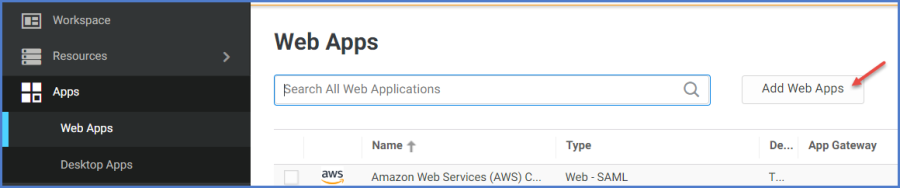
The Add Web Apps screen appears.
-
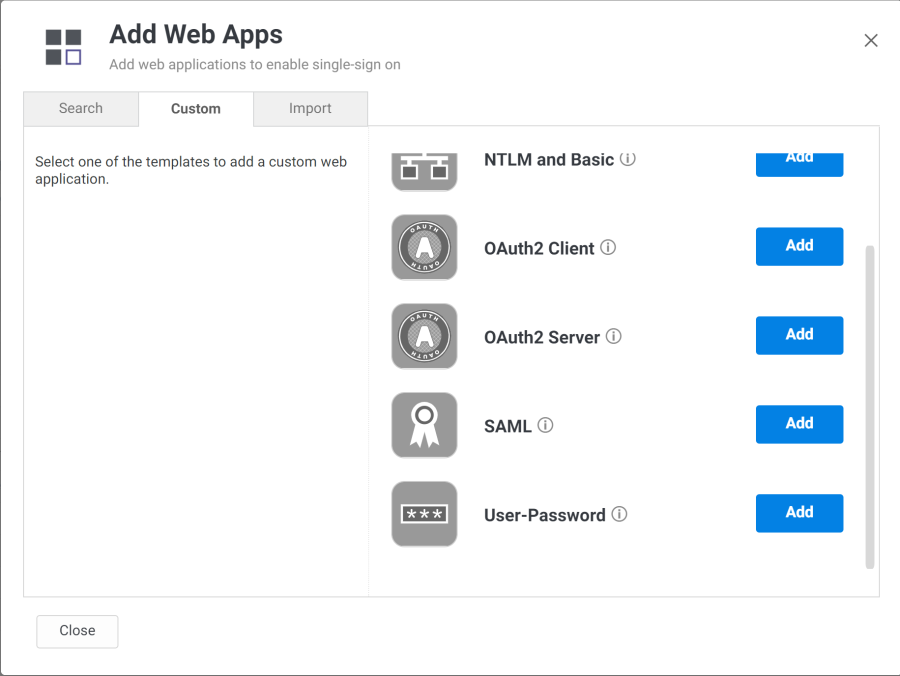
On the Search tab, enter the partial or full application name in the Search field and click the search icon.
-
Next to the application, click Add.
-
In the Add Web App screen, click Yes to confirm.
Admin Portal adds the application.
-
Click Close to exit the Application Catalog.
The application that you just added opens to the Application Settings page.
The description of how to choose and download a signing certificate in this document might differ slightly from your experience. See Choose a Certificate File for the latest information.
Configuring Splunk SSO
The following steps are specific to the Splunk application and are required in order to enable SSO for Splunk. For information on optional configuration settings available in the Delinea Admin Portal, see Optional Configuration Settings.
To configure Splunk for single sign-on:
-
In a new browser window, go to the Splunk server and sign in with your administrator login.
It is helpful to open the Splunk web application and the Delinea Admin Portal Application Settings window simultaneously to copy and paste settings between the two browser windows.
-
In the Splunk server browser window, go to the Settings menu and select Access Controls > Authentication method.
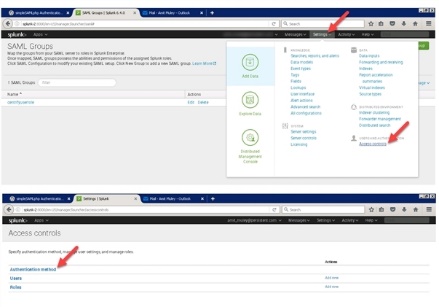
-
Select SAML as your External Authentication Method.
-
Click Configure Splunk to use SAML.
-
On the SAML groups page, click SAML Configuration.
-
Configure the following General Settings in the Splunk application.
The red arrows in the table below indicate the direction of the copy and paste operation between the two windows. For instance, the first arrow in the table below indicates that you copy the content from the indicated field on the Privileged Access Service Admin Portal and paste it into the corresponding field in the Splunk website
Admin Portal >Application Settings Copy/Paste Direction Splunk application What you do Download Identity Provider SAML Metadata --> Metadata XML File or Metadata Contents Click Select File to Browse and select your Metadata file, or copy and paste the contents of the file directly into the Metadata Contents window. Note: If you do not know how to find your Metadata file, refer to your IdP’s documentation. Note: Splunk supports SAML assertion based on the username value. The default template for Splunk On-Premise is configured to use the username format. The attribute used for this purpose is samAccountName. The Advanced Script however is designed to fetch user information from User repository in case the Privileged Access Service instance is not configured with the Active Directory. N/A N/A Single Sign on URL This field is populated automatically by your Privileged Access Service Metadata file. It is the protected endpoint on your IdP to which Splunk sends authentication requests. To access the login page after SAML is enabled, use the SSO Bypass URL: https://<YOUR-SPLUNK-FQDN:PORT>/account/login?loginType=Splunk N/A N/A Single Log Out URL This field is populated automatically by your Privileged Access Service Metadata file and is the IdP protocol endpoint. If you do not want users to be automatically logged out, remove the URL from this field. Download Signing Certificate N/A IdP certificate path You do not need to download this certificate. If you use the standard certificate, it is included as part of the Metadata file and no action is required here To use a different certificate with a private key (.pfx file), you can upload that certificate file to the Splunk application in the IdP’s certificate path field. The value can be either a directory or a file, depending on your IdP requirements. If you provide a file, Splunk uses that file to validate the authenticity of SAML response. If you provide a directory, Splunk looks for all the certificates that are present as children of the directory and tries to validate SAML response with each one of them. If Splunk fails to validate authenticity with any of them, the SAML response is not considered authentic. If you replace the certificate, be sure to get a new Metadata file from Splunk that uses the new certificate. Entity ID N/A Entity ID This field is populated automatically by your Privileged Access Service Metadata file. The contents of this field on the Privileged Access Service Application Settings page must match the contents of this field in the Splunk application. N/A N/A Sign AuthnRequest Select this option. N/A N/A Sign SAML Response Select this option. -
Skip the Attribute Query Requests section in the Splunk application.
-
In Advanced Settings in the Splunk application, configure the following settings:
Capability Required? What you do Attribute Alias Role Optional Use this field to specify a role attribute sent from the IdP. Set the value as role. This value tells Splunk which attribute contains the role information in the SAML response returned. Attribute Alias Mail Optional Use this field to specify a role attribute sent from the IdP. Set the value as emailaddress. This value maps the alias to the user email addresses in the SAML response returned. Attribute Alias Real Name Optional Use this field to specify a role attribute sent from the IdP. Set the value as displayname. This value maps the alias to the user real names in the SAML response returned. Fully qualified domain name or IP of the load balancer Required Set to the machine name with fully qualified domain name: https://acme.com. This setting works for a Splunk deployment with Single Search Head Setup or a Search Head Cluster Setup. You must provide an address if you use load balancing with a search head cluster. Redirect port - load balancer port Optional Provide a redirect port for the load balancer described in the previous field. Redirect to URL after logout Optional Provide a URL to redirect to after the user signs out. -
Click Save.
For more information, see Configuring SSO with AzureAD or ADFS as your Identity Provider
-
(Optional) To turn on encryption (https), go to Settings > Server Settings > General Settings and select the Yes radio button for Enable SSL (HTTPS) in Splunk Web. For more information, see Splunk documentation.
!. Configure the following settings in the Admin Portal Application Settings window:
| Admin Portal >Application Settings | Copy/Paste Direction | Splunk application | What you do |
|---|---|---|---|
| Assertion Consumer Service URL | N/A | N/A | This field will be automatically populated when you upload the Service Provider Metadata later during configuration. The URL is located in the AssertionConsumerService tag in the Metadata file. It should look similar to: http://< YOUR-SPLUNK-FQDN:PORT>/saml/acs. For example, If Splunk is installed on a machine with the IP address of 11.11.111.111 and a machine named splunk-1, then you can use either a URL with the IP address: http://11.11.111.111:8000/saml/acs/ or a URL with the machine name: http://splunk-1:8000/saml/acs Note: If you chose to enable SSL in the previous step, this URL must start with https instead of http. |
Creating and uploading the Splunk Metadata in Admin Portal
Uploading the Splunk Metadata file modifies the SAML assertion script. It is recommended that you copy and save your script before uploading the Splunk Metadata file.
For more information about customizing scripts, see Optional Configuration Settings.
To upload Splunk Metadata in Admin Portal
-
In a new browser window, go to your Splunk Metadata file:
https://<YOUR-SPLUNK-FQDN:PORT>/saml/spmetadata
-
Copy the contents of the Metadata file and paste it into a new file in a text editor.
-
Save the Metadata file with a file extension of .txt or .xml.
-
In the Admin Portal browser window, go to the Advanced page.
If you do not still have the browser window open that you were using in Configuring Splunk SSO, you may need to navigate to the Splunk app in Admin Portal and then Click on Advanced to navigate to the script page.
-
Copy the contents of the script window and save it into a file on your computer.
-
Click Upload SP Metadata and choose the Splunk Metadata file you created and saved above.
-
Copy and paste to replace the content of the script window with the script you saved before uploading the Metadata.
If you want to return your script to its original “factory installed” state, you can find the original script in Splunk script.
-
Click User Access in the Admin Portal and see Deploying Applications for configuration details.
After you assign roles to the application, the application state changes to deployed and the assigned users can access the application.
-
Click Account Mapping in the Admin Portal and see Map User Accounts for configuration details.
-
Click Save in Admin Portal.
-
Continue with Mapping SAML groups to Splunk roles.
Mapping SAML groups to Splunk roles
To map SAML groups to Splunk roles:
-
In the Splunk web application browser window, go to the SAML Groups page.
If you do not still have the browser window open that you were using in Configuring Splunk SSO, you may need to navigate to the SAML Groups page by first opening the Settings menu and selecting Access Controls > Authentication method, then selecting SAML as your authentication type and clicking Configure Splunk to use SAML.
-
Click New Group to create a new group or click Edit to modify an existing group.
-
Provide a Name for the group.
-
Indicate the Roles that you want to assign to this group by moving the desired roles from the left column to the right column.
-
Click Save.
For more information, see Map SAML groups to roles.
Now that you have finished configuring the application settings in the Admin Portal and the Splunk application, users are ready to launch the application from the Admin Portal.
For more information
-
For more information about certificate chaining with Splunk, see Splunk documentation.
-
For more information about configuring SSO with AzureAD or ADFS as your Identity Provider, see Splunk documentation.
-
for more information about mapping SAML groups to roles, see Splunk documentation.
-
Contact Splunk for more information about configuring Splunk On-Premise for SSO.
Splunk Specifications
Each SAML application is different. The following table lists features and functionality specific to Splunk.
| Capability | Supported? | Support details |
|---|---|---|
| Web browser client | Yes | |
| Mobile client | No | |
| SAML 2.0 | Yes | |
| SP-initiated SSO | Yes | |
| IdP-initiated SSO | Yes | |
| Force user login via SSO only | Yes | After SSO is enabled, standard login forces users to login with SSO. To bypass SSO, login with this URL: https://<YOUR-SPLUNK-FQDN:PORT>/account/login?loginType=Splunk |
| Separate administrator login after SSO is enabled | Yes | Administrators can login separately using the SSO bypass URL: https://<YOUR-SPLUNK-FQDN:PORT>/account/login?loginType=Splunk |
| User or Administrator account lockout risk | No | After SAML is enabled, users can still login using the SSO bypass URL: https://<YOUR-SPLUNK-FQDN:PORT>/account/login?loginType=Splunk Note: After SAML is enabled, users without SAML-enabled accounts (user-password only) can only login with the bypass URL. |
| Automatic user provisioning | Yes | User is created in Splunk after successful consumption of SAML assertion. |
| Multiple User types | Yes | Admin User |
| Self-service password | Yes | Users can reset their own passwords only if they are non-provisioned users and have the change_own_password capability. |
| App Gateway | Yes | The App Gateway can be used to securely access this application outside of your corporate network. See Configuring App Gateway for more information. Note: The App Gateway is a premium feature and is available only in the Privileged Access Service App+ Edition. Please contact your Privileged Access Service representative to have the feature enabled for your account. |
| Access restriction using a corporate IP range | Yes | You can specify an IP Range in the Admin Portal Policy page to restrict access to the application. |
Splunk script
The following script is the original Splunk script provided in Admin Portal. Copying and pasting this script to the Advanced page in Admin Portal will return the script to its original “factory installed” state:
setIssuer(Issuer);

setSubjectName(UserIdentifier);

setAudience('splunkEntityId');

setRecipient(ServiceUrl);

setHttpDestination(ServiceUrl);

setSignatureType('Response');

setNameFormat('persistent');

if (ServiceUrl.match(/YOUR-SPLUNK-FQDN-AND-PORT/)) {

throw '_I18N_Exception_AcsUrlNotCompletelyConfigured';

}

var displayName = LoginUser.DisplayName;

if (!displayName) {

throw '_I18N_Exception_BadSamlAttributeValue';

}

var allRoles = new Array();

var groupNames = LoginUser.GroupNames;

for (var i = 0; i \< groupNames.Length; i++) {

allRoles.push(groupNames[i]);

}

var cloudRoles = LoginUser.RoleNames;

for (var i = 0; i \< cloudRoles.Length; i++) {

allRoles.push(cloudRoles[i]);

}

setAttributeArray('role', allRoles);

setAttribute('displayname', displayName);

setAttribute('emailaddress', UserIdentifier);