Cloudera Manager
Cloudera Manager is an end-to-end application for managing CDH clusters. The following is an overview of the steps required to configure the Cloudera Manager Web application for single sign-on (SSO) via SAML. Cloudera Manager offers both IdP-initiated SAML SSO (for SSO access through the Admin Portal) and SP-initiated SAML SSO (for SSO access directly through the Cloudera Manager web application).
-
Adding Cloudera Manager in Admin Portal in the Delinea Admin Portal.
-
Configure the application for single sign-on in Delinea Admin Portal and on the Cloudera Manager web site.
You will need to copy some settings from Application Settings in Delinea Admin Portal and paste them into fields on the Cloudera Manager website, and copy some settings from the Cloudera Manager website and paste them into Delinea Admin Portal. For details, see
Cloudera Manager Requirements for SSO
Before you configure the Cloudera Manager web application for SSO, you need the following:
-
Cloudera Enterprise installed.
-
An active Cloudera Manager account for your organization with Full Administrator and User Administrator roles.
-
A signed certificate.
-
Cloudera Security expects token a signing certificate in a Java KeyStore format. You can either use the token signing certificate that is available by default for your Privileged Access Service Instance or you can upload your organization's certificate in Delinea. Once you decide which token signing certificate to use, import that certificate in a Java KeyStore file. Cloudera Manager also expects its own Private Key in the same keystore file. Cloudera Manager uses this Private Key to sign the SAML request. For more information, see: Cloudera documentation, Understanding Keystores and Truststores
Setting Up the Certificates for SSO
To establish a trusted connection between the web application and the Privileged Access Service, you need to have the same signing certificate in both the application and the application settings in Admin Portal.
If you use your own certificate, you upload the signing certificate and its private key in a .pfx or .p12 file to the application settings in Admin Portal. You also upload the public key certificate in a .cer or .pem file to the web application.
What You Need to Know About Cloudera Manager
Each SAML application is different. The following table lists features and functionality specific to Cloudera Manager.
| Capability | Supported? | Support details |
|---|---|---|
| Web browser client | Yes | |
| Mobile client | No | |
| SAML 2.0 | Yes | |
| SP-initiated SSO | Yes | |
| IdP-initiated SSO | Yes | However, users can choose to disable this by unclicking Show in User App List in Cloudera Manager. |
| Force user login via SSO only | Yes | Once SAML SSO is enabled, all users are by default authenticated using SSO. However, those users who already had a password set before SSO was enabled can login using this URL: http://<YOUR-CLOUDERA-MANAGER-FQDN>:7180/cmf/localLogin |
| Separate administrator login after SSO is enabled | Yes | After SSO is enabled, admin and other users who already have a password set or are created by the Administrator after SSO is enabled can login with this URL: http://<YOUR-CLOUDERA-MANAGER-FQDN>:7180/cmf/localLogin. |
| User or Administrator lockout risk | Yes | All external users that are created through User Provisioning will get blocked if there is any issue with the SSO integration. The only users who can log in using the alternate URL http://<YOUR-CLOUDERA-MANAGER-FQDN>:7180/cmf/localLogin are those who have a password already set before SSO integration, or who are created by the Administrator after SSO is enabled. Administrators can login with the alternate URL and unblock the users. |
| Multiple User Types | No | |
| Self-service password | Yes | Regular users can reset their own passwords. Admins can reset user passwords. Users created through User Provisioning cannot reset their own passwords. |
| Access restriction using a corporate IP range | Yes | You can specify an IP Range in the Admin Portal Policy page to restrict access to the application. |
Adding Cloudera Manager in Admin Portal
To add and configure the Cloudera Manager application in Admin Portal:
-
In Admin Portal, click Apps, then click Add Web Apps.
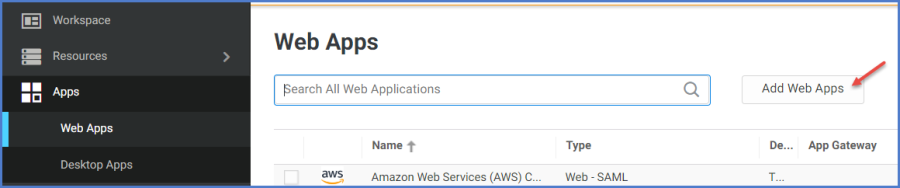
The Add Web Apps screen appears.
-
On the Search tab, enter the partial or full application name in the Search field and click the search icon.
-
Next to the application, click Add.
-
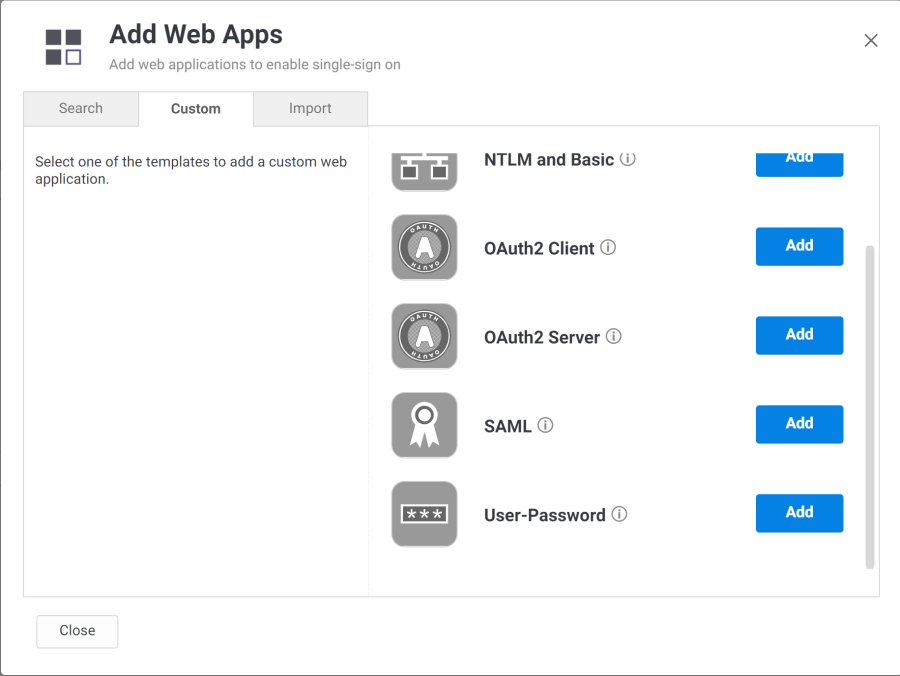
In the Add Web App screen, click Yes to confirm.
Admin Portal adds the application.
-
Click Close to exit the Application Catalog.
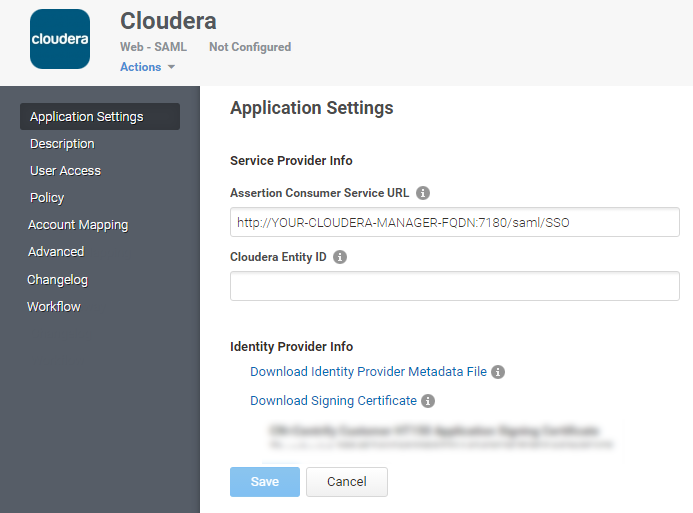
The application that you just added opens to the Application Settings page.
The description of how to choose and download a signing certificate in this document might differ slightly from your experience. See Choose a Certificate File for the latest information.
-
Keep this browser tab open to the Application Settings page for the Cloudera Manager app.
Configuring Cloudera Manager for Single Sign-On
To configure Cloudera Manager for SSO
- On the Application Settings page in Admin Portal, configure the following:
Field Required or optional Set it to What you do Assertion Consumer Service URL Required http://<YOUR-CLOUDERA-MANAGER-FQDN>:7180/saml/SSO Replace <YOUR-CLOUDERA-MANAGER-FQDN> in the default URL with the fully-qualified domain name of your Cloudera Manager host. Cloudera Entity ID Optional The Entity ID you chose for this instance of Cloudera Manager. Each Cloudera Manager instance has a different entity ID. These are assigned by organizational policy and must match with the value of the SAML Entity ID property that you can find in Cloudera Manager at Administrator > Settings > External Authentication. -
Click Download Identity Provider Metadata File and save the file to your computer.
You will need to know the path to this file when Configuring Cloudera Manager for Single Sign-On.
-
(Optional) If you plan to use the Delinea signing certificate, click Download Signing Certificate and save the file to your computer. If you plan to use your organization’s signing certificate, you can skip this step.
-
On the Application Settings page, expand the Additional Options section and specify the following settings:
Option Description Application ID Configure this field if you are deploying a mobile application that uses the Centrify Mobile SDK. The Privileged Access Service uses the Application ID to provide single sign-on to mobile applications. Note the following: The Application ID has to be the same as the text string that is specified as the target in the code of the mobile application written using the mobile SDK. If you change the name of the web application that corresponds to the mobile application, you need to enter the original application name in the Application ID field. There can only be one SAML application deployed with the name used by the mobile application. The Application ID is case-sensitive and can be any combination of letters, numbers, spaces, and special characters up to 256 characters. -
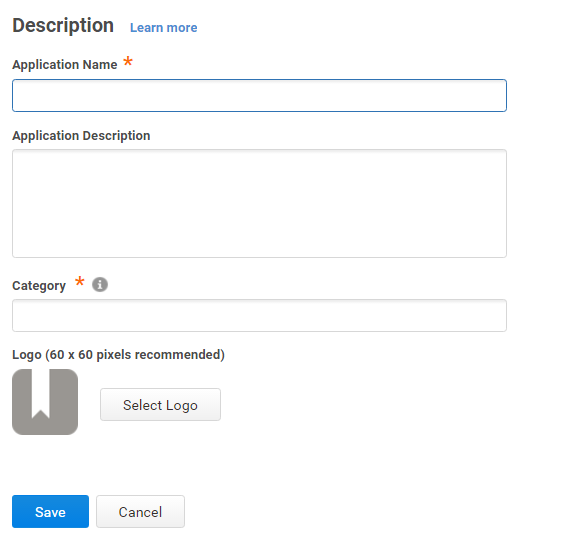
(Optional) On the Description page, you can change the name, description, and logo for the application. For some applications, the name cannot be modified.
-
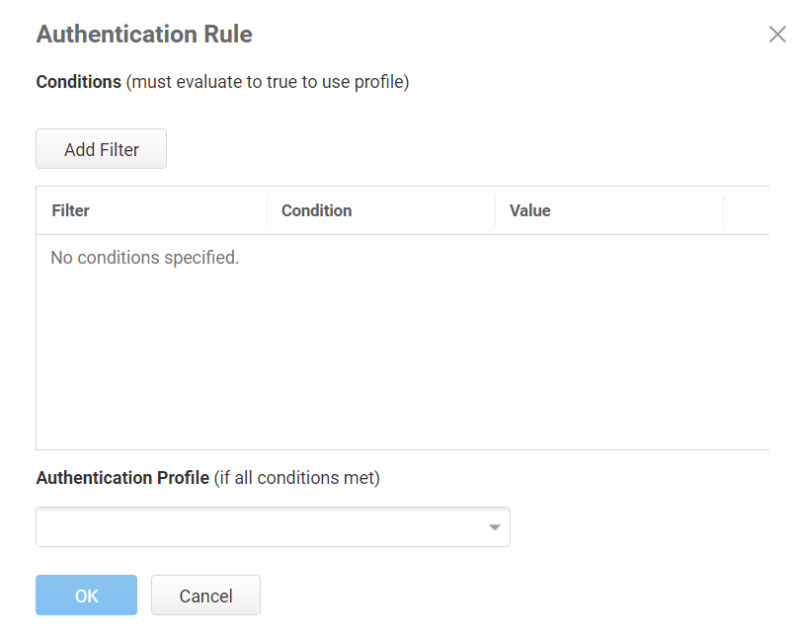
Click Add Rule.
The Authentication Rule window displays.
-
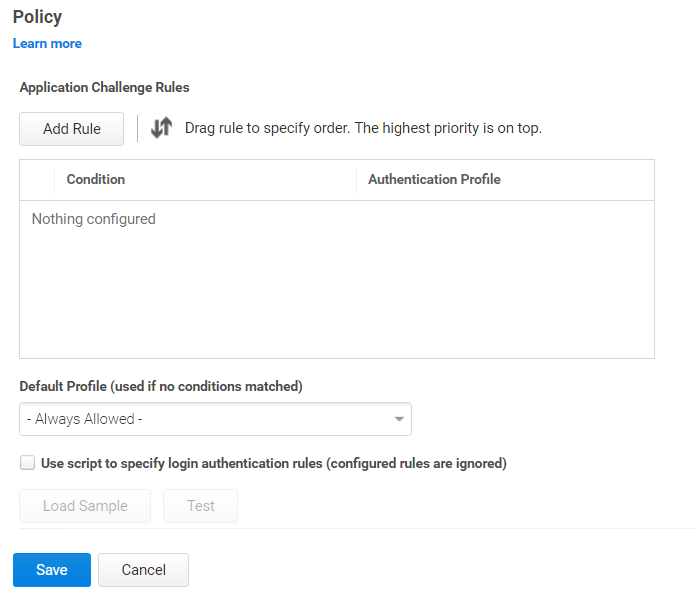
(Optional) On the Policy page, specify additional authentication controls for this application.
-
Click Add Filter on the Authentication Rule window.
-
Define the filter and condition using the drop-down boxes. For example, you can create a rule that requires a specific authentication method when users access the Privileged Access Service from an IP address that is outside of your corporate IP range. Supported filters are:
Filter Description IP Address The authentication factor is the computer’s IP address when the user logs in. This option requires that you have configured the IP address range in Settings, Network, Corporate IP Range. Identity Cookie The authentication factor is the cookie that is embedded in the current browser by the Privileged Access Service after the user has successfully logged in. Day of Week The authentication factor is the specific days of the week (Sunday through Saturday) when the user logs in. Date The authentication factor is a date before or after which the user logs in that triggers the specified authentication requirement. Date Range The authentication factor is a specific date range. Time Range The authentication factor is a specific time range in hours and minutes. Device OS The authentication factor is the device operating system. Browser The authentication factor is the browser used for opening the Privileged Access Service Admin Portal. Country The authentication factor is the country based on the IP address of the user computer. For the Day/Date/Time related conditions, you can choose between the user’s local time and Universal Time Coordinated (UTC) time. -
-
Click the Add button associated with the filter and condition.
-
Select the profile you want applied if all filters/conditions are met in the Authentication Profile drop-down.
The authentication profile is where you define the authentication methods. If you have not created the necessary authentication profile, select the Add New Profile option. See Creating Authentication Profiles if a user does not match any of the configured conditions.
If you have no authentication rules configured and you select Not Allowed in the Default Profile dropdown, users will not be able to log in to the service.
-
-
Click Save.
If you have more than one authentication rule, you can prioritize them on the Policy page. You can also include JavaScript code to identify specific circumstances when you want to block an application or you want to require additional authentication methods. For details, see Application Access Policies with JavaScript.
If you left the Apps section of Admin Portal to specify additional authentication control, you will need to return to the Apps section before continuing by clicking Apps at the top of the page in Admin Portal.
-
On the Account Mapping page, configure how the login information is mapped to the application’s user accounts.
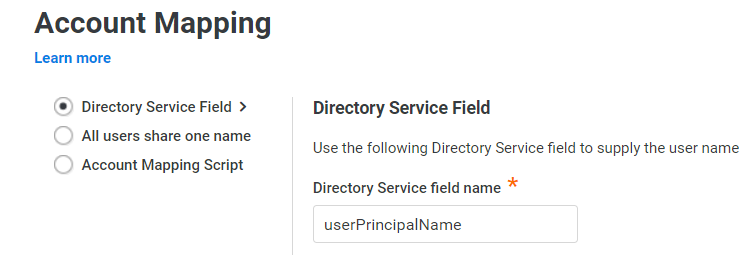
The options are as follows:
-
Use the following Directory Service field to supply the user name: Use this option if the user accounts are based on user attributes. For example, specify an Active Directory field such as mail or userPrincipalName or a similar field from the Delinea Directory.
-
Everybody shares a single user name: Use this option if you want to share access to an account but not share the user name and password. For example, some people share an application developer account.
-
Use Account Mapping Script: You can customize the user account mapping here by supplying a custom JavaScript script. For example, you could use the following line as a script:
LoginUser.Username = LoginUser.Get('mail')+'.ad';The above script instructs the Privileged Access Service to set the login user name to the user’s mail attribute value in Active Directory and add ‘.ad’ to the end. So, if the user’s mail attribute value is Adele.Darwin@acme.com then the Privileged Access Service uses Adele.Darwin@acme.com.ad. For more information about writing a script to map user accounts, see the SAML Application Scripting.
-
-
(Optional) On the Advanced page, you can edit the script that generates the SAML assertion, if needed. In most cases, you don’t need to edit this script. For more information, see the SAML Application Scripting.
By default, the script provides a list of roles that correspond to the roles set by the user. These roles are the default external facing names given to the actual Cloudera Manager roles. If you change the external facing names in Cloudera Manager SAML settings, then you should also change the role names in the script here.
This integration asserts the identity of the user in the SAML assertion through the SAML subject. If you change the option at Cloudera Manager SAML setting to Attribute then you must modify this script to provide the username information in the SAML attribute. The name of the attribute in that case must match the name configured in the Cloudera Manager SAML settings. Refer to Configuring Cloudera Manager for Single Sign-On for more details.
-
(Optional) On the Changelog page, you can see recent changes that have been made to the application settings, by date, user, and the type of change that was made.
-
(Optional) Click Workflow to set up a request and approval work flow for this application.
See Managing Application Access Requests for more information.
-
Click Save.
Configuring Single Sign-On in Cloudera Manager
Note:This section assumes that you have two browser tabs open so that you can copy and paste information back and forth between the two tabs as appropriate:
- One tab open to the Application Settings page for the Cloudera Manager app in Delinea Admin Portal as described in Adding Cloudera Manager in Admin Portal. If this tab was accidentally closed, you can return to it by navigating to the Delinea Admin Portal and opening the Cloudera Manager app.
- Another tab open to the Cloudera Manager web page as you are instructed below.
To configure Cloudera Manager for SSO:
-
Open a new tab in your web browser.
-
Go to the following URL and sign in as Admin:
https://<YOUR-CLOUDERA-MANAGER-FQDN>:7180/cmf/localLogin
-
Go to Administration > Settings.
-
In the left-hand frame, select External Authentication, and then select SAML as the External Authentication Type.
-
Scroll down to Path to SAML IDP metadata file and enter the path name to the metadata file you downloaded from the Application Settings page in Delinea Admin Portal.
-
Create a Java KeyStore file on the Cloudera Manager host. Import your chosen certificate file into the Java KeyStore file. Cloudera Manager also expects its Private Key imported in the same KeyStore file. Note the following:
-
The value of the KeyStore password.
-
The alias under which Cloudera Manager's private key is placed.
-
The Private key password.
-
For more information about how to set up the keystore file, see Cloudera documentation, Understanding Keystores and Truststores
-
Copy and paste the path of the Java KeyStore file into the Path to SAML keystore file field.
-
Configure the following:
Field Required or optional Set it to What you do SAML keystore password Required The password used to prepare the keystore Copy/paste the keystore password in this field Alias of SAML sign/encrypt Private key Required The sign/encrypt private key alias Copy/paste the sign/encrypt private key alias in this field SAML sign/encrypt Private key password Required The sign/encrypt private key password Copy/paste the sign/encrypt private key password in this field SAML Entity ID Required The Entity ID used on the Application Settings page in Delinea Admin Portal Enter the value of the Cloudera Entity ID field from the Application Settings page in Delinea Admin Portal SAML response binding Required HTTP-Post Select the HTTP-Post option. Source of user ID in SAML response Required NameID or the attribute of your choice Enter NameID or the attribute of your choice. If you choose another attribute than NameID, you will have to update the SAML script on the Advanced page in Delinea Admin Portal to match the attribute you have chosen. SAML attribute identifier for User Role Required Selected Select this option and enter an identifier to pass to this attribute in SAML response. Choose role as the attribute name. SAML Attribute Values for Roles Optional External facing names for Cloudera Manager user roles Use the defaults or enter your custom user role names. -
Click Save to save the settings.
-
Log out of your Cloudera Manager account.
For More Information about Cloudera Manager
For more information about configuring Cloudera Manager for SSO, contact Cloudera Manager support.